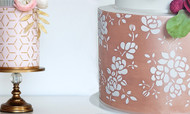
Transform your creations with cake stencils! They’re so simple but effective and can completely transform your bakes. There are a few ways in which you can make your pattern come to life, so we’ll talk you through a few methods!
Sugar paste covered cakes with royal icing pattern.
Cover your cake, ensuring you have a smooth level finish around the cake. Leave the sugarpaste for 24 hours to harden completely, so it doesn’t dent if you hold the top. Pop your stencil where you wish to add the pattern, you have a couple of options of how you’re going to hold your stencil in place.
- Securing with needle pins
- Using vegetable fat
- Holding it yourself
- Secure your stencil by placing pins around the outside of the cake stencil, make sure you have pulled the stencil flat to the cake to avoid warping and imperfect patterns. We understand this isn’t to everyone’s liking as there is a risk of contamination using metal pins, so we recommend the following alternatives.
– Apply a thin layer of vegetable fat to the sugarpaste before adding your stencil. Too much vegetable fat will affect the royal icing, but if you apply a thin layer it will act like a temporary glue while you apply your icing.
You can hold your stencil yourself, though there is a greater risk of the stencil moving and it may be a little tricky to apply and scrape the icing while holding the stencil.
Always make sure the stencil is flush with the cake whichever method you wish to use as you don’t want it to bubble or warp when applying the royal icing. Apply a layer of icing to the stencil with a spatula starting from the bottom upwards covering all of the stencil pattern. Once it’s covered, use a scraper to scrape any excess icing off, the stencil should be visible and pretty clean after scraping. Handy hint: scrape in the direction of the pattern so you don’t catch any of the stencil while scraping.
Once your happy, carefully peel the stencil off from one side to another and leave the icing to set for around half an hour to avoid risk of smudging when continuing the pattern. You may have small peaks on the icing from peeling the stencil off, leave them dry then you can work on pushing them down and making it look a little neater.
If you are using a continuous patterned stencil and wish to follow that pattern around the cake, take your time to line it up and again use your preferred method of securing the stencil and repeat the process again. Don’t forget to wash your stencil in warm water before using again as you don’t want any unwanted marks or smudges.
Buttercream cakes with buttercream pattern.
Cover your cake with buttercream, ensuring you have a smooth surface to work with. Leave the buttercream to set for 24 hours so it will dent if touched. We recommend popping it in the freezer to harden the buttercream. You have 2 methods of how to secure your stencil, either use pins or hold it yourself. If you choose to hold it yourself, you can apply a small amount of buttercream on one side to act as a glue then work your way around the stencil ensuring you press it flat to the cake as you go.
The method of applying your buttercream will be the same as applying icing, work your way around the stencil then scrape off the excess. Pop in the fridge or freezer to harden before moving onto the next section of your cake. Again, be sure to wash your stencil between uses.
Airbrushing on sugarpaste cake.
Cover your cake ensuring you have a smooth surface to work on, again leave to harden so it doesn’t dent if you hold the cake. You can secure your cake with pins, vegetable fat or by holding it yourself. If you wish to use vegetable fat apply it to the stencil rather than covering the sugarpaste as the fat may affect the paint. Only apply a small amount so it doesn’t bleed to any unwanted places.
Always test your airbrush before using it with the stencil. A heavy flow may result in the paint bleeding. If you wish to only paint part of the stencil, cover the rest with masking tape to avoid any unwanted marks or splashes. When air brushing, it is best to start with a thin layer so you can build up to the opacity you desire. Once you are happy, peel the stencil from one side to another carefully and leave to dry before working your way around the cake.
All three methods can be used on smaller stencils too!
Pin, press or use vegetable fat to pop your stencil where you wish to have the pattern and work away! Now you’re all set to level up your bakes!
