
How to Avoid Making a Fail Cake: Essential Steps
Every british baker knows that a well-organised kitchen is the starting point for cake success. With over 80 percent of baking mishaps caused by poor preparation or overlooked details, the importance of your workspace cannot be understated. Taking a methodical approach from the start streamlines your process, upholds hygiene, and lets you focus on creativity rather than scrambling for supplies. Discover how a simple setup and the right tools can elevate even your first attempts to professional standards.
Step 1: Prepare your workspace and gather supplies
Baking a successful cake starts with creating the right environment and assembling your tools. Before you begin mixing ingredients, you’ll want to transform your kitchen into a well-organised baking station that supports your cake creation process. This means having all necessary equipment within reach and ensuring your workspace is clear.
Start by clearing a clean, spacious countertop and gathering essential items: mixing bowls, measuring cups, electric mixer or whisk, cake tins, cooling rack, and spatulas. Place these items strategically to minimise unnecessary movement while baking.
One crucial tip: wash your hands thoroughly before starting and keep a separate area for raw ingredients. This prevents cross-contamination and ensures your cake preparation meets the highest food safety standards. With your workspace primed and supplies ready, you’re now set to move on to measuring and mixing your cake ingredients.
Step 2: Measure ingredients accurately for baking success
Accurate measurement is the cornerstone of creating a perfect cake. Weighing ingredients precisely transforms an ordinary recipe into a professional baking masterpiece, ensuring consistent texture and flavour every single time.
To achieve this precision, invest in a digital kitchen scale that measures ingredients by weight rather than volume. Different ingredients settle differently, so cups can be wildly inconsistent. When measuring dry ingredients like flour, gently spoon them into the measuring cup and level off with a straight edge to avoid compaction. For sticky ingredients such as honey or treacle, lightly coat your measuring spoon with oil first so they slide off cleanly. Understanding common measuring terms is crucial tracking the subtle differences between packed, sifted, and levelled measurements.
One golden rule to remember: baking is a science. Small measurement discrepancies can dramatically alter your cake’s rise, texture, and taste. Take your time, be methodical, and treat each ingredient with respect. With these techniques, you are now ready to move on to mixing your perfectly measured ingredients.
Step 3: Mix and bake cakes with correct technique
Mixing cake batter is an art form that requires precision and understanding. Avoiding common mixing mistakes can transform your cake from mediocre to magnificent. The key is to approach each ingredient with care and respect, understanding how they interact and contribute to the final texture.
Begin by creaming butter and sugar thoroughly until the mixture becomes light and fluffy. This process incorporates air and creates the foundation for a tender cake. When adding eggs, introduce them one at a time, mixing thoroughly after each addition to prevent curdling. Sift dry ingredients like flour, baking powder, and salt together to ensure even distribution and eliminate lumps. Understanding proper mixing techniques helps prevent overmixing, which can lead to tough, dense cakes. Fold ingredients gently with a spatula, using a figure of eight motion that maintains the delicate air bubbles you’ve worked so hard to create.
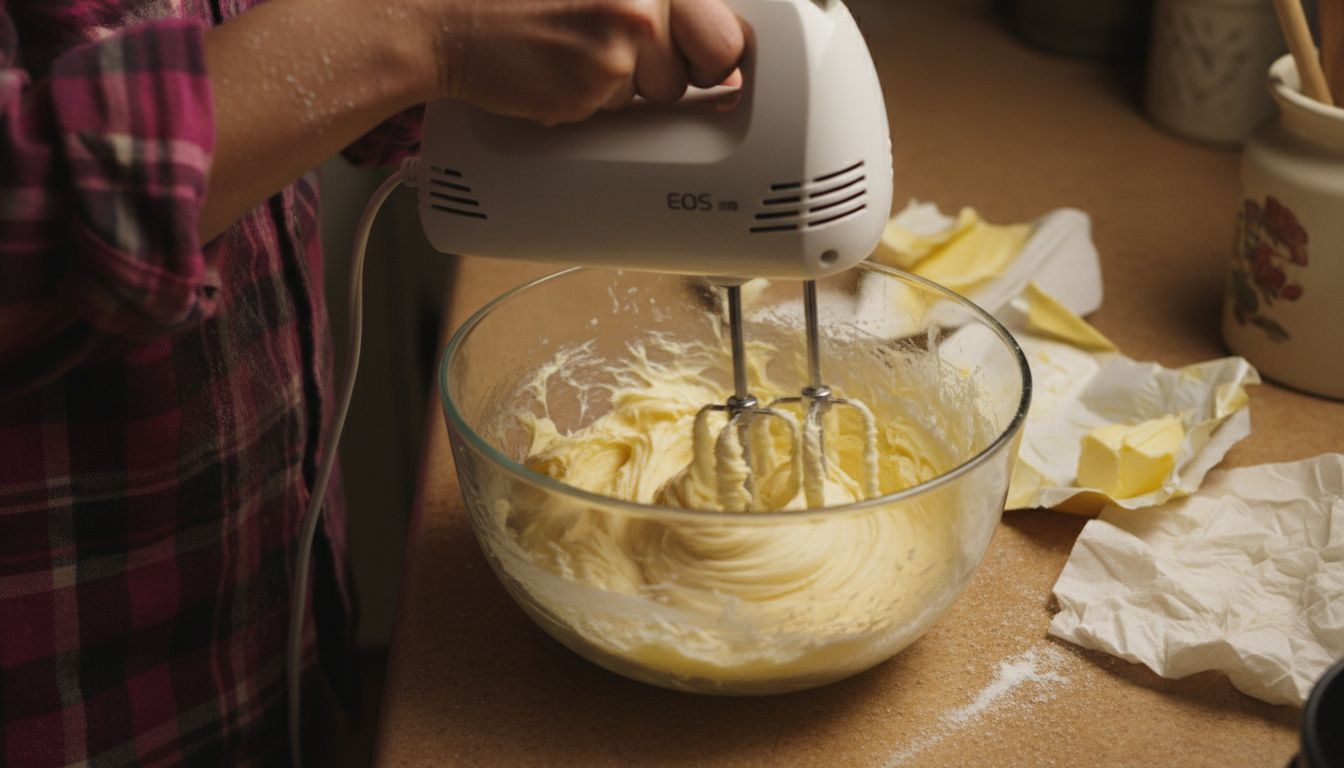
One critical tip: always preheat your oven and use the correct tin size specified in the recipe. Temperature and pan dimensions dramatically impact your cake’s final rise and texture. With these techniques mastered, you are now ready to create a cake that will impress even the most discerning baker.
Step 4: Insert dowels to prevent cake layers collapsing
Dowels are your secret weapon against the dreaded cake collapse scenario that haunts many bakers. These simple wooden or plastic supports provide critical structural integrity to multi layered cakes, ensuring your masterpiece remains standing proud and elegant. Using cake dowels for tiered cake stability transforms an ordinary cake into a professional showstopper that can withstand transportation and display.
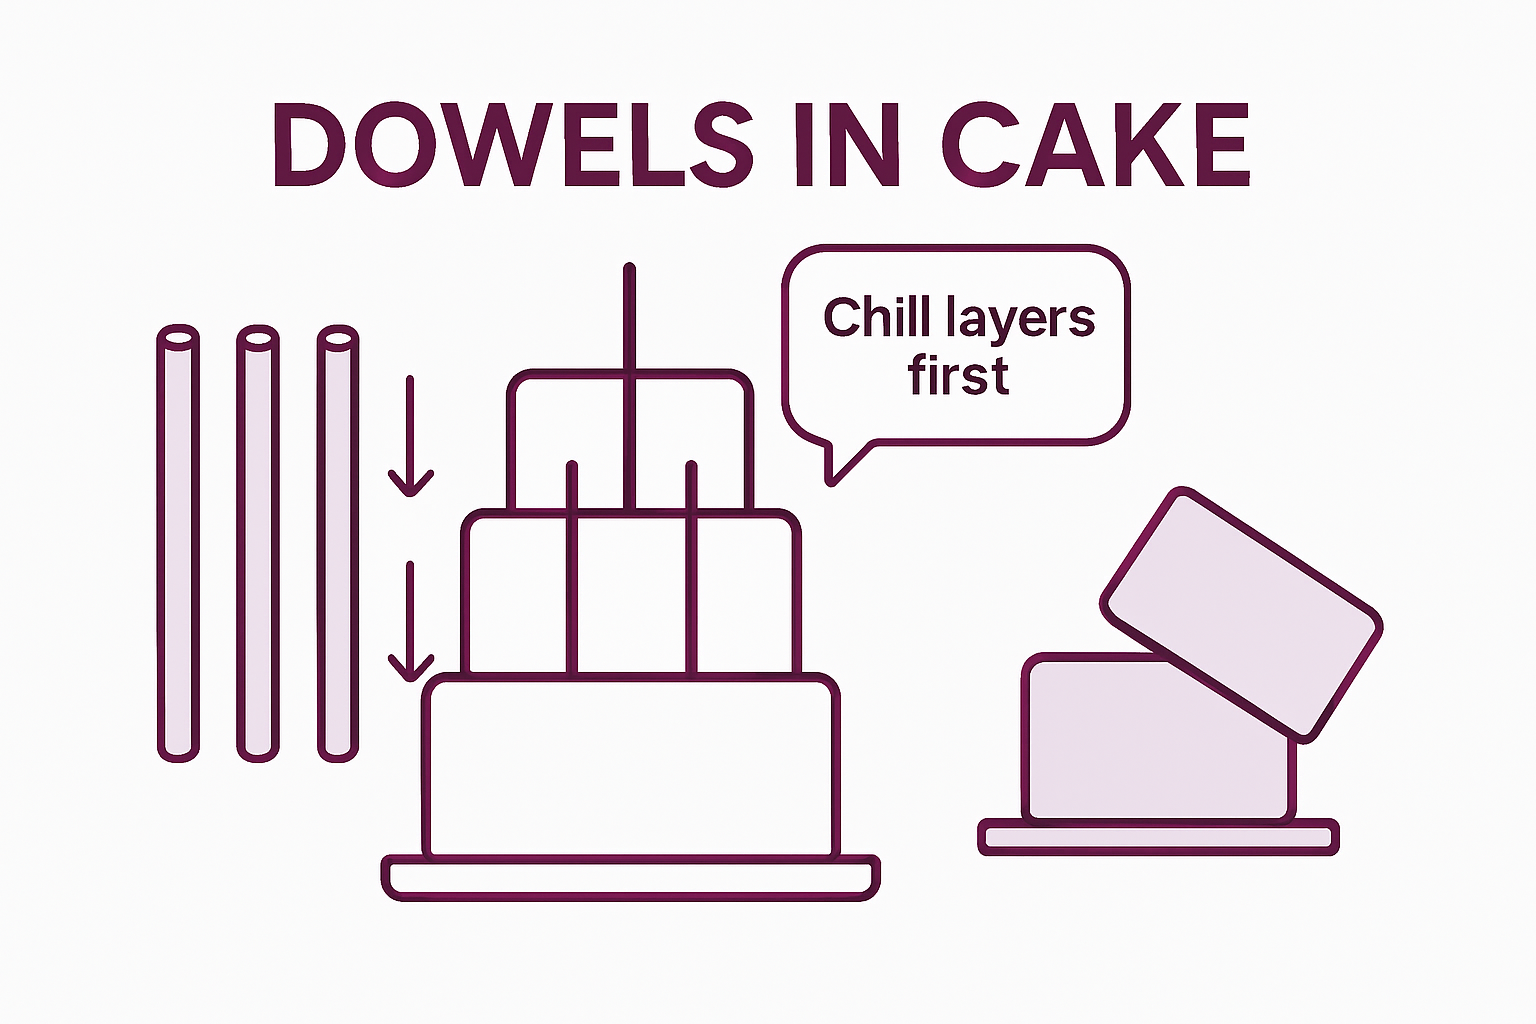
To insert dowels correctly, start by chilling your cake layers to make them firmer and easier to work with. Measure and mark the precise locations where dowels will provide maximum support. Choose food safe wooden or plastic dowels that are slightly shorter than the total height of your cake tier. Insert them vertically and straight, ensuring they are evenly spaced to distribute weight uniformly. For larger cakes, consider using a central support dowel through the entire cake structure to provide additional reinforcement.
One critical tip: always test the stability of your cake before final decoration. Gently press down on the top layer to check for any wobbling or uneven support. With careful dowel placement, you will create a cake that not only looks spectacular but remains structurally sound throughout your event.
Step 5: Assemble and level layers for smooth structure
Creating a professionally assembled cake requires precision and patience. Stacking tiered cakes demands a methodical approach that transforms individual cake layers into a stunning architectural masterpiece. Think of layer assembly like building a delicate structure where each component must sit perfectly to create a seamless whole.
Start by ensuring each cake layer is completely cooled and firm. Use a long serrated knife to level the top of each cake layer, creating flat surfaces that stack neatly. Place your first layer on a sturdy cake board and apply a thin, even layer of buttercream or filling. This acts as both adhesive and flavour enhancer. Carefully position subsequent layers, checking alignment from multiple angles. Gently press down to secure each layer, being careful not to create air pockets or uneven surfaces.
One critical tip: always rotate your cake stand or turntable as you work to check for symmetry and level alignment. A slight turn can reveal subtle imperfections invisible from a single angle. By taking your time and maintaining precision, you will create a cake with clean lines and professional appearance that will impress even the most discerning guests.
Step 6: Inspect your cake for stability and decoration readiness
Checking cake stability before decoration is a critical final checkpoint that separates amateur bakers from professionals. This crucial stage ensures your meticulously crafted cake can withstand the weight of decorations and maintain its structural integrity throughout your event.
Begin by performing a gentle stability test. Carefully press down on the top layer with light fingertip pressure to assess any wobbling or unevenness. Check that your cake board provides a solid foundation and that layers are aligned symmetrically. Look for potential weak points around dowel insertions or between tiers. Examine the sides of your cake for any bulging or uneven surfaces that might compromise structural strength. Chill the cake for about 30 minutes before decoration to help firm up buttercream and enhance overall stability.
One critical tip: always keep a small palette knife or offset spatula nearby during inspection. These tools can help you make minute adjustments to level layers or smooth out minor imperfections before final decoration. By taking these careful preparatory steps, you will create a cake that not only looks professional but stands tall and proud throughout your celebration.
Prevent Cake Disasters with Expert Tools and Quality Supplies
The journey to baking a flawless cake is full of essential steps like accurate measuring, careful mixing, and structural support using dowels. These stages demand precision and the right equipment to avoid common pitfalls that cause cake failures. Whether you are tackling tiered layers or perfecting your icing, having trusted cake decorating supplies at your fingertips can make all the difference in turning your baking efforts into stunning results.
Unlock your full baking potential with our wide range of professional-grade tools and decorations at The Vanilla Valley. From sturdy cake boards and food-safe dowels to vibrant food colours and sprinkles, we provide everything you need to master techniques like stacking layers smoothly and creating stable, beautiful cakes. Visit us today and benefit from free and next day delivery services. Start transforming your baking challenges into creations that stand tall and impress every time.
Frequently Asked Questions
How can I prepare my workspace to avoid making a fail cake?
To prepare your workspace effectively, ensure it is clean and organised. Gather all necessary tools, such as mixing bowls, measuring cups, and cake tins, and position them within easy reach before you begin baking.
What is the importance of measuring ingredients accurately for my cake?
Accurate measurement of ingredients is crucial for ensuring consistent texture and flavour in your cake. Use a digital kitchen scale to weigh ingredients and follow measuring techniques like spooning and levelling to avoid compaction.
What mixing techniques should I use to prevent a fail cake?
To avoid a fail cake, focus on mixing techniques such as creaming butter and sugar until light and fluffy, and gently folding ingredients together. Avoid overmixing, which can lead to a dense cake, and ensure you incorporate air to achieve a light texture.
How do I use dowels to prevent my cake from collapsing?
Insert dowels into your cake layers to provide stability and prevent collapse. Ensure the dowels are evenly spaced and slightly short of the cake’s height to properly support your layers without compromising the overall look.
What steps should I take to assemble my cake layers correctly?
When assembling your cake layers, ensure each layer is completely cooled and level the tops for a flat stack. Use a thin layer of filling between layers to secure them and create a seamless finish.
How can I check my cake’s stability before decorating?
To check your cake’s stability, gently press down on the top layer to assess any wobbling. Ensure that all layers are aligned and solidly secure, making adjustments as needed before proceeding with decoration.