
7 Essential Creative Buttercream Techniques for Beginners
Many british cake decorators feel frustrated when smooth buttercream finishes seem impossible, yet over 60 percent of professional-looking cakes are crafted with surprisingly simple techniques. In South Wales, amateur bakers often search for ways to add modern flair and skill to their celebration bakes. Exploring fresh buttercream methods not only helps you achieve flawless surfaces and creative designs, but also brings your personal baking projects closer to the artistry seen in top bakeries.
Table of Contents
- Smoothing Buttercream For A Flawless Finish
- Piping Rosettes And Simple Borders
- Creating The Ombré Effect With Colours
- Basic Textures Using Palette Knives
- Applying Drips With Coloured Ganache
- Making Simple Buttercream Flowers
- Stencilling Patterns Onto Cakes
Quick Summary
| Takeaway | Explanation |
|---|---|
| 1. Use Proper Tools for Smoothing | Employ a metal bench scraper or offset spatula at a 45-degree angle for a smooth buttercream finish. |
| 2. Consistent Pressure is Key to Piping | Maintain consistent pressure on your piping bag for uniform rosettes and borders to achieve professional decoration. |
| 3. Gradual Colour Mixing for Ombré | Blend gel food colourings in small increments to achieve a seamless ombré effect on your buttercream. |
| 4. Experiment with Palette Knife Techniques | Practice various movements with a palette knife to create diverse textures on buttercream surfaces. |
| 5. Control Temperature for Ganache Drips | Ensure ganache is at 32-35 degrees Celsius for perfect drips that add elegance to your cake design. |
1. Smoothing Buttercream for a Flawless Finish
Achieving a smooth buttercream finish is the hallmark of a professional cake decorator. When working with buttercream, your goal is to create a surface so uniform that it looks almost like fondant but retains the delightful texture and flavour of classic buttercream.
Mastering buttercream smoothing requires precision and the right tools. Professional bakers recommend using a metal bench scraper or an offset spatula to create those perfectly even surfaces. By holding the tool at a 45-degree angle and rotating your turntable slowly, you can achieve a remarkably smooth buttercream surface.
The technique involves multiple passes with your smoothing tool. Start by applying a thin crumb coat that seals in cake crumbs, then chill the cake for about 15 minutes. This initial layer creates a stable base for your final smooth finish. Once chilled, apply your final layer of buttercream slightly thicker than the crumb coat, ensuring an even distribution across the entire cake.
Temperature plays a crucial role in buttercream smoothing. Your buttercream should be at the perfect consistency not too cold and not too warm. If it is too firm, it will crack when smoothing. If too soft, it will slide off the cake. Aim for a temperature around 21 to 23 degrees Celsius for optimal smoothing results.
Pro tip: For an ultra-smooth finish, heat your metal bench scraper under hot water and dry it thoroughly before smoothing your buttercream surface, which helps create a perfectly polished look.
2. Piping Rosettes and Simple Borders
Piping rosettes and borders transforms a basic cake into an elegant masterpiece. Learning these decorative techniques allows you to create stunning visual designs that elevate your baking skills from amateur to professional.
To create beautiful rosettes, you will need a piping bag and a star nozzle. The key is maintaining consistent pressure and a steady hand. When piping, start from the centre of your design and move in a spiral motion outward, applying gentle and even pressure. Border design principles can help you understand the symmetry and spacing required for perfect decorations.
For beginners, practicing on a piece of parchment paper before decorating an actual cake is essential. Hold your piping bag at a 45-degree angle and use your dominant hand to apply pressure while rotating the piping bag in a consistent circular motion. The size of your star nozzle will determine the volume and texture of your rosettes.
Different nozzle sizes create varied effects. Smaller nozzles produce delicate, tight rosettes perfect for wedding cakes, while larger nozzles create bold, dramatic designs ideal for birthday celebrations. Practice controlling your hand pressure to achieve uniform shapes and sizes.
Pro tip: Chill your buttercream for 10 to 15 minutes before piping to ensure it holds its shape and creates crisp, defined rosettes.
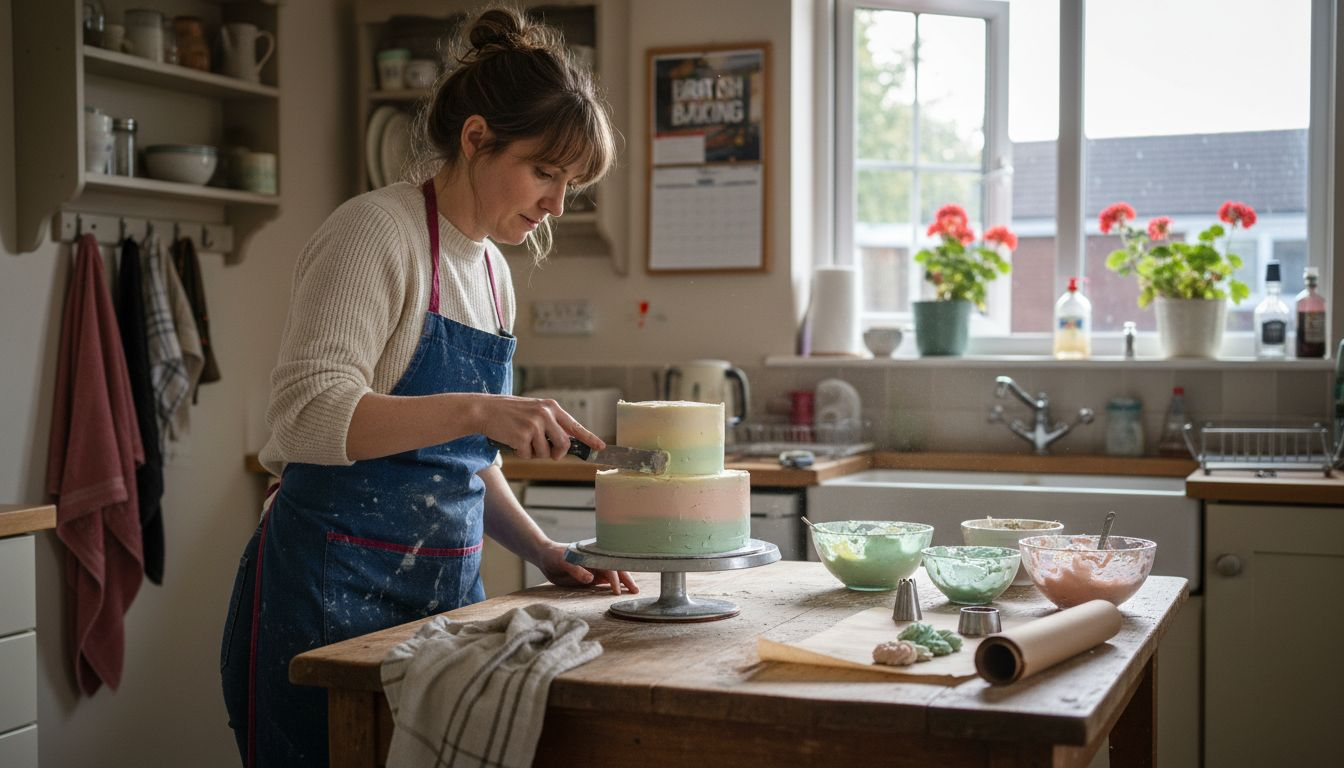
3. Creating the Ombré Effect with Colours
Ombré buttercream decorating is a stunning technique that creates a beautiful gradient effect, transforming an ordinary cake into an extraordinary masterpiece. This method involves blending multiple shades of the same colour to create a seamless transition from light to dark.
To achieve a perfect ombré effect, you will need gel food colourings, which provide more vibrant and concentrated colour than liquid alternatives. Start with your base buttercream colour and gradually add incremental amounts of food colouring to create distinct shade variations. When selecting colours, consider approved colour additives to ensure food safety and compliance.
The key to a successful ombré design is creating smooth transitions between colour shades. Divide your buttercream into separate bowls, adding progressively more food colouring to each. Begin with the lightest shade at the top of your cake and gradually transition to darker shades towards the bottom, using a bench scraper or palette knife to blend the colours gently.
Practical application requires patience and a steady hand. Use a turntable to help you rotate the cake smoothly while applying and blending colours. Aim for at least three to four distinct shades that flow naturally into one another, creating a visually striking gradient effect that looks professional and elegant.
Pro tip: Always mix your colours in small increments and test the shade on a piece of white paper to ensure a gradual and harmonious colour progression.
4. Basic Textures Using Palette Knives
Palette knives are magical tools that transform ordinary buttercream into extraordinary textured surfaces. These versatile utensils allow cake decorators to create unique patterns and visual interest that elevate a simple cake design.
Understanding how to manipulate buttercream with a palette knife requires practice and an appreciation for textural art techniques. Begin by ensuring your buttercream is at the perfect consistency not too soft and not too cold. A slightly chilled buttercream provides better control and more defined textures.
Different palette knife movements create distinct textures. Sweeping motions can produce soft waves, while stippling creates a bumpy, rustic appearance. Angled scraping techniques can generate sharp geometric patterns, while gentle dragging motions produce smooth, undulating surfaces. Experiment with various angles and pressures to discover unique textural effects.
To start, apply a smooth base layer of buttercream to your cake. Then use your palette knife to create deliberate textures by pressing, dragging, or tapping the surface. Practice on a piece of parchment paper first to build confidence and understand how different movements impact the buttercream’s appearance.
Pro tip: Clean your palette knife between texture techniques with a warm, damp cloth to prevent buttercream build up and maintain crisp, clean lines in your decorative patterns.
5. Applying Drips with Coloured Ganache
Coloured ganache drips are the secret weapon for transforming an ordinary cake into a showstopping dessert. This technique adds drama and visual interest with elegant streams of glossy colour cascading down your cake sides.
To create perfect ganache drips, you need precise temperature control. Ganache should be slightly warm but not hot approximately 32 to 35 degrees Celsius. When preparing fluid application techniques, use a squeeze bottle or piping bag for maximum control. Start at the cake’s top edge and allow the ganache to naturally flow downward, creating organic drip patterns.
Choose chocolate or white chocolate as your ganache base, then add gel food colouring for vibrant results. Darker colours like deep burgundy or navy blue create dramatic effects, while pastel shades offer a softer aesthetic. Mix your colour thoroughly to ensure an even tone throughout the ganache.
Practical application requires a chilled cake with a smooth buttercream surface. The cold temperature helps the ganache set quickly and prevents excessive spreading. Practice on a piece of parchment paper first to understand how different ganache temperatures and pouring techniques impact your drip design.
Pro tip: Allow ganache drips to set at room temperature for 10 to 15 minutes before refrigerating to prevent condensation and maintain a smooth, glossy finish.
6. Making Simple Buttercream Flowers
Buttercream flowers transform an ordinary cake into an artistic masterpiece, adding elegance and personal touch to your baking creations. Mastering these delicate decorations requires patience, practice, and understanding of basic piping techniques.
Beginners should start with simple flower designs like roses or daisies. Using floral arrangement principles, build your flower from the centre outward. Select a star nozzle and prepare buttercream at the perfect consistency not too soft and not too firm.
To create a basic rose, start by piping a small central spiral as the flower’s core. Then pipe petals around this centre, gradually increasing the size and overlapping each petal slightly. Work on a square of parchment paper affixed to a flower nail, which allows you to rotate and create uniform petals. Different pressure levels and angles will create varied petal shapes and textures.
Colour plays a crucial role in making buttercream flowers look realistic. Use gel food colourings to add depth and variation. Start with lighter base colours and add darker shades at petal edges to create dimension and visual interest.
Pro tip: Chill your piped buttercream flowers on the parchment paper for 10 minutes before transferring to the cake, which helps maintain their delicate shape and prevents unwanted melting.
7. Stencilling Patterns onto Cakes
Stencilling offers cake decorators a precise method for creating intricate patterns and designs with minimal artistic skill. This technique allows beginners to achieve professional looking results by using pre designed templates applied directly onto buttercream surfaces.
To begin stencilling, ensure your buttercream is chilled and completely smooth. Select a clean food safe stencil and precise stencil application techniques that minimise potential smudging or bleeding of design elements.
Apply edible colour dust or thin royal icing over your stencil using a flat brush or offset spatula. Hold the stencil firmly against the cake surface and work slowly to ensure clean lines. Gently lift the stencil straight upwards to prevent dragging or smearing the design, revealing a crisp pattern underneath.
Experiment with different stencil materials such as plastic or mylar, which offer varying levels of flexibility and detail. Consider using multiple stencils in complementary designs to create complex layered patterns that add visual depth and sophistication to your cake decorations.
Pro tip: Practice your stencilling technique on a piece of parchment paper before attempting it directly on a cake to develop consistent pressure and smooth lifting skills.
Below is a comprehensive table summarising the main topics, techniques, and suggestions detailed in the article on cake decorating methods using buttercream.
Elevate Your Buttercream Decorating with Expert Tools and Supplies
Mastering the art of buttercream techniques like smoothing, piping rosettes, and creating dazzling ombré effects brings joy but also presents challenges. Achieving the perfect consistency, vibrant colours, and flawless finishes can be frustrating without the right materials. Whether you struggle with precise piping or want to add those stunning ganache drips, having professional-grade supplies makes all the difference.

At The Vanilla Valley, we understand your passion and the hurdles you face turning beginner skills into elegant cake creations. Explore our extensive range of cake decorating essentials including food colours, piping nozzles, palette knives, and specialised cake boards designed to help you nail every buttercream technique effortlessly. Start creating show-stopping cakes today by shopping trusted products from a reliable independent supplier with expert support. Visit The Vanilla Valley online now and unlock your decorating potential with tools that make success simple.
Frequently Asked Questions
How can I achieve a smooth buttercream finish on my cake?
Achieving a smooth buttercream finish involves several key steps. Begin with a crumb coat to seal in crumbs, chill the cake to set it, and then apply a final layer of buttercream while using a metal bench scraper or offset spatula to create an even surface.
What are some easy buttercream flowers I can make as a beginner?
As a beginner, start with simple buttercream flowers like roses or daisies. Use a star nozzle to pipe these flowers, beginning with a small centre and adding petals around it, gradually increasing their size for a more realistic appearance.
How do I create an ombré effect with buttercream?
To create an ombré effect, divide your buttercream into several bowls with incremental amounts of gel food colouring. Start by applying the lightest shade at the top of the cake and blend progressively darker shades towards the bottom for a seamless colour transition.
What is the best technique for piping rosettes?
Piping rosettes requires consistent pressure and a steady hand. Position your piping bag at a 45-degree angle and start from the centre, moving in a spiral outwards while maintaining even pressure to form the rosettes.
How can I make ganache drips for my cake?
To create ganache drips, prepare your ganache to a warm temperature of around 32 to 35 degrees Celsius. Use a piping bag or squeeze bottle to apply the ganache starting from the top of the cake edge, allowing it to flow naturally downwards for an elegant look.
What is the best way to practice my stencilling technique?
To practice stencilling, start by using a piece of parchment paper rather than a cake. This allows you to develop consistent pressure and learn how to lift the stencil without smearing the design before applying it directly to your cakes.