
How to line a cake tin for perfect baking results
Nothing frustrates amateur bakers more than a perfectly baked cake stubbornly clinging to the tin, ruining hours of careful work. Whether you’re preparing a simple sponge or an intricate Bundt creation, the way you prepare your cake tin directly impacts the final result. Many bakers overlook this crucial step, leading to broken cakes, uneven surfaces, and disappointing presentations. This comprehensive guide walks you through the essential techniques for lining cake tins effectively, from selecting the right greasing agents to avoiding common pitfalls that compromise your baking success. You’ll discover professional methods that ensure clean releases every time, transforming your baking outcomes from frustrating to flawless.
Table of Contents
- Essential Tools And Ingredients For Lining A Cake Tin
- Step-By-Step Guide To Lining Your Cake Tin
- Common Mistakes To Avoid When Lining Cake Tins
- Checking Your Results And Cleaning Your Cake Tin
- Enhance Your Baking Experience With Our Cake Decorating Supplies
- Frequently Asked Questions
Key takeaways
| Point | Details |
|---|---|
| Proper preparation matters | Correct pan greasing and flouring ensures clean release and affects crumb texture and crust quality. |
| Shortening outperforms alternatives | Vegetable shortening provides superior release compared to butter or oil, especially in detailed moulds. |
| Avoid standard cooking sprays | Sprays containing lecithin create residue build-up and darker crusts, particularly damaging Nordic Ware pans. |
| Use proper tools | A pastry brush ensures even coverage in intricate pan details, preventing bare spots that cause sticking. |
| Tailor methods to pan types | Different cake tins require specific lining approaches for optimal results. |
Essential tools and ingredients for lining a cake tin
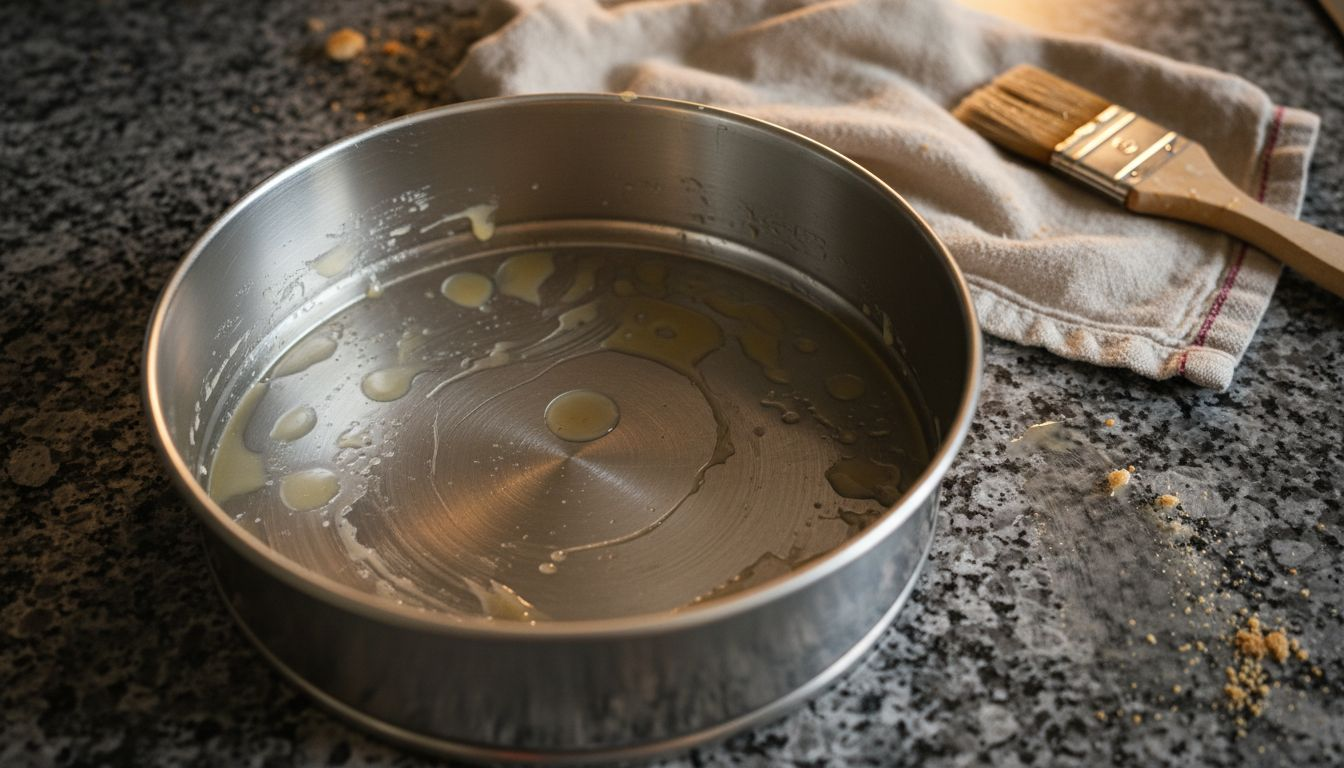
Successful cake tin preparation begins with assembling the right equipment and greasing agents. You’ll need a quality pastry brush for applying melted fats evenly, a flexible spatula for spreading room temperature shortenings, parchment paper cut to size for base lining, and your chosen greasing agent. Having these baking tools for home bakers ready before you start mixing batter streamlines the entire process.
Greasing agents fall into four main categories, each with distinct properties affecting cake release and texture. Vegetable shortening remains the professional baker’s choice because it stays solid at room temperature, creating an effective barrier without adding moisture. Butter adds flavour but contains water and milk solids that can cause sticking in detailed pans. Vegetable oil works for simple tins but runs down vertical surfaces before setting. Standard cooking sprays seem convenient but contain lecithin and propellants that damage pan surfaces over time.
Comparing these options helps you make informed choices based on your specific baking project:
| Greasing agent | Advantages | Disadvantages |
|---|---|---|
| Vegetable shortening | Best release, stays in place, no flavour transfer | Requires melting for intricate pans |
| Butter | Adds rich flavour, readily available | Water content causes sticking, burns easily |
| Vegetable oil | Simple application, neutral flavour | Runs down sides, less effective barrier |
| Cooking spray | Quick coverage, even coating | Builds residue, darkens crusts, damages surfaces |
Flour dusting complements greasing by creating a dry layer between fat and batter. After greasing, sprinkle a tablespoon of plain flour into the tin, then tap and rotate until all surfaces show a light, even coating. Invert the tin and tap out excess flour to prevent white patches on your finished cake. This combination technique proves especially valuable for cakes with delicate crumbs that tear easily.

Pro Tip: Melt shortening in a small bowl and apply with a pastry brush for intricate Bundt or decorative pans, ensuring every crevice receives thorough coverage without thick lumps.
Your pan type influences which greasing method works best. Silicone moulds rarely need greasing due to their naturally non-stick properties. Glass and ceramic tins benefit from thorough greasing and parchment lining. Metal pans with non-stick coatings require only light greasing to preserve the coating. Always check your recipe instructions, as some batters specify particular preparation methods for optimal texture and rise.
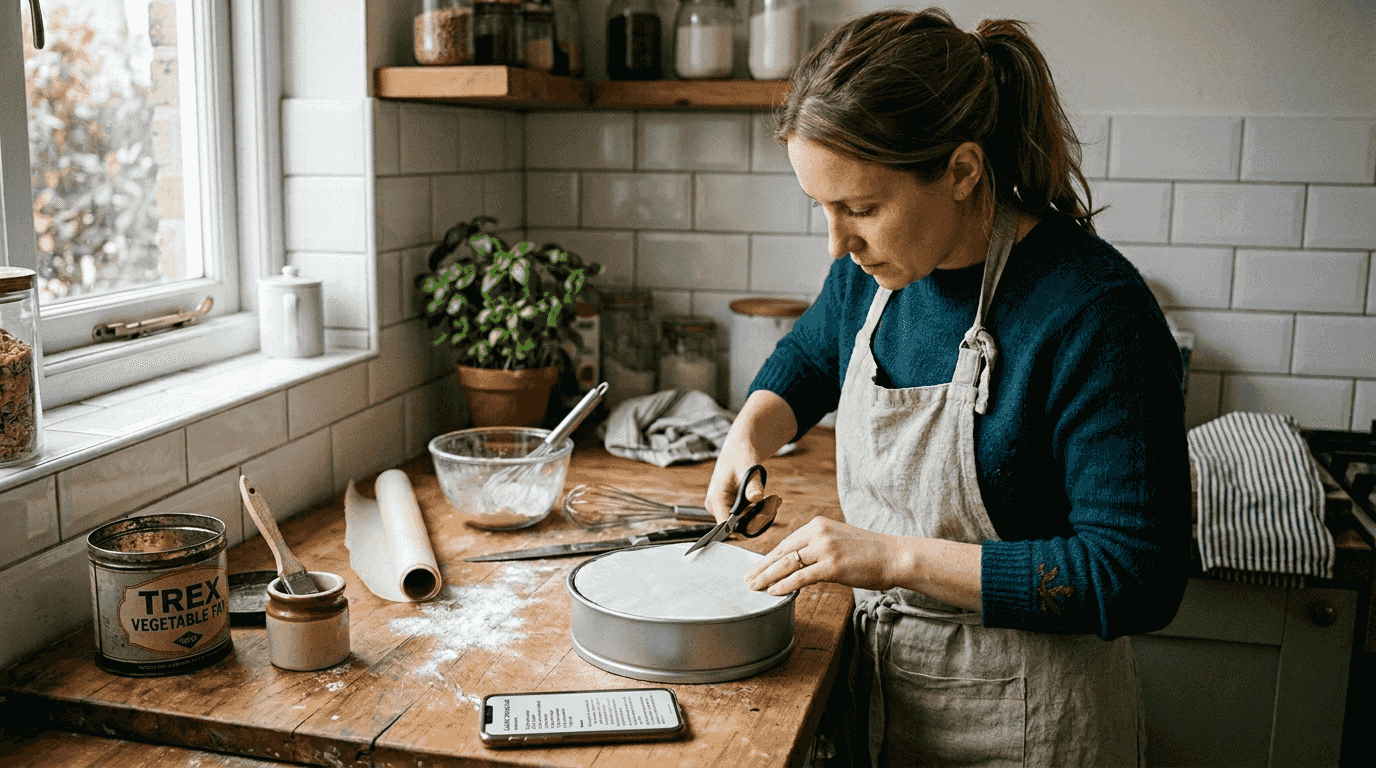
Step-by-step guide to lining your cake tin
Begin by selecting your greasing agent based on pan complexity and recipe requirements. For standard round or square tins, room temperature shortening spread with a spatula provides adequate coverage. Intricate designs demand melted shortening applied with a pastry brush, allowing you to reach every detail without leaving bare spots that cause sticking.
-
Grease the entire inner surface systematically, starting at the base and working up the sides in overlapping strokes. Pay particular attention to corners where the base meets vertical walls, as these areas trap batter and stick most readily. Use generous amounts without creating thick deposits that mar the cake surface. For tube pans, grease both the outer walls and central tube thoroughly, including the top edges where batter rises.
-
Dust the greased surface with plain flour immediately after applying fat, whilst the greasing agent remains tacky. Add approximately one tablespoon of flour for standard 20cm tins, adjusting quantities for larger pans. Rotate and tap the tin to distribute flour evenly across all surfaces. This flour layer absorbs into the fat, creating a protective barrier that prevents direct batter contact with metal.
-
For Bundt and decorative moulds, melt your shortening until completely liquid but not hot. Dip a clean pastry brush into the melted fat and paint every ridge, valley, and decorative element methodically. Work in good lighting to spot any missed areas. The melted consistency flows into tight spaces that solid fats cannot reach, ensuring comprehensive coverage that prevents frustrating sticking in ornamental details.
-
When recipes specify parchment lining, trace your tin base onto baking parchment and cut slightly inside the line for a neat fit. Grease the tin base lightly before pressing the parchment circle into place, which prevents the paper shifting when you pour batter. For side lining, cut strips matching your tin height and press firmly against greased walls. Grease the parchment edges if your recipe produces particularly sticky batters.
-
Inspect your prepared tin under good light, checking for bare patches or thick accumulations of greasing agent. Thick lumps trap excess flour, creating unsightly white marks on your finished cake. Smooth any heavy deposits with a clean pastry brush or paper towel. Your prepared surface should appear evenly coated with a thin, consistent layer showing no gaps or pooling.
Pro Tip: Nordic Ware explicitly advises against standard cooking sprays on their premium pans, as propellant residues build up in decorative details and eventually cause sticking despite the non-stick coating.
Always follow recipe-specific guidance when provided, as some cakes require particular cake tin preparation methods. Delicate sponges often specify parchment lining only, without greasing, to prevent dense edges. Rich fruit cakes need both greasing and parchment plus a collar extending above the rim. Angel food cakes require completely ungreased tins, as the batter must cling to pan walls whilst rising. Respecting these specifications ensures your cake develops the intended texture and structure.
Common mistakes to avoid when lining cake tins
Bare spots represent the most frequent preparation error, particularly in corners where bases meet sides. These ungreased patches allow batter to bond directly with metal, causing sections to tear away when you attempt removal. Check your work carefully before filling the tin, adding extra greasing to any suspicious areas. Even experienced bakers occasionally miss spots in complex decorative moulds, so systematic coverage beats rushed application every time.
Thick, uneven application of shortening creates another common problem. Heavy lumps trap excessive flour, which bakes onto your cake surface as unsightly white patches that mar presentation. Spread greasing agents thinly and evenly, aiming for complete coverage rather than thick deposits. If you notice accumulation in crevices, smooth it out with your brush or finger before flouring. Your goal is a barely visible coating that provides release without affecting appearance.
Cooking sprays darken crusts and leave residue that accumulates with repeated use, eventually causing the very sticking they claim to prevent. The lecithin and propellants in these products create a gummy film that bakes onto pan surfaces, particularly in the intricate details of Bundt moulds. This build-up proves difficult to remove and progressively worsens release performance. Professional bakers avoid these products entirely, relying instead on traditional shortening methods that clean away completely.
Standard cooking sprays often contain lecithin and propellants that can build up on pan surfaces, leading to cakes sticking despite the non-stick coating.
Heavy, dark, non-stick pans require special consideration because they affect baking times and crust thickness. These surfaces absorb and retain heat more efficiently than light-coloured metal, causing faster browning and potentially burning. Reduce oven temperature by 15°C when using dark pans and monitor baking progress closely. The non-stick coating still benefits from light greasing, despite manufacturer claims, as this extends coating life and ensures consistent release.
Maintaining your cake tins properly between uses prevents long-term problems:
- Wash pans promptly after use with warm water and gentle detergent, avoiding abrasive scrubbers that damage coatings
- Remove all residue completely before storage to prevent rancid fat smells and sticky build-up
- Dry thoroughly to prevent rust on uncoated metal surfaces
- Store nested pans with paper towels between them to prevent scratching
- Avoid dishwashers for non-stick and speciality pans, as harsh detergents degrade coatings
- Re-season occasionally by coating with shortening and heating briefly, similar to cast iron care
Recognising how pan material affects preparation helps you adjust techniques appropriately. Silicone requires minimal intervention beyond light greasing for insurance. Glass and ceramic need thorough preparation as they lack non-stick properties. Aluminium tins benefit from both greasing and parchment. Understanding these differences prevents common cake failures caused by inadequate preparation for specific pan types.
Checking your results and cleaning your cake tin
Testing cake release before inverting saves many disasters. Run a thin palette knife around the tin perimeter, feeling for resistance that indicates sticking. The blade should glide smoothly without catching. For tube pans, check both outer and inner edges carefully. If you encounter stuck sections, work the knife gently underneath whilst supporting the cake, easing it free gradually rather than forcing release that tears the structure.
Successful release produces a cake that drops cleanly onto your cooling rack with minimal coaxing. The surface should appear smooth and even, free from torn patches or stuck crumbs. Any white flour marks indicate excessive dusting, whilst dark spots suggest inadequate greasing or pan material affecting baking. These visual cues help you refine technique for next time, building expertise through observation and adjustment.
Cleaning immediately after the tin cools prevents residue hardening into stubborn deposits. Fill the sink with hot water and washing-up liquid, then submerge your tin for ten minutes to soften any stuck-on batter or fat. Use a soft sponge or cloth to wipe surfaces clean, paying attention to decorative details where residue hides. For stubborn spots, make a paste from bicarbonate of soda and water, applying gently with a soft brush.
Pro Tip: Hand wash non-stick and speciality pans exclusively, as dishwasher detergents contain harsh chemicals that degrade coatings and dull finishes over years of use.
Removing cooking spray build-up requires more aggressive intervention than standard cleaning. Soak affected pans in hot water with biological washing powder for several hours, then scrub with a plastic brush. For severe cases, create a paste from cream of tartar and white vinegar, applying to stained areas and leaving for thirty minutes before scrubbing. This treatment restores pan surfaces but proves unnecessary when you avoid sprays entirely.
Proper storage extends pan life significantly. Stack tins with paper towels, clean tea towels, or purpose-made pan protectors between them to prevent scratching. Store in a dry cupboard away from moisture that causes rust. Hang Bundt and speciality pans individually if space permits, as their intricate designs scratch easily when nested. Check stored pans periodically for any signs of rust or residue that requires attention before next use.
Pan type dramatically influences both preparation requirements and baking outcomes. Heavy, dark pans create thicker, darker crusts and require temperature adjustments, whilst light aluminium produces more delicate results. Glass conducts heat differently than metal, often needing longer baking times. Understanding these variables helps you anticipate results and adjust both preparation and baking parameters for consistent success across your tin collection.
Enhance your baking experience with our cake decorating supplies
Now that you understand professional tin preparation techniques, equip yourself with quality tools that make the process effortless. The Vanilla Valley offers everything amateur bakers need to achieve consistently excellent results, from premium pastry brushes to professional-grade parchment paper.

Our comprehensive range of cake decorating supplies includes specialised greasing tools, release agents, and preparation accessories designed for both simple and intricate baking projects. We stock trusted brands that professional bakers rely on daily, ensuring you work with equipment that delivers reliable performance. Whether you’re preparing a basic sponge or tackling an elaborate decorative mould, our curated selection supports your success.
Explore our expert guides on achieving even baking results and avoiding common cake failures to complement your improved tin preparation skills. We’re committed to helping home bakers develop confidence and capability through quality supplies and practical education.
Frequently asked questions
How do I prevent my cake from sticking to the tin?
Thoroughly grease all surfaces including corners where base meets sides, as these areas stick most readily. Apply a thin, even layer of vegetable shortening followed by light flour dusting for maximum release effectiveness. Avoid standard cooking sprays that build residue over time, opting instead for traditional greasing methods that clean away completely.
Can I use butter instead of shortening to grease a cake tin?
Butter adds pleasant flavour but contains water and milk solids that increase sticking risk, particularly in detailed moulds. Shortening provides superior release because it remains solid at room temperature and creates a more effective barrier. Reserve butter for simple tins where slight sticking won’t ruin decorative details.
Why should I avoid using cooking sprays on intricate pans?
Cooking sprays contain lecithin and propellants that accumulate in decorative crevices, creating gummy residue that eventually causes sticking despite non-stick coatings. These products also darken crusts and prove difficult to remove from detailed surfaces. Nordic Ware and other premium manufacturers explicitly warn against spray use on their speciality pans.
What’s the best way to clean a cake tin after baking?
Wash by hand immediately after cooling using warm water and gentle washing-up liquid with a soft sponge. Avoid abrasive scrubbers and dishwasher cycles that damage non-stick coatings and dull finishes. Remove all residue promptly to prevent rancid fat build-up and staining that worsens with time.