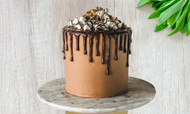
How to make drip cakes
What’s better than ‘flooding’ your cake with chocolate? Drip cakes are a chocoholics dream!
First time trying a drip cake? No problem, here’s a few tips and tricks to get you going .
Preparing your cake
First off you need to layer buttercream around your cake. Start off with a thin
layer around the sides and top of the cake to create a crumb coat and leave to
set in the fridge for around 30 minutes. Once set, add more buttercream to the
top and sides of the cake and smooth around, covering the cake in buttercream.
We recommend using a slightly warm, large metal scraper to smooth out your
buttercream, as this will give you more of a seamless smooth finish. Pop the
cake in the fridge again for 30 minutes to set. Check out our ganache page for
tips and tricks on ganaching like a pro.
Preparing your cake drip
Once your buttercream has set, you can prepare your drip. A quick and easy way is using ready-made chocolate drips. Chocolate drips are great to achieve vibrant colours, and they’re mess free! Ready-made drips can be stored in the fridge and reheated again and again. You also can melt deco melts and use these for your drips. Or, if you would like to make your own ganache drip, heat cream and chocolate and mix together. If you use white chocolate and would like to colour it yourself, we suggest using gel colouring over liquid. Gel colours are super vibrant and don’t change the consistency of the drip.
Adding drip to your cake
Once you’ve chosen your drip method, there are two
ways of applying it to the cake.
You could either use a spoon, simply spooning teaspoons of ganache/drip on to
the edge of your chilled buttercream cake. Another option is using a plastic
bottle, this allows you to add a drip to a cake a lot more quickly, it’s also a
lot easier and cleaner and you can control how much you want.
If you have left over drip in a bottle, you can just pop it in the fridge –
left over drip can last in the fridge for up to a month. To reuse it just pop
it in the microwave and reheat in 15 second intervals until it’s the right
consistency.
Different styles of drip
You can achieve different style drips; this all depends on how warm your ganache/drip is. Make a thick, chunky drip with ganache which has been left to cool and is nearly at room temperature. Create a medium drip, with ganache which is just warm to touch, or a thin drip which ganache which has only been left to cool slightly. Shorter drips are best for when you plan on decorating the bottom of the cake, or longer drips are great for more of a dramatic look
Tips for a perfect cake drip
Take your time
Always be careful when adding drips to cakes – don’t do it too quickly as
you’ll get a runaway drip off the cake board.
Do a test drip
Always test your drip first! Just do a single drip and let it set for a
couple of minutes, if you’re happy with it use that temperature drip. If you’re
not, either let it cool for longer or put it in the microwave for a little
longer – 5 second intervals will do the trick. If you have made your own
ganache drip and it’s too runny, you may not have enough chocolate in your mix
– try adding a little more. Once you’ve adjusted your drip, test it again.
Chill your cake
Always chill your cake! Buttercream must be firm to touch 30 mins in fridge
or 10 mins in freezer. This helps your drips stay in place once you’ve added
them, prevents them from running further down the cake.
