What’s the Secret to Creating the Perfect Blood-Filled Surprise?
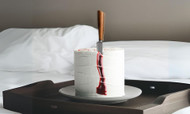
Whether you're a Swiftie or just someone who loves a little drama on their dessert table, Taylor Swift’s “Blank Space” cake has taken Halloween cake inspiration to a whole new level! The eerie surprise of cutting into a cake and releasing a gush of edible “blood” makes it a showstopper. It’s creepy, a little glamorous, and definitely memorable – perfect for your spooky celebrations!
Ready to make one? Here’s a step-by-step guide to help you create your own “Blank Space” inspired cake with a haunting twist.
Step 1: Bake and Stack Your Cake
The base of this dramatic cake is a simple, pale or white sponge. The light colour really contrasts with the “blood” you’ll add later, giving that wow factor when you slice into it.
- Bake two or more layers of vanilla sponge or any pale cake of your choice.
- Stack the layers with your preferred filling – buttercream, white chocolate ganache, or a thin layer of raspberry jam to hint at the "bloody" surprise inside.
Step 2: Cut Out the Centre
Once your cake is stacked and iced with a crumb coat:
- Take a round cutter and cut out a small circle from the middle of your cake layers. Don’t go too close to the edge – you want the cake to stay stable.
- Gently scoop out the cake inside, leaving a hollow area that will be filled with your ‘blood’.
Step 3: Tempered Chocolate Lining
To prevent the blood from soaking into your cake too quickly, brush the inside of the hollowed-out space with tempered white chocolate:
- Melt and temper your chocolate (tempering ensures the chocolate will set with a nice snap and won’t melt easily).
- Brush the melted chocolate all over the inside of the exposed sponge, creating a smooth barrier. This step keeps the blood contained until it’s time to serve.
Step 4: Add the ‘Blood’
For your spooky blood effect, raspberry coulis is a great choice – it’s vibrant, tangy, and easy to make:
- Strain your raspberry coulis to remove seeds and ensure it’s a smooth, pourable consistency.
- Fill the hollowed-out section of your cake with the raspberry coulis. You want enough to spill out when the cake is cut but not so much that it overflows while assembling.
Step 5: Seal the Cake with Chocolate
To create a “lid” for your cake’s hidden blood centre, use more tempered white chocolate:
- Pour or spread a thin layer of tempered chocolate onto parchment paper and place it in the freezer to set.
- Once it’s firm, carefully peel off the parchment
- Place the chocolate lid over the coulis-filled centre and gently press it into place.
Step 6: Ice and Decorate
Now that your cake is filled with its blood surprise, finish icing the cake as usual:
- Frost the outside with a pale buttercream or fondant – keeping the overall look simple and clean so the blood surprise stands out.
- For an extra Halloween twist, drip red-coloured icing or raspberry coulis around the edges of the cake for a subtle bloody effect, or decorate with themed toppers like skulls, bats, or even Taylor Swift-inspired details for fans.
Step 7: The Grand Reveal
When it’s time to serve, slice into the cake (or if you’re feeling dramatic plunge your knife straight into the centre) and watch as the blood slowly oozes out, giving the ultimate Halloween shock factor!
Top Tips for Success:
- Tempering chocolate: If you’re unfamiliar with tempering chocolate, there are plenty of easy tutorials available online that will walk you through the process.
- Flavour combo: White chocolate and raspberry is a delicious combination, but feel free to switch up the flavours depending on your preferences.
- Blood alternatives: If you’re not a fan of raspberry, you can experiment with strawberry or any sauce that could be coloured with Red Extra – just strain it to get the right consistency.
