
7 Easy Ways to Fix Common Buttercream Problems at Home
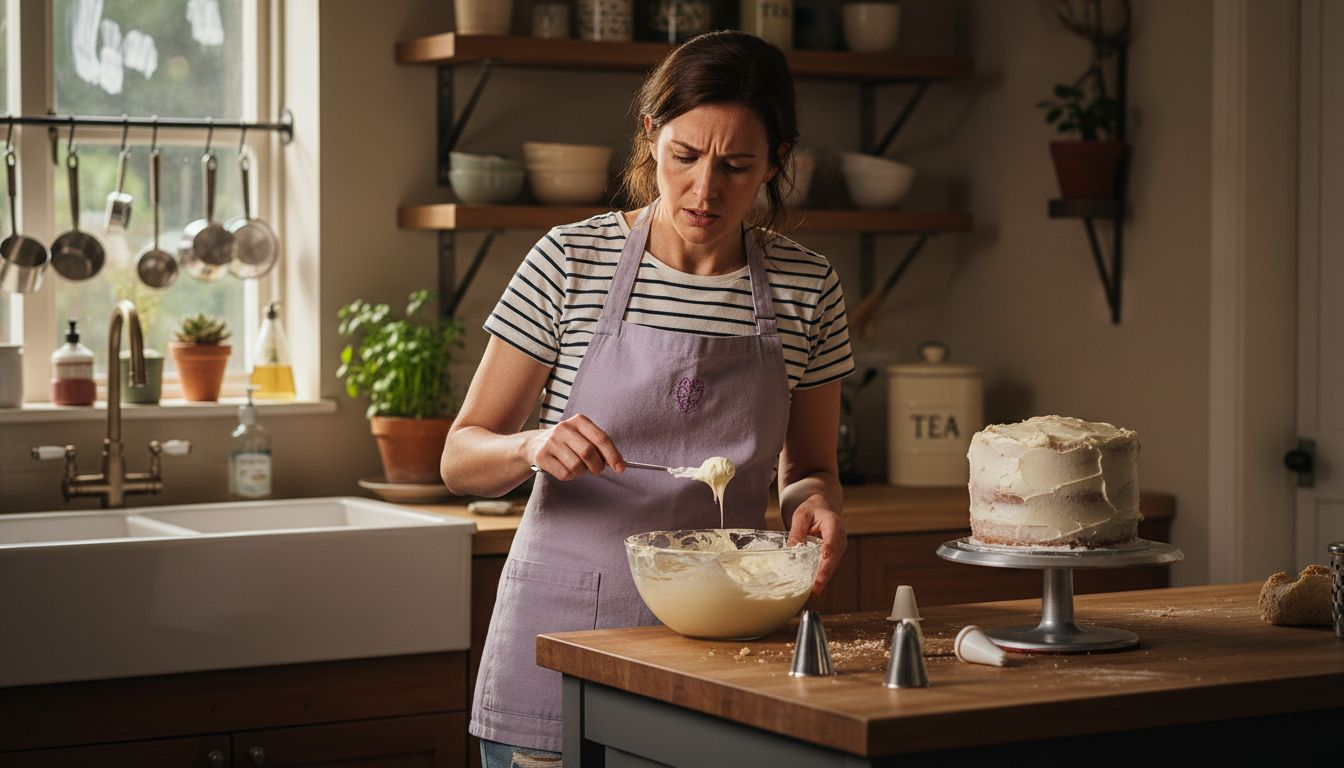
Smooth, creamy buttercream looks easy in professional cake photos, but at home it can quickly turn grainy, slide off or end up riddled with air bubbles. Struggling with the right texture or a flawless finish often takes the joy out of cake decorating. If you’ve ever found your frosting split or awkward to spread, you’re not alone.
The right techniques make all the difference and can transform your buttercream from frustrating to reliable. With the right know-how, you can achieve a bakery-quality look and taste every time. Get ready to discover clear, actionable tips that will help you master every stage of the process, from getting the perfect consistency to fixing tricky mishaps and making your buttercream ready for any celebration.
Table of Contents
- 1. Check Buttercream Consistency Before Decorating
- 2. Beat Out Air Bubbles for a Smooth Finish
- 3. Solve Grainy Buttercream with Gentle Mixing
- 4. Fix Split or Curdled Buttercream Quickly
- 5. Adjust Flavour for Better Tasting Buttercream
- 6. Use Proper Tools for Even Spreading
- 7. Store Buttercream Safely for Later Use
Quick Summary
| Key Insight | Explanation |
|---|---|
| 1. Check Buttercream Consistency First | Use the toothpick method to test if your buttercream is thick enough for decorating. A stiff peak means it’s ready. |
| 2. Remove Air Bubbles Before Smoothing | Tap your cake gently on the surface to release trapped air bubbles for a flawless finish. |
| 3. Softened Butter Prevents Graininess | Use room temperature butter to ensure smooth buttercream without grainy texture caused by cold ingredients. |
| 4. Fix Split Buttercream with Warmth | Use a warm water bath to gently whisk and re-emulsify split buttercream. |
| 5. Store Buttercream Properly for Freshness | Keep buttercream in a cool place for short-term storage; refrigerate or freeze for longer shelf life. |
1. Check Buttercream Consistency Before Decorating
Before you pipe a single swirl or crumb coat your cake, you need to know if your buttercream is actually ready. Getting the consistency right is the difference between a beautifully decorated cake and one that slides around like it’s melting in the summer sun. Most amateur decorators skip this step entirely, and it costs them.
Butterscotch frosting comes in different varieties, and each one behaves differently on your cake. American buttercream is thicker and more stable at room temperature, which makes it easier to spread and pipe. Swiss Meringue Buttercream, however, is lighter and airier, but requires careful temperature control. If you’re working with one type and treating it like another, your decorating will suffer from the start.
So how do you actually check the consistency? The best test is the toothpick method. Insert a toothpick into your buttercream, then pull it straight up. If it holds a stiff peak and doesn’t fall over, you’ve got the perfect thickness for piping sharp details and intricate designs. If it droops, your buttercream is too soft. If it’s lumpy and hard to work with, it’s too stiff. This simple check takes ten seconds and saves you hours of frustration.
Consistency affects how your buttercream holds up under pressure and heat. Achieving the right buttercream consistency ensures it stays in place without sliding or drooping, which is essential for piping and other decorating techniques. Room temperature matters too. If your kitchen is warm, your buttercream will be softer than expected. If it’s cold, it might be stiffer. Always adjust your working environment or your recipe slightly to match your decorating needs.
The texture should feel smooth and creamy when you run a spatula through it. There shouldn’t be any graininess or lumps unless you’ve intentionally added sprinkles or other elements. If you’ve over mixed your buttercream, it can become grainy or separate. If that happens, add a tiny splash of milk and mix gently for thirty seconds.
Pro tip: Keep a small bowl of warm water nearby whilst decorating. Dip your piping bag or spatula into it for a few seconds between tasks to soften the buttercream edges slightly, which creates smoother transitions between swirls and designs without compromising the overall structure of your cake.
2. Beat Out Air Bubbles for a Smooth Finish
Air bubbles are the silent saboteur of smooth buttercream finishes. You might have perfect consistency and beautiful colour, but if those tiny pockets of air are trapped inside your frosting, they’ll create pits and holes that ruin an otherwise gorgeous cake. The good news is that removing them is straightforward once you know the technique.
When you make buttercream, you need to beat it well to incorporate air and create that fluffy texture. But here’s the catch: not all that air is welcome. The air that gets trapped during mixing creates small bubbles that sit just beneath the surface of your frosting. When you spread it on your cake, those bubbles collapse unevenly, leaving behind craters and an unpolished appearance. This is why releasing trapped air through tapping techniques matters so much before you start decorating.
The easiest method is the tap and smooth technique. Once you’ve spread your buttercream on the cake, take your cake and gently tap it on the work surface. Not hard enough to damage anything, but firmly enough to dislodge those air pockets. You’ll see tiny bubbles rise to the surface where you can smooth them away with a spatula. Do this a few times around the entire cake, and you’ll notice an immediate improvement in smoothness.
Using a bench scraper is your best friend here. Hold it at a 45 degree angle and drag it across the frosting with gentle, consistent pressure. This action pushes air bubbles toward the edges and flattens the surface simultaneously. Work in one direction at first, then turn the cake and repeat from a different angle. Each pass should be smooth and deliberate, not rushed.
After tapping and scraping, use a clean, damp palette knife or offset spatula to give your buttercream one final polish. The slight moisture helps seal the surface and eliminates any remaining small imperfections. Your crumb coat should now look virtually flawless, ready for your final layer of frosting or for piping details.
Pro tip: Keep your workspace cool and work quickly when smoothing buttercream, as warm conditions cause air bubbles to expand and make them harder to eliminate completely.
3. Solve Grainy Buttercream with Gentle Mixing
Grainy buttercream feels sandy on your tongue and looks dull and lumpy. It’s one of the most frustrating problems home decorators face, but the fix is simpler than you might think. The issue usually stems from either cold butter or sugar crystals that haven’t fully dissolved, and patience is your secret weapon.
When butter is too cold, it doesn’t blend smoothly with the other ingredients. Instead of creating a silky emulsion, the cold butter breaks apart into tiny grainy particles that remain visible throughout your frosting. Similarly, if your sugar hasn’t dissolved completely, you get that gritty texture. Temperature control is absolutely critical here. Room temperature butter is essential because it allows the fats to soften and blend seamlessly with your other ingredients.
The solution is straightforward: gently remix your buttercream at room temperature. Don’t use high speed on your mixer. Instead, use medium or low speed and let time do the work. Start with just 30 seconds of mixing, then check the texture. You’ll notice the graininess beginning to disappear as the sugar crystals dissolve into the butter and the fats emulsify properly. This patient, moderate mixing approach leads to a glossy, silky buttercream that transforms your cake from amateur to professional looking.
One common mistake is overbeating cold buttercream, thinking more mixing will fix the problem. It won’t. More speed with cold ingredients actually makes graininess worse because you’re forcing cold butter particles into smaller and smaller pieces. Instead, let your buttercream sit at room temperature for 15 to 20 minutes before you start mixing again. This warming period allows the butter to soften naturally without any vigorous action required.
Using softened butter from the start prevents this problem entirely. When making fresh buttercream, take your butter out of the refrigerator 30 minutes before you begin. It should feel soft enough that your finger leaves a slight indent, but not so soft that it’s greasy or melting. Careful folding and gentle mixing techniques promote a smooth, creamy consistency that’s ready to decorate with.
Pro tip: If your buttercream is still grainy after gentle remixing, add a tablespoon of milk or cream and mix on low speed for another minute, which helps dissolve any remaining sugar crystals and creates an even smoother finish.
4. Fix Split or Curdled Buttercream Quickly
A split or curdled buttercream looks like it’s broken into greasy puddles with lumps floating around in it. It’s usually the result of temperature mismatches between your ingredients, but don’t panic. This is one of the easiest buttercream disasters to fix, and you can save it in minutes.
Split buttercream happens when your butter and other ingredients are at vastly different temperatures. If you’ve added cold egg whites to warm butter, or dumped room temperature butter into cold icing sugar, the emulsion breaks. The fat and the liquid separate instead of blending together smoothly. The good news is that your buttercream isn’t ruined. The ingredients just need to be coaxed back into friendship through gentle warmth and patient whisking.
The quickest fix is the warm water bath method. Fill a bowl with warm water, but not hot. You want it warm enough that you can hold your hand in it comfortably. Set your bowl of split buttercream over this warm water bath and gently whisk it. The warmth gradually brings all the ingredients up to the same temperature, which allows them to re-emulsify. You’ll see the mixture slowly transform from broken and grainy back into smooth and creamy. This usually takes three to five minutes of patient whisking.
As you whisk over the warm water, add small amounts of powdered sugar, one tablespoon at a time. This helps the mixture come back together and creates a smoother texture throughout. Stop every minute or so to check your progress. The buttercream will begin looking glossy and unified rather than separated. When the temperature is consistently warm throughout and the texture looks smooth again, you’re done.
If you’re working with meringue based buttercreams, temperature control is even more critical. Understanding different types of buttercream helps you know exactly what temperature range works best for your specific recipe. American buttercream is more forgiving, but Swiss or Italian meringue buttercream needs precise temperature management from start to finish.
Pro tip: Prevent split buttercream entirely by bringing all your ingredients to room temperature before you start mixing, and add butter or liquids slowly and gradually rather than in big chunks.
5. Adjust Flavour for Better Tasting Buttercream
Vanilla buttercream is lovely, but sometimes your cake deserves more personality. The difference between boring buttercream and absolutely delicious buttercream often comes down to thoughtful flavour adjustments. Your taste buds will tell you instantly when you’ve nailed it.
Start by understanding that buttercream is heavily sweetened, which can mask subtle flavours. A teaspoon of quality vanilla extract might disappear entirely because of all that sugar. This is why flavour adjustments should be made gradually and tasted frequently to achieve the desired profile without overpowering the delicate butter notes. Add a small amount, mix it in completely, then taste before adding more. This prevents you from overshooting and ruining an entire batch.
Quality extracts make an enormous difference. Almond extract adds warmth and complexity. Peppermint extract creates a festive note. Lemon or orange extract brightens the entire profile. You can also use fresh citrus zests for a brighter, more natural flavour. A tablespoon of lemon zest transforms vanilla buttercream into something special. Zests add flavour without adding liquid, which keeps your consistency perfect.
Don’t forget about balancing sweetness. A small pinch of salt cuts through overly sweet frosting and makes the butter flavour shine through more prominently. Start with just a quarter teaspoon and taste. That tiny amount of salt won’t make your buttercream taste salty but will elevate every other flavour present.
Chocolate, fruit purees, and liqueurs are classic additions that work beautifully. Cocoa powder adds depth without affecting texture. A tablespoon of coffee liqueur creates a sophisticated coffee buttercream. Fruit purees need careful handling because they add moisture, so you may need to adjust your powdered sugar slightly to maintain consistency. The choice and quantity of flavouring impact the overall taste significantly, so taste as you go.
Pro tip: Add flavourings in small increments, tasting after each addition to prevent overpowering your buttercream with too much extract or zest, which can quickly turn a subtle enhancement into an unpleasant surprise.
6. Use Proper Tools for Even Spreading
You cannot achieve professional looking buttercream with kitchen knives and random spatulas. The right tools make an enormous difference in how smoothly you can spread buttercream and how polished your finished cake looks. Investing in a few key implements transforms your decorating from frustrating to genuinely enjoyable.
An offset spatula is your workhorse. The angled blade lets you spread buttercream smoothly without dragging your hand across the cake surface. Unlike a straight spatula, an offset keeps your knuckles away from the frosting, giving you better control and precision. A bench scraper is equally important for creating smooth, flat surfaces on the sides of your cake. Hold it at a slight angle and drag it around the entire cake in one smooth motion. This tool is what separates amateur cakes from bakery quality cakes.
A turntable is genuinely transformative. When you can rotate your cake towards you rather than stretching and twisting yourself around it, spreading becomes exponentially easier. You maintain consistent pressure and angle with every stroke. Your buttercream application becomes even and professional looking because you’re working from a stable, repeatable position. If you decorate cakes regularly, a turntable is the single best investment you can make.
A straight spatula works beautifully for the crumb coat stage, when you want to get buttercream onto the cake quickly without worrying about perfection. Once your crumb coat is set, the offset spatula becomes your tool of choice for the final, visible layer. These two spatulas handle 90 percent of spreading tasks you’ll encounter.
Practice with these implements improves finish quality and reduces mistakes significantly. Spend ten minutes just spreading buttercream on a practice cake with each tool. You’ll develop muscle memory for pressure and angle, which translates directly to better results. Using proper cake decorating tools and techniques allows for smooth, consistent application and control that genuinely elevates your finished work.
Pro tip: Keep your tools warm by dipping them in hot water between spreads, then wiping them dry completely before using them again, which prevents buttercream from sticking and dragging.
7. Store Buttercream Safely for Later Use
Buttercream is wonderfully forgiving when it comes to storage. Whether you’ve made a batch for next week’s cake or want to prepare ahead for a big decorating project, proper storage keeps your buttercream fresh and ready to use. Learning the right methods means you’ll always have gorgeous frosting on hand.
At room temperature, buttercream stays fresh for about two days in a cool, dry place, covered to protect it from dust and odours. Your kitchen cupboard is perfect for this short term storage. The cake itself should be covered with a cake dome or box to prevent it from drying out or absorbing flavours from your surroundings. If your home is particularly warm or you’re planning to decorate within a day or two, room temperature storage is ideal because your buttercream is already at the perfect spreading consistency.
Refrigeration extends your buttercream’s life to about a week. Store it in an airtight container so it doesn’t absorb odours from other foods. When you’re ready to use refrigerated buttercream, let it come to room temperature first, which takes about an hour. This is crucial because cold buttercream is stiff and impossible to spread smoothly. Once it’s warm, give it a gentle re whip with your mixer on medium speed for 30 seconds. This restores the smooth, creamy texture you need for decorating.
Freezing is your secret weapon for long term storage. Buttercream can be frozen for weeks without significant texture loss. Store it in an airtight container or even pipe it into portions on a baking tray, freeze them, then transfer to a freezer bag. Freezing should be done in airtight containers to prevent drying or flavour absorption from surrounding foods. After thawing at room temperature, re whip your buttercream to regain smooth consistency. Maximising freshness and shelf life of all your baking supplies, including buttercream, ensures you always have quality ingredients ready.
Never store buttercream in direct sunlight or near heat sources. Temperature fluctuations cause the buttercream to separate or become grainy. Consistency is your friend when storing buttercream properly.
Pro tip: Freeze buttercream in ice cube trays for perfect portioning, then pop out the cubes and store them in a freezer bag, making it easy to thaw exactly the amount you need for small decorating projects.
This table summarises key steps, techniques, and essential considerations for decorating cakes with buttercream, as described in the article.
| Step | Description | Considerations |
|---|---|---|
| Check Buttercream Consistency | Evaluate the texture and stiffness using the toothpick method for optimum decorating performance. | Consistency affects buttercream stability and ease of use, adjusting for environment temperatures is crucial. |
| Mitigate Air Bubbles | Use the tap and smooth method to minimise air bubbles for a polished buttercream finish. | Proper techniques prevent pits and maintain the visual appeal of the cake. |
| Handle Grainy Buttercream | Resolve grainy textures by warming and gentle remixing to dissolve sugar crystals and blend cold butter. | Prevent graininess by using room temperature ingredients and moderate mixing. |
| Fix Split Buttercream | Employ gentle warming and progressive mixing techniques to re-emulsify separated buttercream. | Maintaining consistent ingredient temperatures avoids splitting issues. |
| Optimise Flavours | Add precise quantities of flavourings and zests gradually, and balance sweetness with salt. | Incremental flavouring reduces errors and tailored taste enhances culinary appeal. |
| Tools for Spreading | Use specialised equipment like offset spatulas, bench scrapers, and turntables for professional results. | Quality tools improve spreading efficiency and the overall cake finish. |
| Buttercream Storage | Store at appropriate conditions: room temperature, refrigeration, or freezing based on duration. | Proper storage maintains freshness, preventing textural or flavour degradation. |
Master Buttercream Troubles with The Vanilla Valley
Struggling with common buttercream issues like graininess, splitting, or inconsistent texture can sap the joy from cake decorating. Whether you need to perfect your buttercream consistency, eliminate air bubbles, or achieve smooth spreading, having the right tools and quality ingredients makes all the difference. From professional offset spatulas and turntables to premium flavourings and bulk baking supplies, The Vanilla Valley equips both passionate amateurs and seasoned bakers to conquer every decorative challenge confidently.

Discover our specially curated cake decorating supplies and essential baking accessories at The Vanilla Valley. Bring your creations to life with trusted products, expert guidance, and reliable delivery options that ensure you are ready to tackle any buttercream problem right now. Visit our main store and explore helpful cakespiration articles to elevate your cake decorating skills today.
Frequently Asked Questions
How can I check the consistency of my buttercream before decorating?
To check the consistency of your buttercream, use the toothpick method. Insert a toothpick into the buttercream and pull it up; it should maintain a stiff peak and not droop. If it falls over, your buttercream is too soft, and if it’s lumpy, it’s too stiff. Adjust the mixture as needed before you start decorating.
What should I do if my buttercream has air bubbles?
If your buttercream contains air bubbles, use the tap and smooth technique. Gently tap the cake on your work surface after applying the buttercream to release the bubbles, then smooth the surface with a bench scraper for a flawless finish. Repeat this process until the surface is evenly smooth.
How can I fix grainy buttercream?
To fix grainy buttercream, gently remix it at room temperature on low speed. If it remains grainy, let it sit for 15 to 20 minutes to soften, then mix again. This should help the sugar crystals dissolve, resulting in a smooth, creamy texture ready for decorating.
What should I do if my buttercream splits or curdles?
Fix split or curdled buttercream by placing the bowl over a warm water bath and gently whisking. Add powdered sugar gradually while mixing to help re-emulsify the ingredients. This method typically takes about 3 to 5 minutes and will restore the smooth texture needed for your cake.
How can I enhance the flavour of my buttercream without overpowering it?
Enhance the flavour of your buttercream by adding extracts or citrus zests gradually. Start with a small amount, mix it in completely, and taste before adding more. This careful approach prevents any flavour from becoming too dominant and ensures a balanced, delicious buttercream.
What tools are essential for spreading buttercream smoothly?
Key tools for smoothing buttercream include an offset spatula, a bench scraper, and a turntable. Use the offset spatula for spreading and the bench scraper for creating flat surfaces, while the turntable allows for even application as you rotate the cake. Practising with these tools will significantly improve the quality of your buttercream finish.