
7 Essential Cake Airbrush Techniques for Beginners
Over 60 percent of british cake decorators now use airbrushes to achieve precise and vibrant finishes that look straight out of a professional bakery. The demand for showstopping cakes has fuelled a surge in creative tools and techniques across the United Kingdom. Whether you want flawless ombré gradients or bold three dimensional effects, understanding the essentials of cake airbrushing is the gateway to elevating your baking artistry. This guide brings together expert tips and industry standards to help you get started with confidence.
Table of Contents
- Understanding Cake Airbrush Equipment and Setup
- Choosing the Right Colours and Edible Airbrush Paints
- Basic Blending and Shading Techniques for Cakes
- Using Stencils for Precision Patterns and Designs
- Creating Realistic Illusions and 3D Effects on Cakes
- Tips for Cleaning and Maintaining Your Airbrush
- Troubleshooting Common Cake Airbrushing Problems
Quick Summary
| Key Message | Explanation |
|---|---|
| 1. Invest in quality airbrush equipment | Prioritise precision and reliability by selecting a professional-grade airbrush system for better colour control and application techniques. |
| 2. Choose compatible edible airbrush paints | Opt for water-based colours for beginners and alcohol-based for intense pigmentation, ensuring food safety and compatibility with your airbrush. |
| 3. Master blending and shading techniques | Use two complementary colours and maintain consistent air pressure and distance to create smooth transitions and depth in your designs. |
| 4. Practice stencil application for precision | Use flexible materials for stencils, apply light bursts of colour, and test designs on parchment paper to achieve clean, intricate patterns. |
| 5. Regularly clean your airbrush equipment | Disassemble and clean your airbrush after each use to prevent clogs and ensure consistent spray patterns for all your cake decorations. |
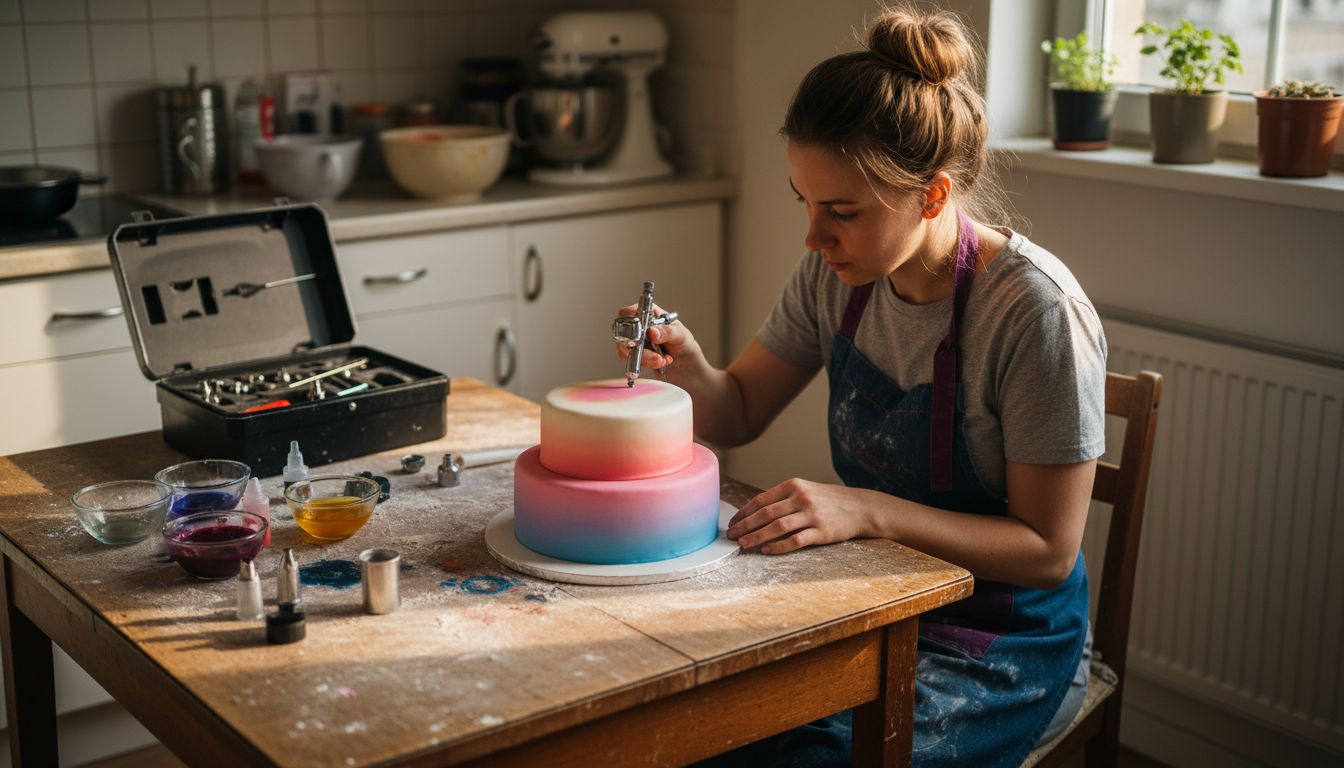
1. Understanding Cake Airbrush Equipment and Setup
Airbrushing is a game changing technique that transforms ordinary cake decorations into professional masterpieces. For beginners, understanding your equipment becomes the crucial first step in mastering this sophisticated art form.
A typical cake airbrush kit consists of several key components that work together to create seamless colour applications. You will need an air compressor, which provides consistent air pressure, an airbrush gun with adjustable nozzles, and specialised food colouring designed for airbrushing. When selecting your equipment, prioritise precision and reliability.
The technical standards from SkillsUSA Florida recommend investing in a professional grade airbrush system with multiple pressure settings. This allows greater control over colour intensity and application techniques.
When setting up your airbrush station, ensure you have a clean, well ventilated workspace with a turntable for easy cake rotation. Cover surrounding surfaces with plastic sheeting to protect from overspray. Practice holding the airbrush at a consistent 15 to 20 centimetre distance from your cake surface for even colour distribution.
Pro Tips for Equipment Setup:
- Choose an airbrush with interchangeable nozzle sizes
- Purchase food grade colours specifically formulated for airbrushing
- Clean your equipment thoroughly after each use to prevent colour contamination
- Start with basic colours and gradually build your palette
Remember that mastering airbrush equipment takes practice. Start with simple techniques and gradually build your confidence and skill level.
2. Choosing the Right Colours and Edible Airbrush Paints
Selecting the perfect colour palette is an art form that can elevate your cake decoration from ordinary to extraordinary. Understanding how to choose and apply edible airbrush paints will transform your cake design approach.
Edible airbrush colours come in various formulations including water based, alcohol based and gel colours. Water based colours work best for beginners as they are more forgiving and easier to blend. Professional bakers often prefer alcohol based colours for their intense pigmentation and faster drying time.
When exploring colour options for cake decorating, consider the following key factors: colour intensity, compatibility with your airbrush system, and food safety standards. Some colours provide metallic finishes while others offer matte or pearl effects.
Essential Colour Selection Tips:
- Start with primary colours that can be mixed to create secondary shades
- Invest in professional grade food colours specifically designed for airbrushing
- Test colours on a small fondant section before applying to the entire cake
- Use titanium free colours for vibrant white based decorations
Metallic finishes can add sophistication to your cake designs. Sweet Sticks Edible Metallic Lustre Dust offers beautiful champagne gold options that create stunning shimmer effects when applied with an airbrush.
Remember that practice and experimentation are key to mastering colour selection and application. Each cake presents a unique canvas for your creative expression.
3. Basic Blending and Shading Techniques for Cakes
Blending and shading transform ordinary cake decorations into extraordinary works of art. These techniques allow you to create depth dimension and visual interest that elevates your cake design from simple to spectacular.
The secret to successful blending lies in understanding airbrush pressure distance and colour gradation. Start by selecting two complementary colours that will create a smooth transition. Professional cake decorating techniques emphasise maintaining consistent air pressure and keeping your airbrush approximately 15 centimetres from the cake surface.
Key Blending Principles:
- Begin with lighter colours as your base
- Gradually introduce darker shades using gentle sweeping motions
- Practice controlling air pressure for subtle colour transitions
- Use a circular motion to create smooth colour gradients
Blending techniques outlined in SkillsUSA Florida’s technical standards recommend starting with monochromatic colour schemes for beginners. This approach helps you understand colour progression without overwhelming your design.
Master the art of movement with your airbrush. Short controlled bursts create more precise results than long continuous sprays. Experiment with different angles and distances to discover how slight adjustments dramatically transform your cake’s appearance.
Remember that practice makes perfect. Each cake is an opportunity to refine your blending skills and develop your unique artistic style.
4. Using Stencils for Precision Patterns and Designs
Stencils represent a remarkable technique for transforming ordinary cake surfaces into extraordinary artistic canvases. These precise templates enable bakers to create intricate designs with professional consistency and stunning visual impact.
Airbrush stencils come in various materials including plastic mylar and food grade acetate. When selecting stencils, prioritise thin flexible materials that allow precise colour application and clean edge definition. Stencilling techniques require careful preparation and strategic application to achieve flawless results.
Essential Stencil Application Tips:
- Clean and dry your stencil thoroughly before each use
- Use repositionable adhesive spray to secure stencils temporarily
- Hold the airbrush perpendicular to the stencil surface
- Apply light gentle bursts of colour from approximately 15 centimetres away
The Cake Institute’s comprehensive tutorial recommends practicing on parchment paper before applying designs directly to cakes. This approach helps you understand colour density and airbrush pressure without risking your final cake decoration.
Experimentation is key to mastering stencil work. Each design presents an opportunity to develop precision and creativity. Start with simple geometric patterns and gradually progress to more complex architectural and floral motifs.
Remember that patience and steady hand control will ultimately determine the quality of your stencilled designs.
5. Creating Realistic Illusions and 3D Effects on Cakes
Making cakes that appear three dimensional or create stunning visual illusions requires mastering advanced airbrush techniques. These methods transform ordinary cake surfaces into extraordinary artistic landscapes that captivate and surprise viewers.
Cake decorating techniques involving realistic illusions demand careful colour gradation and strategic shadowing. Professional decorators understand that depth perception relies on subtle colour transitions and precise airbrush control.
Key Techniques for 3D Illusions:
- Use lighter colours for raised surfaces
- Apply darker shades to create shadow and depth
- Experiment with angular airbrush approaches
- Practice subtle colour blending
Advanced decorating standards from SkillsUSA Florida recommend maintaining consistent air pressure while creating dimensional effects. This approach ensures smooth colour gradients that trick the eye into perceiving depth and texture.
To achieve realistic effects, think like an artist. Consider how light naturally falls on objects and replicate those subtle variations with your airbrush. Shadows and highlights are your primary tools for creating three dimensional impressions.
Remember that creating convincing illusions takes practice. Each cake is an opportunity to refine your technique and push the boundaries of visual perception.
6. Tips for Cleaning and Maintaining Your Airbrush
An airbrush is a precision instrument that requires meticulous care and regular maintenance to ensure optimal performance. Neglecting cleaning procedures can lead to colour contamination, uneven spray patterns and potential equipment failure.
Technical maintenance standards emphasise the importance of systematic cleaning routines for professional cake decorating equipment. Professional bakers understand that a well maintained airbrush is the foundation of consistent and beautiful cake designs.
Essential Cleaning Procedures:
- Disassemble the airbrush after each use
- Use specialised cleaning solutions designed for food equipment
- Rinse thoroughly with warm water
- Dry all components completely before reassembly
- Store in a clean dust free environment
Begin by disconnecting the air hose and removing all removable parts. Soak these components in a gentle cleaning solution specifically formulated for airbrush equipment. Use soft brushes to remove any dried colour residue without scratching delicate surfaces.
Pay special attention to the needle and nozzle areas where colour can easily accumulate. A blocked nozzle can completely disrupt your ability to create smooth colour gradients. Regular maintenance prevents unexpected technical issues during cake decorating projects.
Remember that cleaning is not just about functionality it is about preserving the quality and precision of your artistic tools.
7. Troubleshooting Common Cake Airbrushing Problems
Even experienced cake decorators encounter challenges when airbrushing. Understanding how to diagnose and resolve common issues will help you maintain professional quality and prevent frustrating decorating moments.
Technical standards for professional cake decorating highlight the importance of systematic problem solving when working with airbrush equipment. Recognising potential problems early can save your cake design and prevent wastage.
Typical Airbrushing Challenges:
- Uneven colour distribution
- Splattering or inconsistent spray patterns
- Colour clogging in the airbrush nozzle
- Unexpected colour bleeding
If you experience inconsistent spray patterns, first check your air pressure and distance from the cake surface. Maintain a steady 15 centimetre distance and use gentle sweeping motions. Colour splattering often occurs when the airbrush is held too close or air pressure is too high.
Nozzle blockages can be resolved by thoroughly cleaning your equipment after each use. Use specialised cleaning solutions and soft brushes to remove dried colour residue. Always test your airbrush on a piece of parchment paper before applying colour to your cake to ensure smooth operation.
Remember that troubleshooting is part of the learning process. Each challenge is an opportunity to refine your technique and become a more skilled cake decorator.
Below is a comprehensive table summarising the key elements, techniques, and maintenance tips for cake airbrushing discussed throughout the article.
| Topic | Description | Key Considerations |
|---|---|---|
| Equipment Setup | Includes air compressor, adjustable nozzle airbrush gun, and specialised food colouring. | Select precision and reliable equipment for best results. Ensure a clean, ventilated workspace. |
| Colour Selection | Edible colours include water, alcohol, and gel based types. | Start with primary colours, test on small fondant sections, and choose professional grade options. |
| Blending Techniques | Create depth with colour transitions using consistent air pressure and sweeping motions. | Start with light colours, gradually add darker shades, and utilise a circular motion for smooth gradients. |
| Stencil Usage | Enables creation of intricate designs with professional consistency. | Secure stencils with adhesive spray, apply colour perpendicularly, and practice on parchment paper. |
| 3D Effects | Achieving depth and dimension through colour gradation and strategic shadowing. | Use light for raised surfaces and darker shades for shadow. Experiment with airbrush angles. |
| Maintenance | Essential for equipment performance: systematic cleaning routines and proper storage. | Disassemble, clean with food-safe solutions, rinse, dry, and store dust-free. Clean nozzle thoroughly to avoid clogging. |
| Troubleshooting | Address common issues such as uneven colour and nozzle blockages. | Maintain correct air pressure and distance, clean equipment regularly, and test before applying to cake. |
Elevate Your Cake Airbrushing Skills with Premium Supplies from The Vanilla Valley
Mastering the seven essential cake airbrush techniques for beginners requires not only practice but the right tools that deliver precision and reliability. Whether you are perfecting your blending and shading skills, handling intricate stencilling, or creating three dimensional illusions, having high quality airbrush colours, food safe materials, and professional equipment at your fingertips is key to turning your creative vision into reality. Don’t let uneven spray patterns or clogged nozzles disrupt your artistry when you can rely on products trusted by bakers nationwide.

Discover a wide range of carefully curated cake decorating supplies including specialised food colours designed for airbrushing, reliable airbrush kits, and essential accessories by visiting The Vanilla Valley. Benefit from our long standing experience since 2009, enjoy free and next day delivery options, and join our loyalty club to get exclusive offers. Take the next step in your cake decorating journey with confidence knowing you have expert support and premium products at hand. Start elevating your cakes today by browsing our collection here at The Vanilla Valley.
Frequently Asked Questions
What are the basic components needed for cake airbrushing?
To start airbrushing cakes, you will need an air compressor, an airbrush gun with adjustable nozzles, and edible food colouring designed for airbrush use. Assemble these components to create an effective airbrush setup for your cake decorating projects.
How can I choose the right colours for airbrushing on cakes?
Select colours based on their intensity, compatibility with your airbrush system, and food safety standards. Test your chosen colours on a small piece of fondant to ensure you achieve the desired shades before applying them to the entire cake.
What techniques can I use for blending and shading on cakes?
Begin with lighter colours as your base and gradually introduce darker shades using gentle sweeping motions from the airbrush. Focus on keeping the airbrush at a consistent distance and practice controlling the air pressure for seamless colour transitions and smooth gradients.
How do I use stencils effectively when airbrushing cakes?
Clean and dry your stencils thoroughly before each use, and secure them temporarily with repositionable adhesive spray. Hold your airbrush perpendicular to the stencil and apply light bursts of colour from approximately 15 centimetres away for clean edges and precise designs.
What should I do if my airbrush is clogging or producing uneven spray patterns?
First, check the air pressure and ensure you are maintaining the correct distance from the cake surface. If issues persist, thoroughly clean the airbrush components using a gentle cleaning solution, focusing on the needle and nozzle areas to prevent blockages and achieve consistent results.
How can I maintain my airbrush equipment for optimal performance?
Disassemble your airbrush after each use and rinse all components with warm water, using specialised cleaning solutions when necessary. Ensure to dry all parts completely before reassembling and store them in a clean, dust-free environment to protect your equipment.