
7 Essential Choclate Melting Tips for Perfect Results
Watching chocolate turn lumpy or burn as you try to melt it can quickly ruin your cake decorating plans. Many home bakers in South Wales struggle with chocolate that seizes, loses its shine, or simply refuses to melt evenly. You want that flawless, glossy chocolate for drizzling, dipping, or coating your cakes, but getting it right often feels unpredictable.
The good news is, there are proven techniques and smart choices that will give you smooth, professional results every time. By understanding steps like choosing the right couverture chocolate, chopping uniformly, and melting gently, you can avoid sticky disasters and achieve perfect chocolate with ease.
Get ready to discover the practical steps that professional chocolatiers trust when melting chocolate for cakes. Each method is clear and doable at home, so your next creation can look and taste spectacular.
Table of Contents
- 1. Choose The Right Chocolate For Melting Success
- 2. Chop Chocolate Evenly For Consistent Results
- 3. Melt Chocolate Gently Using A Bain-Marie
- 4. Master Microwave Melting Without Burning
- 5. Stir Often And Avoid Water Contact
- 6. Test Texture For Smoothness And Gloss
- 7. Store Melted Chocolate Properly For Reuse
Quick Summary
| Takeaway | Explanation |
|---|---|
| 1. Use Couverture Chocolate for Melting | Couverture chocolate melts smoother and offers a better finish due to high cocoa butter content, making it ideal for baking projects. |
| 2. Chop Chocolate into Uniform Pieces | Evenly chopped chocolate melts at the same rate, preventing burnt spots and ensuring a smooth consistency for dipping or decorating. |
| 3. Employ a Bain-Marie for Gentle Melting | A bain-marie protects chocolate from direct heat, ensuring uniform melting and reducing the risk of burning or seizing. |
| 4. Stir Regularly to Distribute Heat | Frequent stirring ensures even temperature and prevents hot spots that can scorch the chocolate, maintaining its smooth texture. |
| 5. Store Leftover Melted Chocolate Properly | To reuse melted chocolate, cool it, break it, and store in an airtight container to prevent moisture and loss of quality. |
1. Choose the Right Choclate for Melting Success
The chocolate you select makes all the difference between a silky, professional finish and a grainy, disappointing result. Not all chocolate melts the same way, and understanding what to look for will transform your cake decorating projects from amateur to impressive.
The best choice for melting is couverture chocolate. This premium chocolate contains a higher percentage of cocoa butter and cocoa solids than regular baking chocolate, which means it melts more smoothly and has a much thinner viscosity when liquefied. Think of it this way: standard chocolate can be thick and clumpy when heated, whereas couverture flows like silk. This matters tremendously when you’re dipping cake tiers, creating chocolate ganache, or coating your baked creations. Professionals favour couverture chocolate because it delivers both that satisfying glossy finish and intense chocolate flavour that makes your work stand out.
When shopping for melting chocolate, look for products that specifically mention high cocoa butter content on the packaging. This is your quality indicator. Brands like Callebaut and Belcolade are ranked highly for their consistent melting performance and are trusted by UK bakers for this reason. You’ll notice these chocolates melt uniformly without requiring constant stirring, and they achieve a smooth texture that clings beautifully to your designs. If you’re creating ganache, dipping fondant-covered cakes, or working on chocolate decorations, these are your safest bets.
For amateur bakers in South Wales looking to level up your game, couverture chocolate’s cocoa butter content directly impacts how well your final product sets and shines. Standard chocolate often contains vegetable oil or other additives instead of pure cocoa butter, which means it doesn’t set with that professional sheen you’re after. The investment in better chocolate pays off immediately in your results.
Consider the cocoa percentage as well. Darker chocolate (70% cocoa and above) requires lower melting temperatures and actually flows better than milk chocolate. If you’re new to chocolate work, milk chocolate (around 30 to 40% cocoa) is more forgiving during the heating process, though it doesn’t deliver quite the same intensity of flavour. White chocolate is the trickiest of all because it burns easily, so it demands more careful temperature control.
One practical consideration for home bakers: avoid bargain chocolate from pound shops or supermarket baking aisles unless you’re practising. These products often contain cocoa butter substitutes designed to be shelf stable rather than to melt beautifully. Save those for chocolate-chip baking where quality matters less. When you’re creating something you want to be proud of, the chocolate itself should be your first investment.
Pro tip: Store your couverture chocolate in a cool, dry place (around 15 to 17 degrees Celsius) before melting, as chocolate that’s already warm will melt unevenly and can seize up during the process.
2. Chop Choclate Evenly for Consistent Results
This step might seem simple, but it’s where many home bakers lose control of their melting process. The way you chop your chocolate directly impacts how quickly and evenly it melts, which affects everything from texture to flavour in your final creation.
When chocolate pieces are different sizes, the smaller chunks melt long before the larger ones. This creates a situation where you’re either stirring constantly to break up lumps or risking scorched, overheated chocolate whilst waiting for everything to catch up. Uniform pieces melt simultaneously, which means smoother melting, better temperature control, and less risk of your chocolate becoming grainy or seized. Think of it like cooking a stew, where evenly sized vegetables cook at the same rate rather than some being overdone whilst others remain hard.
Start with a sharp, steady knife. A serrated knife works particularly well because it grips the chocolate rather than sliding across it. Hold the chocolate bar firmly on a clean cutting board and use steady, controlled pressure. Aim for pieces roughly the size of a small pea or chickpea. Professional chocolatiers understand that uniform chunks melt quicker and more evenly than irregular fragments. If you find yourself chopping chocolate frequently for your baking projects, consider investing in chocolate drops or wafers instead. Many professionals prefer these because they arrive pre portioned, eliminating this step entirely and guaranteeing consistency.
The size matters more than perfection. You don’t need every piece to be identical, but aim for roughly the same dimensions across your batch. Smaller pieces are actually better than larger ones if you can’t achieve perfect uniformity. A piece the size of a pea melts far faster than a chunk the size of your thumbnail, so erring on the smaller side gives you more control during the heating phase.
Why does this make such a difference? Chocolate is sensitive to temperature. When you have uniform pieces, you can heat them to your target temperature more predictably. Larger pieces hide heat inside them, meaning the outside can scorch whilst the inside is still cold. Smaller, uniform chunks mean there’s less distance for heat to travel, so everything reaches the target temperature at nearly the same moment.
For cake decorating in South Wales where humidity can sometimes be a challenge, uniform chopping becomes even more important. Smaller pieces mean less exposure time to air during melting, which helps prevent moisture absorption that can cause graining and that annoying chalky texture. Every second your chocolate sits as a liquid waiting for all pieces to melt is a second it’s vulnerable to temperature and humidity changes.
Professional tip: Chill your knife slightly under cold running water before chopping, then dry it completely, as this helps the blade glide through chocolate more smoothly and reduces melting from friction.
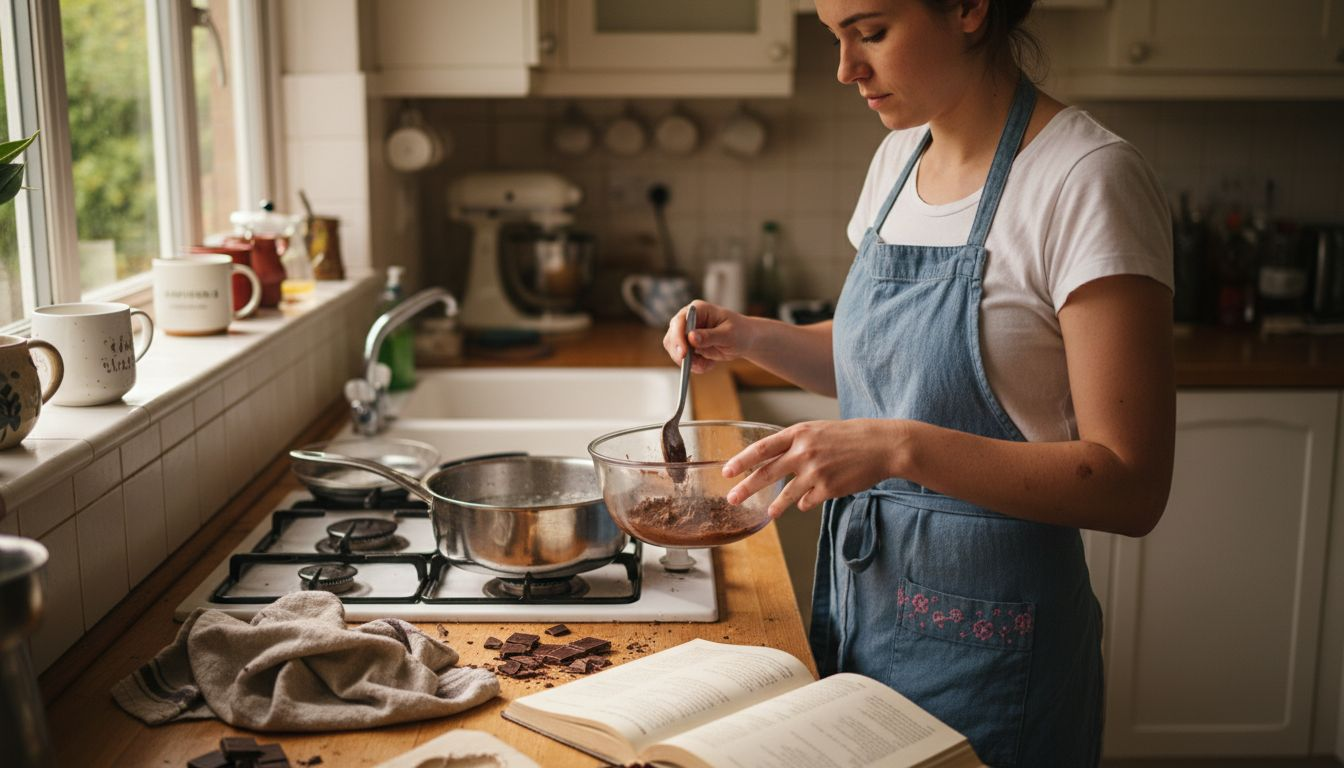
3. Melt Choclate Gently Using a Bain-Marie
The bain-marie (or water bath) is your best friend when melting chocolate. This simple setup gives you precise control over temperature and prevents the burnt, grainy mess that happens when chocolate contacts direct heat.
A bain-marie works by creating a barrier of indirect heat between your chocolate and the heat source. You fill a saucepan with water and bring it to a gentle simmer. Then you place a glass or heatproof bowl on top of the saucepan, making sure the bottom of the bowl doesn’t touch the water. Your chocolate goes in this elevated bowl, where it melts slowly and evenly from the steam rising beneath it. The beauty of this method is that water boils at 100 degrees Celsius, so your chocolate never gets hotter than that, even if you’re not paying close attention.
Why does this matter so much? Chocolate is sensitive. Direct heat on the base of a pan can quickly push chocolate past its melting point into scorching territory. Once chocolate burns, it’s ruined. The flavour becomes bitter and harsh, and the texture becomes grainy and unpleasant. With a bain-marie, you’re working with gentle, consistent heat that allows the chocolate to melt smoothly without stress. Professional chocolatiers favour this method because controlled indirect heat prevents burning and seizing, which are the two biggest disasters in chocolate work.
Here’s how to set it up properly. Use a saucepan you don’t mind tying up for a bit, and fill it about one third with water. Bring the water to a gentle simmer, not a rolling boil. The steam from gently simmering water provides consistent heat without aggressive bubbling that could splash moisture into your chocolate. Place your heatproof bowl on top, making absolutely certain it doesn’t touch the water below. Even a tiny bit of water contaminating your chocolate will cause it to seize and become thick and lumpy. If this happens, try whisking in a small amount of coconut oil or vegetable oil, though prevention is definitely better.
Once your chocolate starts melting, stir it gently and continuously. This ensures even heat distribution and helps you catch the moment when it’s perfectly melted rather than overcooked. You’re looking for a smooth, glossy consistency without any lumps remaining. The whole process usually takes between 3 to 5 minutes, depending on how much chocolate you’re melting.
For cake decorators in South Wales working on special projects, this method is particularly reliable during humid weather. The steam from the water bath creates a stable microclimate around your chocolate, protecting it from absorbing excess moisture that could affect texture and shine. If you’re preparing chocolate for dipping, drizzling, or creating decorations, a bain-marie keeps your chocolate in the ideal working state for far longer than direct heat would.
The only real downside is that you’ll need to be patient and present whilst your chocolate melts. You can’t simply turn on a microwave and walk away. But that patience pays off in the quality of your results. Your chocolate will be silky, workable, and ready for whatever creative project you have planned.
Professional tip: Keep a clean, dry tea towel nearby and wipe the bottom of your bowl before lifting it off the saucepan to prevent any stray water droplets from dripping into your melted chocolate.
4. Master Microwave Melting Without Burning
Not everyone has time to fuss with a bain-marie, and that’s perfectly fine. The microwave offers a quick, convenient alternative if you know the right technique. The key is understanding that microwave power and timing are everything when it comes to chocolate.
Microwave melting works because the microwave heats your chocolate from the inside out, but it does so aggressively if you’re not careful. Many home bakers make the mistake of using full power and leaving the chocolate unattended, which results in overheated, burnt, unusable chocolate. The solution is surprisingly simple: low power and frequent interruptions. You’re going to heat your chocolate in short bursts of just 20 to 30 seconds, stirring thoroughly between each burst. This constant interruption allows you to catch the chocolate at precisely the right moment before it overheats.
Start by placing your finely chopped chocolate into a microwave safe, completely dry bowl. Any moisture at all will cause your chocolate to seize. Set your microwave to 50 percent power (or low power setting if your microwave doesn’t have percentage controls). Microwave for 20 to 30 seconds, then remove the bowl and stir vigorously. You’ll notice that even though only part of the chocolate appears melted, your stirring will melt the remaining pieces through residual heat. Pop it back in for another 20 to 30 seconds if needed. Repeat until your chocolate reaches that silky, smooth consistency you’re after. The entire process usually takes between 1 to 3 minutes depending on the quantity.
Why does this work so much better than full power? Heating chocolate at low power in short bursts prevents burning and maintains smooth texture rather than creating grainy, ruined chocolate. Low power gives the heat time to distribute evenly throughout the bowl rather than creating scorching hot spots at the base. Your frequent stirring also prevents the chocolate from sitting at dangerously high temperatures for too long.
The critical rule is this: keep everything dry. Your bowl must be completely dry. Your spoon must be dry. Even the tiniest drop of water will cause your chocolate to seize into a thick, lumpy mass that won’t flow properly for decorating or dipping. If you accidentally splash water into your chocolate, resist the urge to panic. You can sometimes salvage it by whisking in a small amount of coconut oil, but prevention is genuinely easier than recovery.
For hobbyists in South Wales working on weeknight cake projects, microwave melting is realistic and fast. You can melt chocolate in minutes and move straight to your decorating work without cooling down a bain-marie or waiting for temperature adjustments. Just remember that this speed comes with the responsibility of staying alert and checking your chocolate regularly. Never leave melting chocolate unattended in the microwave, even for a moment.
One unexpected benefit is that microwave melting works brilliantly for small quantities. If you only need to melt 100 grams of chocolate for a quick project, setting up a bain-marie feels like overkill. The microwave method scales perfectly for tiny jobs where you’re just adding finishing touches to your creations.
Professional tip: Use a microwave-safe ceramic or glass bowl rather than plastic, as plastic can sometimes impart flavour to your chocolate and may warp under heat.
5. Stir Often and Avoid Water Contact
This tip might sound obvious, but it’s where most chocolate melting disasters happen. Stirring and keeping water away from your chocolate are two of the most important things you can control during the melting process.
Why stirring matters so much becomes clear once you understand what heat does to chocolate. When you apply heat to chocolate without stirring, the chocolate touching the bottom and sides of your container heats faster than the chocolate in the middle. This creates hot spots where the chocolate burns whilst the rest remains unmelted. Regular stirring moves the cooler chocolate from the middle towards the heat source and brings the hotter chocolate away from direct contact, distributing temperature evenly throughout. This simple action prevents those burnt, bitter flavours from developing and keeps your chocolate smooth and glossy.
Think of stirring as your insurance policy against melting disasters. Every time you stir, you’re essentially resetting the heating process slightly. The cooler chocolate you’ve just mixed in absorbs some of the heat from the already-warm chocolate, preventing any single part from getting too hot. Consistent stirring distributes heat evenly and avoids hot spots that could burn your chocolate, so you should never leave melting chocolate unattended without regular stirring.
Now, the water issue. This is where people get into real trouble. Chocolate and water are enemies. Even a tiny amount of moisture will cause your chocolate to seize, transforming it from a smooth liquid into a thick, grainy paste that won’t flow properly for dipping or decorating. You might be wondering how this happens. Chocolate contains cocoa solids and cocoa butter, and when water is introduced, it causes these components to clump together rather than stay suspended smoothly. Once seizing happens, your chocolate is usually beyond saving.
Protecting your chocolate from water means being deliberate about your setup. Use a completely dry bowl. If you’ve just washed it, dry it thoroughly with a clean tea towel and make sure no moisture remains on the inside or outside. Use a dry spoon or spatula for stirring. If you’re using a bain-marie, ensure the bottom of your bowl doesn’t touch the water beneath it. Even steam can cause problems, so if your bain-marie is producing aggressive steam, turn down the heat slightly to create a gentler steam environment.
For cake decorators in South Wales, humidity from the weather adds an extra consideration. On particularly damp days, be extra cautious about moisture. Make sure your workspace is as dry as possible. If you’re melting chocolate and then letting it sit before using it, cover it loosely to prevent condensation from dripping into your melted chocolate. Some bakers even keep a small fan running to help maintain dry air around their work area.
The moisture problem extends to your ingredients too. If your fondant or other decorative elements are damp, don’t immediately dip them into melted chocolate. Let them come to room temperature and dry slightly first. Bringing cold, damp items into contact with hot chocolate is a recipe for seizing and failure.
One more thing to consider is your hands. If your fingers are wet or damp, you could accidentally introduce moisture whilst stirring. It sounds finicky, but these small details separate successful chocolate work from frustrating failures. Keep your workspace clean, dry, and organised before you even start melting.
Professional tip: Use a wooden spoon or silicone spatula for stirring rather than metal, as metal conducts heat differently and can sometimes create microscopic temperature variations that affect chocolate texture.
6. Test Texture for Smoothness and Gloss
You’ve melted your chocolate carefully, stirred it regularly, and kept it away from water. Now comes the moment of truth: testing whether your chocolate is actually ready to use. Learning to recognise perfectly melted chocolate by sight and feel is a skill that separates amateur results from professional ones.
Perfectly melted chocolate has two unmistakable characteristics. It looks glossy and shiny, almost liquid silk. It feels smooth when you run your spoon through it, with absolutely no lumps, grittiness, or grainy texture. If your chocolate meets both these criteria, you’re ready to work with it. If it’s dull or has a chalky appearance, it’s been overheated. If it’s lumpy or textured, either you haven’t melted it fully or water has contaminated it.
The glossy appearance matters more than you might think. Gloss indicates that the cocoa butter in your chocolate is properly melted and distributed throughout. When chocolate lacks gloss and looks more matte or dull, it means the cocoa butter hasn’t fully incorporated, which will cause problems when you try to use it for dipping or decorating. Your finished cake will look flat and unappetising rather than professional and enticing.
To test your chocolate properly, lift your spoon or spatula out of the melted chocolate and observe how it flows back into the bowl. Quality, properly melted chocolate flows smoothly and quickly, almost like honey. It should cover your spoon evenly with a thin, glossy coating. If the chocolate is too thick and clumpy, it needs more gentle heating. If it’s too thin and watery, you’ve likely added something to it or overheated it significantly.
Run your spoon across the surface of your melted chocolate. Smooth, glossy chocolate without lumps indicates successful melting, so if you see any grainy texture or feel any resistance as your spoon moves through, your chocolate needs attention. Sometimes you can solve this by continuing to stir gently, allowing residual heat to finish the job. Other times you might need to apply a tiny bit more gentle heat.
A pro tip that many home bakers don’t know is that you can actually stop heating your chocolate just before it’s completely melted. The residual warmth in your bowl will finish melting the remaining pieces whilst you stir, and this actually produces smoother, glossier chocolate than heating it to full liquidity. It’s a subtle technique, but it makes a real difference in your final results.
Colour can also tell you something about your chocolate’s state. Dark chocolate should look uniformly dark and rich. Milk chocolate should appear evenly light brown. If you see any variation in colour or streaking, it might indicate uneven heating or the beginning stages of overheating. White chocolate should look smooth and creamy white, never yellowed or spotty.
For cake decorators in South Wales working on special occasion pieces, testing your chocolate before using it prevents disasters. There’s nothing worse than dipping your fondant-covered cake into chocolate only to discover it’s too grainy to set properly or too thick to create that beautiful, thin coating. Taking thirty seconds to test before committing your work saves you from heartbreak.
Trust your instincts. After you’ve done this a few times, you’ll develop an intuitive sense for when chocolate is ready. You’ll know by looking at it, by how it feels on your spoon, by how it moves. This confidence comes from paying attention to these small details each time you melt chocolate.
Professional tip: Dip the tip of a clean, dry knife into your melted chocolate and let it set for a few seconds, then examine how it sets; properly melted chocolate will set with a smooth, glossy finish and a slight snap, whereas overheated chocolate will set dull and brittle.
7. Store Melted Choclate Properly for Reuse
Waste is the enemy of any budding baker’s budget, and chocolate is too expensive to throw away. Learning how to store leftover melted chocolate means you can use it again for future projects without compromising quality or safety.
The key to successful storage is understanding that melted chocolate is vulnerable. Once it’s liquid, it’s exposed to air, moisture, and temperature fluctuations. Your job is to minimise these threats by creating the right storage environment. The process starts immediately after you’ve finished using your chocolate. Don’t let it sit in its melted state for extended periods. Instead, pour any leftover melted chocolate onto parchment paper and let it cool to room temperature naturally. Once it’s solid again, break it into manageable pieces and transfer it to an airtight container.
Temperature and environment matter enormously. Store your chocolate in a cool, dry place away from direct sunlight. A pantry or cupboard works brilliantly. Avoid storing melted chocolate in the fridge unless you need it to harden quickly for immediate use. Refrigeration can cause condensation to form inside your container, and when that moisture contacts your chocolate, you’ll end up with that grainy, seized texture you worked so hard to avoid. The pantry is genuinely your best friend here. A cool, dark space at around 15 to 17 degrees Celsius is absolutely ideal for chocolate storage.
Your container choice matters too. Airtight containers are non negotiable. Glass containers with rubber seals work beautifully. Plastic containers work fine as long as they seal properly and don’t impart flavour to your chocolate. Never store melted chocolate in containers that have been used for strongly scented foods, as chocolate absorbs aromas easily. Avoid containers that have trapped moisture inside them.
How long can you keep stored chocolate? Properly stored melted chocolate stays good for several weeks, sometimes even months, depending on your storage conditions. Quality couverture chocolate lasts longer than cheaper alternatives because of its higher cocoa butter content. Just use your common sense: if your chocolate smells off or looks discoloured, don’t use it.
When you’re ready to reuse your stored chocolate, carefully reheat it in short bursts on low power to avoid the same problems you avoided the first time you melted it. Break your stored chocolate into small pieces first. Use your microwave at low power in 20 to 30 second intervals, stirring thoroughly between each burst. Alternatively, use your reliable bain-marie method. The key is to reheat slowly and gently, never rushing the process. Rapid reheating can cause your chocolate to seize or become grainy again.
For amateur bakers in South Wales managing a busy baking schedule, this storage technique is invaluable. You might melt a large batch of chocolate on one day for a special project, use what you need, and store the rest for your next cake decorating session. This saves you time and money. Rather than buying fresh chocolate every time you bake, you’re maximising your investment by reusing carefully stored chocolate.
One consideration for reheating is that your chocolate might have absorbed slight flavours or impurities whilst sitting in storage. This is rare if your container was truly airtight, but it’s worth being aware of. If your stored chocolate smells or looks unusual when you open the container, it’s better to be cautious and start fresh.
Professional tip: Label your stored chocolate container with the date and type of chocolate using masking tape, so you can easily track how long it has been stored and whether you can reuse it with confidence.
Below is a comprehensive table summarising the key points and techniques discussed in the article for achieving success in melting chocolate for culinary applications.
| Topic | Description | Key Considerations |
|---|---|---|
| Choosing Chocolate | Optimal chocolate for melting can enhance results; couverture chocolate is recommended for its high cocoa butter content. | Select products with high cocoa butter and cocoa solids, and avoid chocolates with additives or oils. |
| Chopping Techniques | Uniform chopping of chocolate ensures consistent melting. | Use a serrated knife for controlled chopping and aim for pea-sized pieces for optimal results. |
| Bain-Marie Method | Employs indirect heat to melt chocolate gently. | Prevent contact with steam, stir continuously, and maintain temperature control for a smooth texture. |
| Microwave Method | Provides a quick, convenient option for melting chocolate. | Use low power and short intervals while stirring frequently to avoid overheating and graininess. |
| Avoiding Water Contact | Water contamination causes chocolate to seize during the melting process. | Ensure all tools and surfaces are completely dry, and prevent water or steam exposure. |
| Testing Melted Chocolate | Verify chocolate’s readiness by observing its gloss and texture. | Properly melted chocolate is smooth, shiny, and flows consistently without clumps or gritty appearance. |
| Storage for Reuse | Leftover melted chocolate can be stored for continued use. | Allow chocolate to solidify before storing in an airtight container in a dry, cool place. |
This table captures the essential guidance and insights provided in the article for handling and preparing chocolate effectively.
Elevate Your Chocolate Melting Experience with The Vanilla Valley
Struggling with uneven melting or seeking that perfect glossy finish you read about in the “7 Essential Chocolate Melting Tips for Perfect Results” article? Achieving smooth, beautifully melted chocolate starts with having the right tools and supplies at your fingertips. Whether you need high-quality couverture chocolate, precise baking accessories, or reliable decorating essentials, The Vanilla Valley caters to every baker aiming for professional results. Don’t let incorrect equipment or subpar ingredients stand between you and flawless cake decoration.

Explore our trusted range of cake decorating supplies and baking accessories that will help you master temperature control, uniform chopping, and moisture-free stirring. Join countless bakers across the UK who rely on our expertly curated products and enjoy benefits like free delivery and a customer loyalty club. Act now to take your chocolate creations to the next level and transform your baking into art with The Vanilla Valley. Discover more and shop today at The Vanilla Valley online store and find inspiration in our cakespiration articles designed to boost your decorating skills.
Frequently Asked Questions
What type of chocolate is best for melting?
The best type of chocolate for melting is couverture chocolate, as it has a higher cocoa butter content that ensures a smooth and glossy finish. Choose couverture chocolate specifically for projects like ganache or dipping to achieve professional results.
How do I chop chocolate evenly for consistent melting?
To chop chocolate evenly, use a sharp knife to create pieces that are roughly the size of a small pea. Aim for uniformity in size to ensure that all pieces melt simultaneously, which helps achieve a smooth consistency without lumps.
What technique should I use to melt chocolate without burning it?
The bain-marie method is ideal for melting chocolate without burning, as it uses indirect heat to gently melt the chocolate. Set up a saucepan with simmering water and place a heatproof bowl on top to keep the chocolate at a controlled temperature.
How can I melt chocolate quickly in the microwave without ruining it?
To melt chocolate in the microwave without ruining it, set your microwave to low power and heat in short bursts of 20 to 30 seconds, stirring in between. This prevents overheating and scorching, and typically takes 1 to 3 minutes for optimal results.
How should I store leftover melted chocolate for future use?
Store any leftover melted chocolate in an airtight container at room temperature, away from direct sunlight. Ensure it cools to room temperature before transferring to the container, which can keep it good for several weeks.
How can I tell when my melted chocolate is ready for use?
Melted chocolate is ready when it looks glossy and smooth, with no lumps or grainy texture. Test its consistency by dipping a spoon; it should flow easily and evenly without being too thick or clumpy.
Recommended
- How to Make Tempered Chocolate with Goldings Chocolate - The Vanilla Valley
- Baking with Chocolate - The Vanilla Valley
- Types of Ganache: Choosing the Right Chocolate - The Vanilla Valley
- How to Flavour Ganache Naturally With Goldings Chocolate - The Vanilla Valley
- 7 Essential Professional Espresso Tips for Perfect Extraction