
How to tell when your cake is perfectly baked
TL;DR:
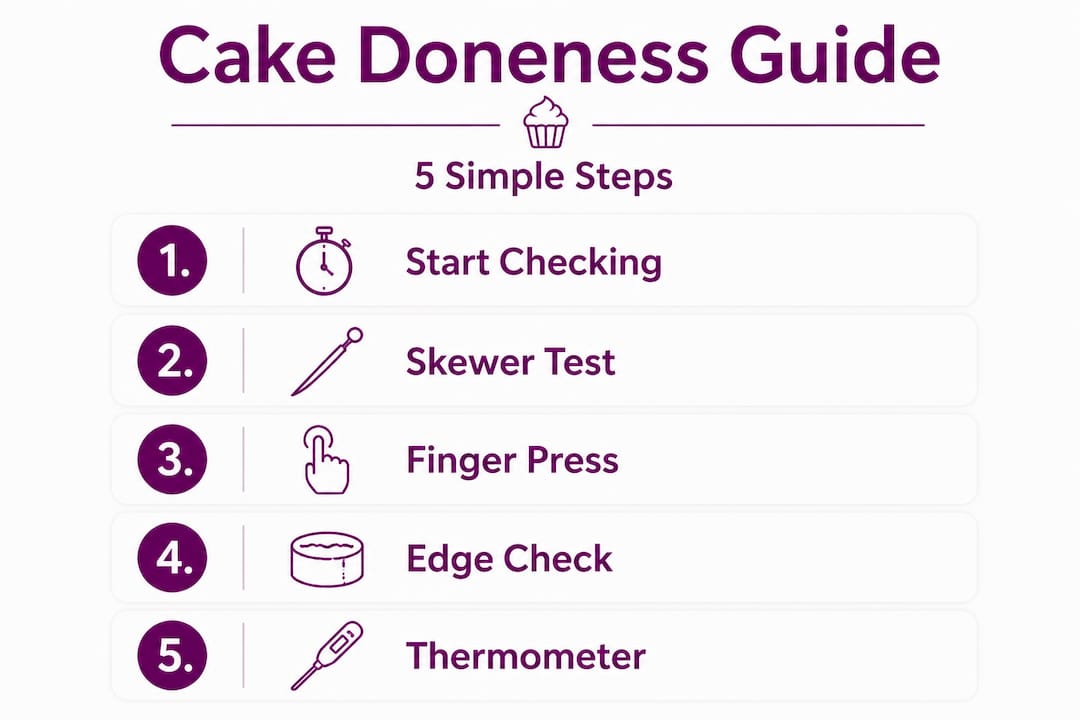
- Proper doneness tests include toothpick moist crumbs, finger springback, visual edges, and internal temperature.
- Avoid overbaking by pulling cake slightly early, as residual heat finishes baking during cooling.
- Using multiple cues and keeping a bake journal builds instinct and confidence for perfect cakes.
You’ve followed the recipe to the letter, your kitchen smells incredible, and you pull the cake from the oven feeling quietly confident. Then you cut into it and find a gooey, undercooked centre. Or worse, you waited a little too long and the whole thing is dry and crumbly before it even reaches the plate. Sound familiar? You’re not alone. Knowing exactly when a cake is done is one of the trickiest skills in baking, and getting it right consistently is what separates a good bake from a great one. This guide walks you through every reliable method, step by step, so you can bake with confidence every single time.
Table of Contents
- Essential tools and techniques for testing cake doneness
- Step-by-step guide: how to test if your cake is fully baked
- Troubleshooting common mistakes and edge cases
- What to expect after baking: cooling, carryover and final touches
- Why most amateur bakers overbake and how to trust your senses
- Get perfect cakes every time with expert supplies and support
- Frequently asked questions
Key Takeaways
| Point | Details |
|---|---|
| Test before recipe time | Check your cake 3–5 minutes before the recommended bake time to prevent overbaking. |
| Moist crumbs are ideal | Look for moist crumbs on your skewer or toothpick, not a clean tester, to avoid dry cakes. |
| Carryover cooking matters | Remove cakes just shy of fully done to let residual heat finish baking without losing moisture. |
| Use thermometer for precision | An instant-read thermometer gives reliable doneness for consistent results, especially with tricky bakes. |
| Cool properly for texture | Let cakes rest in the pan before turning out to preserve moisture and firmness. |
Essential tools and techniques for testing cake doneness
With the problem established, let’s look at what you’ll need to confidently check a cake’s doneness. The good news is that you don’t need a kitchen full of gadgets. A few well-chosen tools and a solid understanding of what to look and feel for will get you there.
The toothpick/skewer test and more are the primary methods most bakers rely on, and for good reason. They’re quick, low-cost, and effective when used correctly. The key methods include:
- Toothpick or skewer test: Insert into the centre of the cake. You’re looking for a few moist crumbs clinging to it, not a completely clean pick.
- Finger press test: Gently press the top of the cake. It should spring back immediately when the cake is done.
- Visual cues: Look at the edges. A fully baked cake will begin to pull away slightly from the sides of the tin.
- Internal temperature: Using an instant-read thermometer is the most precise method. Most cakes are done between 200°F and 210°F (roughly 93°C to 99°C).
Making sure your oven is doing its job is just as important as testing. If you’re not already across the basics, reading about oven preheating basics will help you rule out temperature as a cause of uneven results. And if your cakes are rising unevenly, exploring even cake baking methods is a great next step.
Here’s a quick comparison of each testing method so you can decide which suits you best:
| Method | Ease of use | Accuracy | Best for |
|---|---|---|---|
| Toothpick/skewer | Very easy | Good | Everyday baking |
| Finger press | Easy | Moderate | Sponges and light cakes |
| Visual cues | Easy | Moderate | All cakes, as a support check |
| Instant-read thermometer | Moderate | Excellent | All cake types, especially beginners |
A thermometer is genuinely worth having in your baking kit. It removes all the guesswork, and for bakers just starting out, that extra certainty is absolutely brilliant.
Step-by-step guide: how to test if your cake is fully baked
Once you have your tools, here’s exactly how to use them step by step.
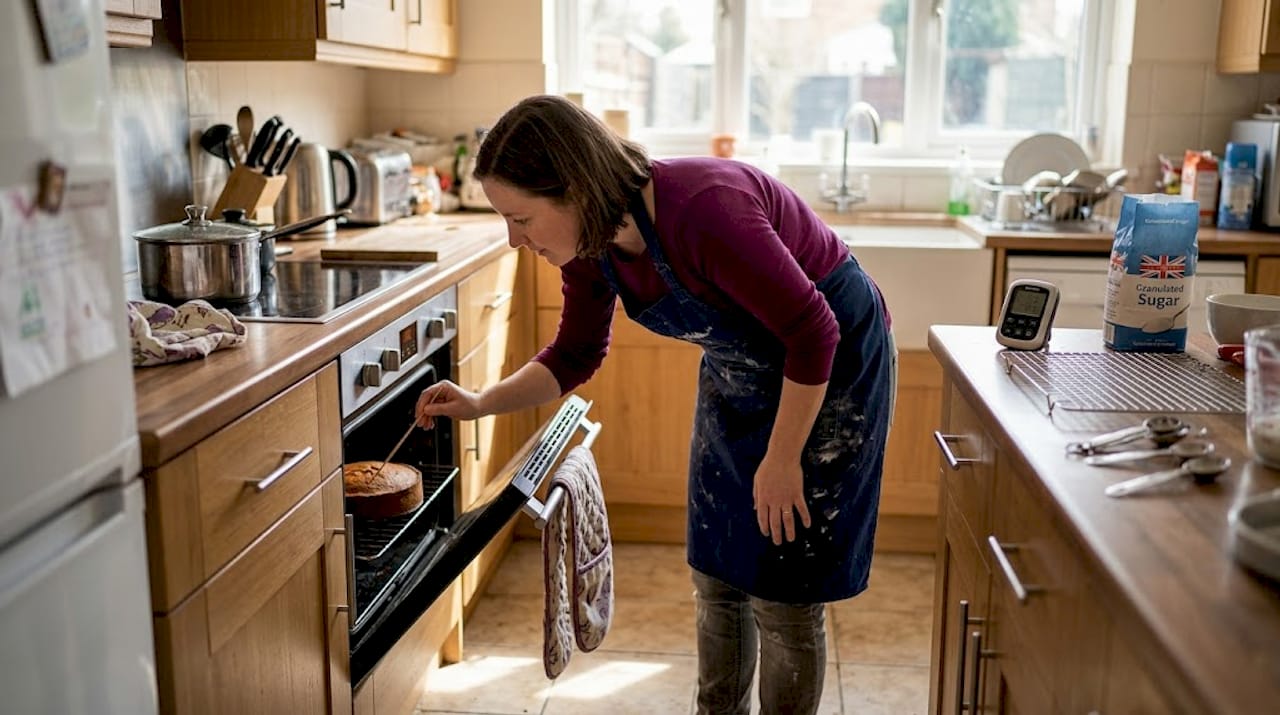
Step 1: Know when to start checking. Don’t wait until the timer goes off. Start checking your cake around 3 to 5 minutes before the recipe’s suggested end time. Ovens vary, and checking early means you can catch it at exactly the right moment.
Step 2: Use the toothpick or skewer test. Insert a clean wooden toothpick or skewer straight down into the very centre of the cake. Pull it out slowly and examine what comes out. According to toothpick test best practice, a completely clean toothpick often means the cake is already overbaked and heading towards dry territory. What you actually want is a toothpick that comes out with a few moist, greasy crumbs clinging to it. That’s the sweet spot. Residual heat will continue to bake the cake once it’s out of the oven, so pulling it a tiny bit early locks in that lovely moisture.
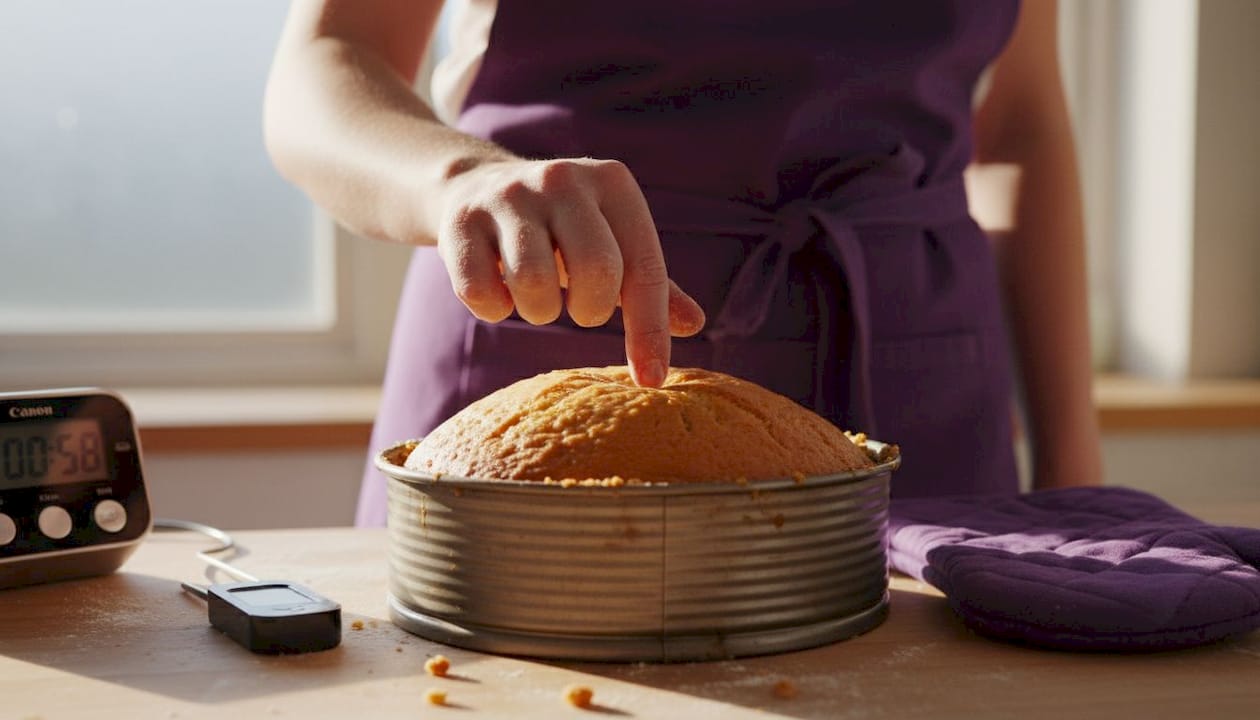
Step 3: Try the finger press. With a clean, dry finger, gently press the top of the cake in the centre. If it springs back immediately and feels firm, it’s done. If your finger leaves an indent that stays there, the cake needs a little more time. This method works especially well for sponge cakes and lighter bakes.
Step 4: Check the edges. Take a look at where the cake meets the sides of the tin. A fully baked cake will naturally begin to pull away from the tin as it sets. It won’t have shrunk dramatically, but there should be a visible gap forming around the edges. If the cake is still stuck firmly to the sides all the way round, it usually needs more time.
Step 5: Use a thermometer for precision. Push the probe of an instant-read thermometer into the centre of the cake, making sure it’s not touching the bottom of the tin. A standard butter or sponge cake is done at around 205°F (96°C). Dense cakes like pound cakes can go to 210°F (99°C). This is honestly the most reliable check you can do, especially when you’re baking a recipe for the first time.
Pro Tip: Carryover cooking is real. Even after you take the cake out of the oven, the interior keeps cooking for a few minutes thanks to retained heat. That’s why pulling the cake when the toothpick shows a few moist crumbs (rather than waiting for a clean pick) is actually the smartest move. It allows for that gentle finish without drying everything out.
If you’re keen to sidestep the most common baking pitfalls before they happen, our guide on how to avoid cake fails covers the essential steps every baker should know.
Troubleshooting common mistakes and edge cases
Knowing the right methods is crucial, but avoiding pitfalls and dealing with tricky recipes makes all the difference.
Certain cakes need extra attention, and understanding why helps you adjust your approach before something goes wrong. Here are the most common issues bakers run into:
- Low-fat cakes dry out faster. Cakes with less fat in the recipe have a smaller margin for error. Cake edge cases are worth noting here: low-fat cakes are especially prone to drying, so those few moist crumbs on your toothpick are absolutely essential as a cue to pull the cake out promptly.
- Underbaked cakes collapse on cooling. If your cake looks done on the outside but sinks dramatically as it cools, it was almost certainly underbaked in the centre. The structure simply hasn’t set fully, so it can’t support its own weight. Always check the middle.
- Overbaked cakes pull away too much. A small amount of edge separation is normal and healthy. If the cake has pulled away significantly all around and looks very brown on top, it’s likely gone too far.
- Sticky bottoms. If a cake has a sticky, gummy base after cooling, this usually signals underbaking or insufficient greasing of the tin. Our article on how to prevent sticking is a handy resource for sorting this out.
- Opening the oven too early. Opening the oven door in the first two-thirds of baking lets cold air in and can cause the centre to sink. Resist the urge until you’re in that 3 to 5 minute checking window.
“The biggest mistake beginners make is trusting the clock over the cake. Recipes give you a time frame, not a guarantee. Your oven, your tin, your altitude, your ingredients all affect the outcome. Learn to read the cake itself, and you’ll bake well every time.” — The Vanilla Valley baking team
Dense or moist cakes like carrot cake, banana loaf, and anything with a heavy batter need the thermometer check more than any other type. They can look done on the surface while hiding a raw centre. Don’t skip that probe check on these. If you’d like to get to grips with some of the common baking errors that catch people out again and again, that’s a great read to bookmark.
What to expect after baking: cooling, carryover and final touches
After testing for doneness and avoiding mistakes, the way you cool and finish your cake determines the final outcome.
Carryover cooking is one of those things that every experienced baker knows about but rarely talks about enough. When you remove a cake from the oven, the outside is hotter than the inside. That difference in temperature means heat continues to travel inward for several minutes, gently finishing the bake. This is a good thing when managed well, but it means you should pull the cake slightly before it looks completely finished.
Expert post-baking tips confirm the ideal cooling protocol: leave the cake in the tin for 10 to 15 minutes after removing it from the oven. This rest period lets the structure firm up enough to handle being turned out without breaking. After that, turn it onto a wire rack and allow it to cool completely before decorating.
Here’s a helpful guide to cooling times and temperatures by cake type:
| Cake type | Internal done temperature | Time in tin | Time on rack |
|---|---|---|---|
| Butter/oil cake | 205°F (96°C) | 10 to 15 minutes | 45 to 60 minutes |
| Sponge cake | 203 to 208°F (95 to 98°C) | 5 to 10 minutes | 30 to 45 minutes |
| Pound or Bundt cake | 210°F (99°C) | 15 to 20 minutes | 60 to 90 minutes |
| Banana or carrot loaf | 205°F (96°C) | 10 to 15 minutes | 60 to 90 minutes |
It’s also worth rotating your tin halfway through baking to ensure even heat distribution. Most domestic ovens have hot spots, and a simple 180-degree turn at the halfway point makes a real difference to the final rise and colour.
Pro Tip: Wait until your cake is completely, thoroughly cool before you apply any crumb coat or frosting. Decorating a warm cake causes buttercream to melt and fondant to slide. Our guide on crumb coating tips walks you through the whole process beautifully. And once your cake is baked and cooled, proper storage matters just as much. Head over to our advice on cake freshness and storage to keep it tasting amazing for longer.
Why most amateur bakers overbake and how to trust your senses
So, what’s the best advice from our experience working with hundreds of home bakers over the years? Here it is, honestly: the single biggest cause of dry cakes isn’t a bad recipe. It’s the clean toothpick myth.
Bakers are taught from early on to wait until a toothpick comes out clean before pulling a cake from the oven. It sounds logical. But expert insight on overbaking is clear: professional chefs actively steer away from the clean toothpick rule because it consistently leads to overbaked, dry results. By the time that toothpick is spotless, the cake has already crossed the line.
Moist crumbs are your friend. A toothpick that comes out with a few soft, slightly sticky crumbs clinging to it is a sign that your cake is at its best. Trust that.
We’d also say this: learning to combine cues is more powerful than relying on any single test. The thermometer, the finger press, the visual check and the toothpick together tell a much fuller story than any one of them alone. The more you bake, the faster you’ll read all four instinctively. But until that confidence builds, the thermometer is your most reliable ally.
To boost your cake confidence, we always recommend keeping a simple baking journal. Note the exact time it took for your cake to bake in your specific oven, what the toothpick showed, and what the temperature read. That record becomes genuinely invaluable the next time you bake the same recipe.
Pro Tip: Document your bake times. Every oven behaves differently, and a few notes after each bake will help you build a personal reference that’s more useful than any recipe book.
Get perfect cakes every time with expert supplies and support
If you’re ready to take your baking to the next level and avoid guesswork, here’s where to start.
At The Vanilla Valley, we’ve been helping passionate bakers just like you since 2009, from our home in North Cardiff to kitchens all across the UK. Whether you’re after that essential thermometer, the right tins, or everything you need to make your finished cake look as amazing as it tastes, we’ve got you covered.

Explore our full range of cake decorating supplies in our online shop, with free delivery options and next day delivery available. And if you’re looking for guidance on which tools to stock your kitchen with first, our roundup of the best baking tools for home bakers is a brilliant place to start. We’re here to help you bake better, one perfect cake at a time.
Frequently asked questions
How do I know if different cake types are done?
Use internal temperature as your guide: butter and oil cakes are done at 205 to 210°F, sponge cakes at 203 to 208°F, and pound or Bundt cakes at 210°F for best results.
Why does a cake sometimes collapse after baking?
A cake collapses if it’s underbaked because the structure hasn’t fully set. Always ensure it springs back to the touch, has edges pulling away from the tin, and an underbaked cake collapses on cooling if the toothpick returns wet batter rather than moist crumbs.
Should I check with a thermometer or a toothpick?
A thermometer gives you the most precise reading, but a toothpick showing moist crumbs is a solid visual cue. Crucially, avoid a clean toothpick as your target, as this signals the cake is already overbaked and drying out.
How long should a cake cool in the tin?
Cool your cake in the tin for 10 to 15 minutes after removing it from the oven, then turn it out onto a wire rack to cool completely before decorating or storing.