
Mirror Glaze Cakes: Tips for a Flawless Finish Every Time
Perfecting a mirror glaze can feel like an intricate challenge, even for seasoned South Wales bakers. Achieving that glossy, flawless finish goes beyond basic recipes it begins with a meticulously organised space and the right cake decorating tools. By investing in premium ingredients and precise equipment, you set the stage for a professional result that rivals the best pâtisseries. This step-by-step guide gives you insight and techniques to help your cakes shine with confidence and impressive detail, right from the foundation.
Table of Contents
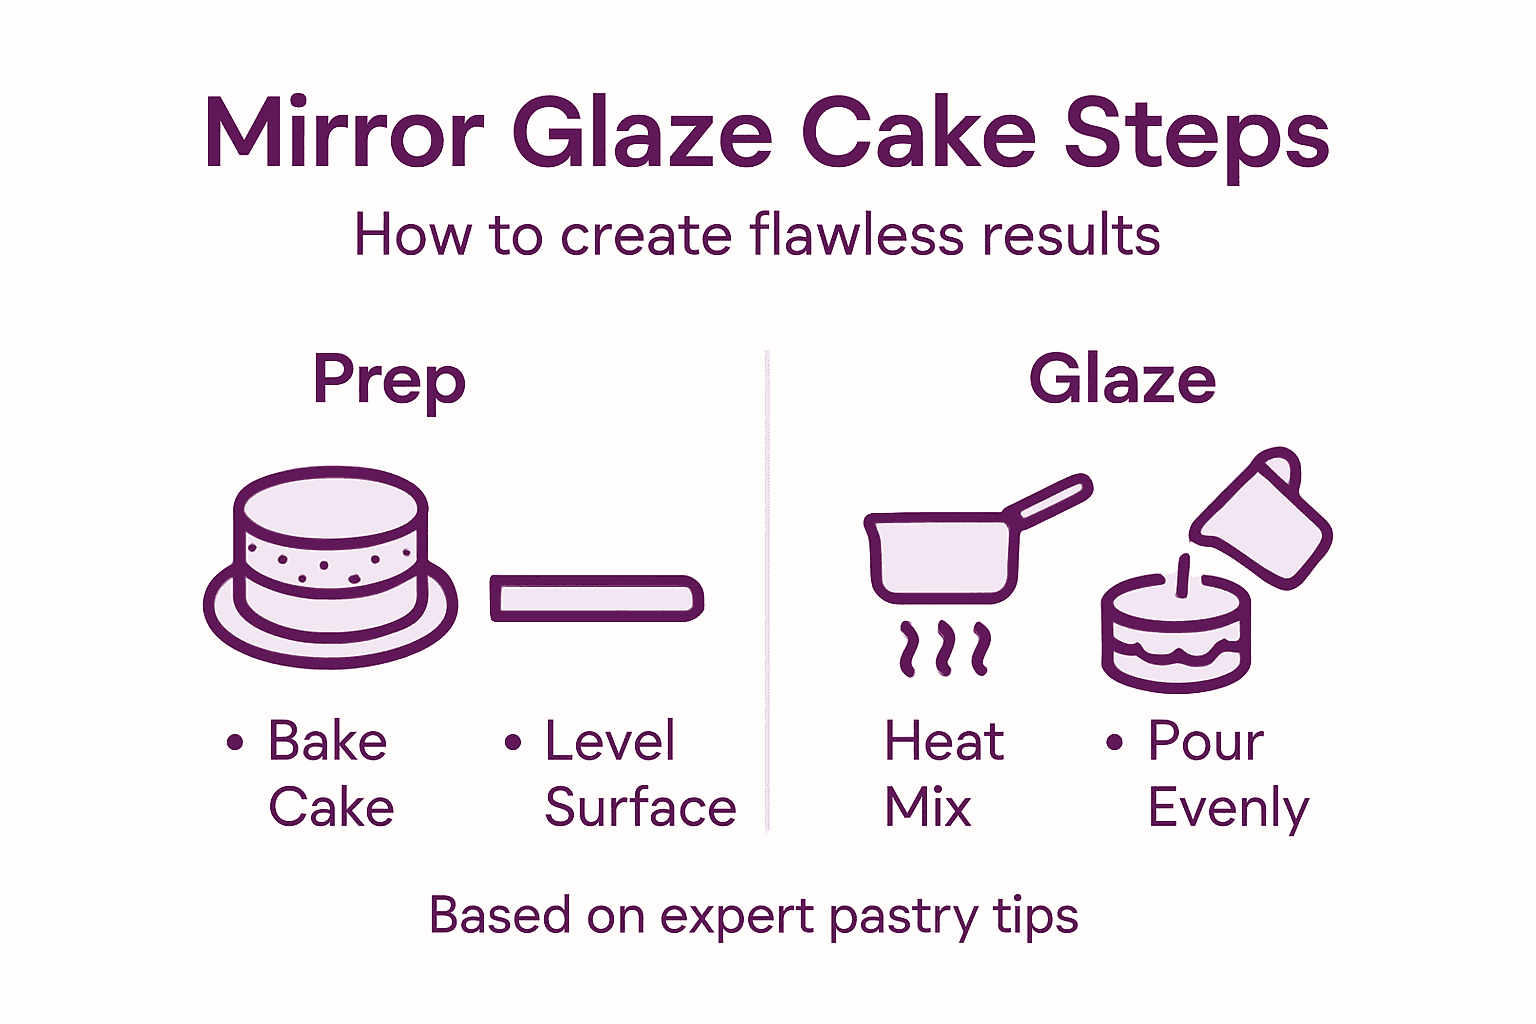
- Step 1: Gather Essential Supplies And Prepare Workspace
- Step 2: Bake And Chill Cakes For Optimal Glazing
- Step 3: Heat And Colour Mirror Glaze For Best Results
- Step 4: Pour Glaze Smoothly For Even Coverage
- Step 5: Check Shine And Tidy Up For A Flawless Finish
Quick Summary
| Key Point | Explanation |
|---|---|
| 1. Gather Essential Supplies | Collect precise measuring tools and high-quality ingredients for a successful mirror glaze. |
| 2. Bake and Chill Cake Properly | Ensure the cake is structurally sound and thoroughly chilled for optimal glazing conditions. |
| 3. Monitor Temperature Carefully | Heat the glaze to the right temperature for a smooth and glossy finish on your cake. |
| 4. Practice Smooth Pouring Techniques | Pour the glaze confidently and consistently to achieve even coverage without interruptions. |
| 5. Final Inspection for Flaws | Inspect and tidy your cake to enhance its presentation and ensure a flawless mirror finish. |
Step 1: Gather Essential Supplies and Prepare Workspace
Preparing for a perfect mirror glaze requires meticulous organisation and the right equipment. In this initial stage, you will assemble your tools and create a clean workspace that sets you up for glazing success.
Start by collecting your key ingredients and equipment. You will need precise measuring tools including digital kitchen scales, multiple mixing bowls of varying sizes, a reliable whisk, a sturdy spatula, and a candy thermometer. Premium ingredients are crucial for a stunning mirror glaze, so source high quality white chocolate, gelatin powder, refined sugar, condensed milk, and professional grade food colouring. Have clean glass or metal mixing bowls ready, ensuring they are completely dry as water can compromise your glaze texture.
Clear your workspace thoroughly before beginning. Cover your work surface with a silicone mat or clean parchment paper, and arrange your tools within easy reach. This approach minimises potential contamination and streamlines your glazing process. Place a large baking tray or sheet pan nearby to catch any drips and make cleanup easier.
Top Tip: Always sift your powdered ingredients and have a clean, damp cloth nearby to quickly wipe down surfaces and utensils during the glazing process.
Below is a summary of key equipment and their roles for mirror glazing:
| Equipment | Purpose | Tip for Best Use |
|---|---|---|
| Digital kitchen scales | Accurate ingredient measurement | Check batteries before starting |
| Candy thermometer | Ensures correct glaze temperature | Calibrate regularly for accuracy |
| Fine mesh sieve | Removes lumps for a smooth finish | Rinse and dry thoroughly beforehand |
| Rotating cake stand | Enables even glaze coverage | Clean before each use for hygiene |
Step 2: Bake and Chill Cakes for Optimal Glazing
Baking the perfect cake foundation is crucial for achieving a stunning mirror glaze finish. Your cake must be structurally sound, evenly baked, and thoroughly chilled to create a flawless glazing surface.
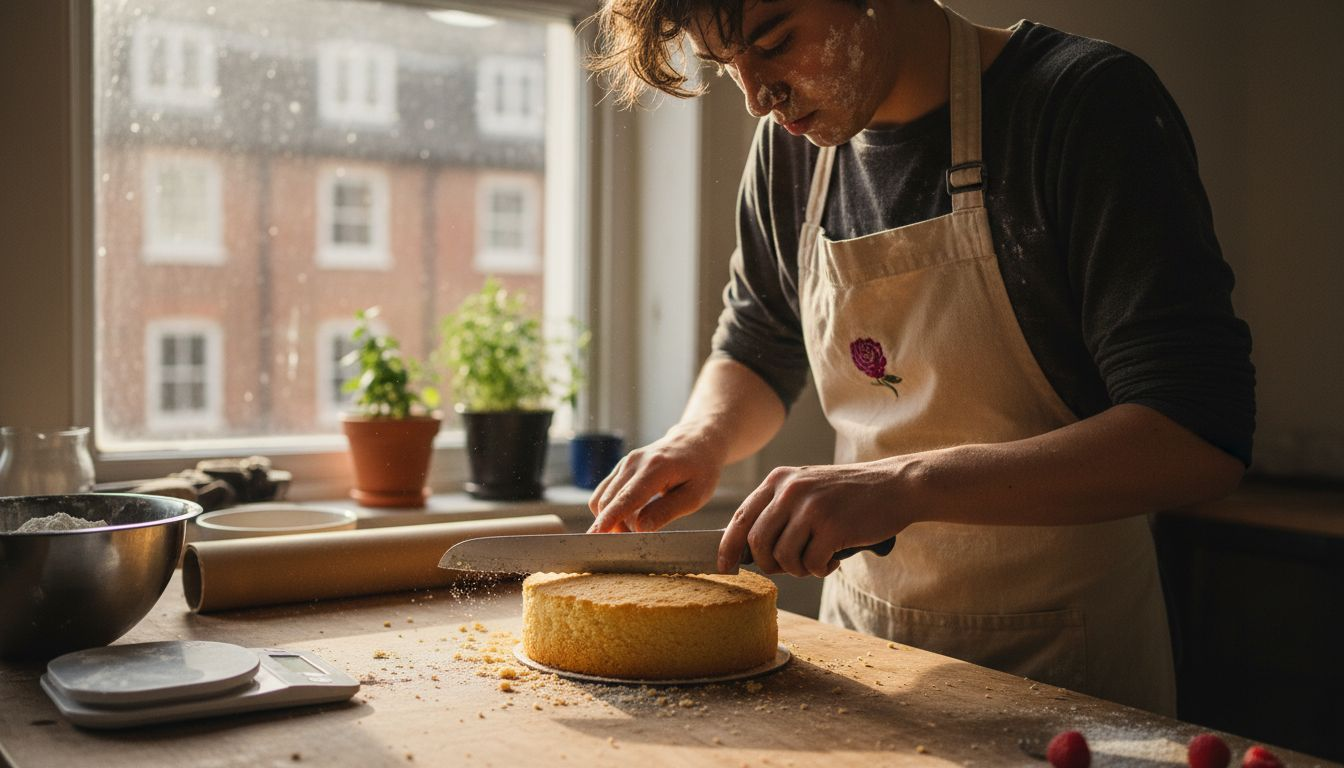
Begin by preparing a light yet sturdy sponge cake that will serve as your mirror glaze canvas. Choose a recipe that produces a dense, level cake with minimal rising and falling. When baking, ensure your oven temperature is consistent and use even baking techniques to prevent uneven layers. Once baked, allow the cake to cool completely at room temperature before transferring to the refrigerator. Chilling is critical the cake needs to be firm and stable before glazing the recommended chilling time is approximately 2 to 3 hours, or ideally overnight.
Prepare your cake for glazing by ensuring a smooth surface. Trim any uneven edges and create a perfectly level top. If using multiple layers, stack and crumb coat them with a thin layer of buttercream or ganache to create a smooth base. Return the cake to the refrigerator for another 30 minutes to set the crumb coat firmly. This preparation ensures your mirror glaze will cascade smoothly and create that professional mirror finish you are aiming for.
Top Tip: Wrap your chilled cake in cling film before final glazing to prevent any moisture condensation that could disrupt your perfect mirror surface.
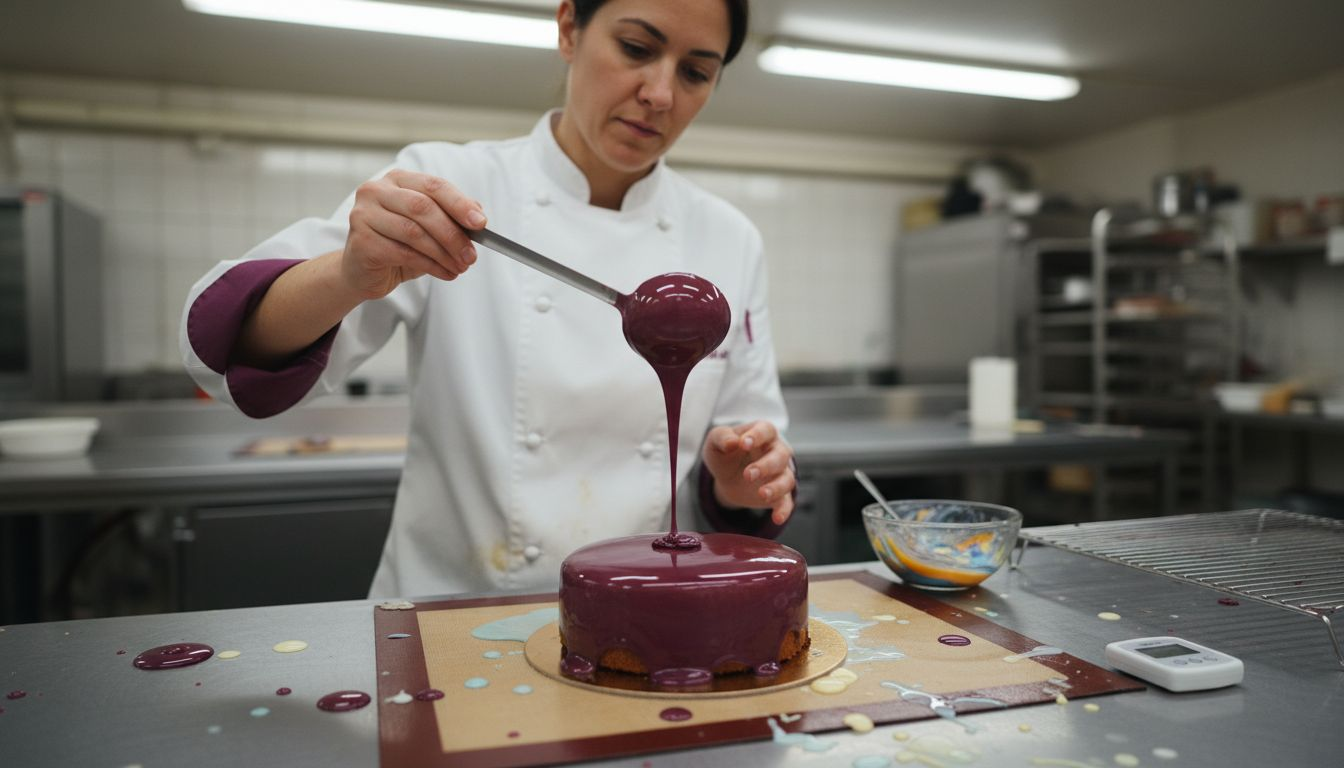
Step 3: Heat and Colour Mirror Glaze for Best Results
Creating a perfect mirror glaze requires precision in heating and colouring techniques that transform a simple mixture into a stunning cake finish. Understanding the delicate balance of temperature and pigmentation is key to achieving that professional glossy look.
Begin by preparing your glaze base using high quality white chocolate, condensed milk, sugar, and gelatin. Use a digital thermometer to monitor temperatures precisely. Heat the mixture slowly to approximately 34 degrees Celsius, stirring continuously to prevent scorching. Once at the correct temperature, divide your glaze into separate bowls for tempered chocolate techniques and add professional grade gel food colouring. Gel colours provide more intense pigmentation without disrupting the glaze consistency. Mix each colour thoroughly but gently to maintain the smooth texture.
When applying the glaze, ensure it remains at the optimal temperature between 32 and 35 degrees Celsius. Too cool, and the glaze will be thick and uneven. Too warm, and it will run straight off your cake. Pour the glaze from the centre of the cake, allowing it to cascade naturally over the sides, creating that signature mirror finish. Use a rotating cake stand if possible to ensure an even, professional coverage.
Top Tip: Always strain your coloured glaze through a fine mesh sieve to remove any potential colour clumps or undissolved particles that might disrupt your perfect mirror surface.
Step 4: Pour Glaze Smoothly for Even Coverage
The moment of glazing is where your cake transforms from a mere dessert to a showstopping masterpiece. Mastering the pouring technique is crucial for achieving that professional mirror finish that will leave everyone amazed.
Position your chilled cake on a wire rack placed over a large baking tray to catch excess glaze. Practice smooth pouring techniques by holding your glaze container at a consistent height approximately 15 centimetres above the cake’s centre. Start pouring in one continuous, steady motion from the centre outwards, allowing the glaze to naturally cascade down the sides. Rotate the cake stand slowly and deliberately to ensure an even, uniform coverage. Move with confidence and consistency avoid stopping or hesitating midpour as this can create uneven patches or disrupt the glossy surface.
Watch the glaze carefully as it flows down the cake. If you notice any bare patches or uneven areas, use a small offset spatula to gently guide the glaze without touching the surface. Allow excess glaze to drip off completely before transferring the cake to a clean presentation plate. The first few attempts might be challenging but remember that practice makes perfect. Each pour will improve your technique and bring you closer to that flawless mirror finish.
Top Tip: Keep a hairdryer on low heat nearby to quickly smooth out any minor imperfections in the glaze surface without remelting the entire coating.
Here’s a comparison of common mirror glaze problems and solutions:
| Issue | Cause | Solution |
|---|---|---|
| Glaze too thick | Cooled below required temperature | Gently rewarm to 32-35°C |
| Dull or cloudy finish | Low-quality chocolate or overheating | Use premium chocolate, monitor heat |
| Air bubbles on surface | Vigorous mixing or rapid pouring | Stir gently, pour steadily |
| Colour streaks | Poor mixing of colour | Mix gel colour thoroughly |
Step 5: Check Shine and Tidy Up for a Flawless Finish
The final inspection stage transforms your mirror glaze cake from good to extraordinary. Your keen eye and attention to detail will elevate the presentation to professional standards.
Once the glaze has set, carefully examine the cake under bright, natural lighting to identify any surface imperfections. Look for air bubbles, drips, or uneven patches that might disrupt the mirror finish. Use a clean paintbrush or cotton wool pad to gently remove any stray specks or dust particles without touching the glossy surface. If you notice small imperfections, a quick blast of warm air from a hairdryer held at least 30 centimetres away can help smooth out minor irregularities.
Trim any excess glaze that has pooled around the base of the cake using a sharp offset spatula. Wipe the edges of your presentation plate clean to create a crisp, professional look. The goal is a seamless transition between the cake and its base that showcases your meticulous craftsmanship. Take a moment to rotate the cake and view it from different angles to ensure a perfect, consistent shine that catches the light beautifully.
Top Tip: Always keep a pair of clean white cotton gloves nearby to handle the cake without leaving fingerprints or disrupting the mirror glaze surface.
Get the Perfect Mirror Glaze Finish with Professional Cake Decorating Supplies
Achieving a flawless mirror glaze demands precision and the right tools at every stage from preparing your workspace to that final smooth pour. If you have ever struggled with uneven coverage, glaze that is too thick or dull, or frustrating colour streaks, you are not alone. The Vanilla Valley understands these challenges and offers a comprehensive selection of premium cake decorating essentials to help you master every step mentioned in the guide, including digital kitchen scales, candy thermometers, gel food colours, and smooth spatulas.

Transform your baking experience today by exploring The Vanilla Valley online store. Benefit from expert-quality ingredients, trusted tools, free next day delivery options, and a loyalty club rewarding your passion for cake decorating. Whether you are perfecting your mirror glaze technique or elevating any cake design, start with supplies that inspire confidence and professional results. Browse now and take the next step towards that stunning, glossy finish you desire.
Frequently Asked Questions
How can I ensure my mirror glaze has the perfect consistency?
To achieve the ideal consistency for your mirror glaze, it should be heated to a temperature between 32 and 35 degrees Celsius. Use a digital thermometer for accuracy, and gently stir the mixture to avoid air bubbles. Pour it over your cake within a specific temperature range to maintain that glossy finish.
What type of cake is best for a mirror glaze?
A light yet sturdy sponge cake works best for a mirror glaze, as it needs to be structurally sound and level. Choose a recipe that minimizes rising and falling during baking, and remember to chill the cake thoroughly before glazing for optimal results.
How do I fix imperfections in my mirror glaze after pouring?
If you notice minor imperfections in your mirror glaze, you can use a hairdryer on a low heat setting to gently smooth out the surface. Keep the hairdryer at least 30 centimetres away from the cake to prevent remelting the entire glaze while making quick adjustments.
What should I do if my mirror glaze is too thick?
If your mirror glaze is too thick, gently rewarm it to the optimal pouring temperature of 32 to 35 degrees Celsius. Use a double boiler or microwave in short bursts to gradually increase the temperature while stirring, allowing it to return to the desired consistency for an even finish.
How do I prevent moisture condensation on my cake before glazing?
To prevent moisture condensation from ruining your mirror glaze, wrap your chilled cake in cling film before glazing. This keeps the cake firm and stable, ensuring that the surface remains smooth and ready for a perfect glaze application.
What ingredients are essential for making a mirror glaze?
Essential ingredients for a mirror glaze include high-quality white chocolate, gelatin powder, refined sugar, condensed milk, and professional-grade food colouring. Gather these ingredients before starting to ensure a flawless finish on your cake.