
Stop fondant from cracking: Essential steps for perfect cakes
TL;DR:
- Fondant cracking results mainly from temperature, humidity, and overworking.
- Proper tools and handling techniques prevent and fix cracks effectively.
- Controlling environment and storage conditions is key to long-term fondant success.
There is nothing quite as disheartening as spending hours crafting a beautiful cake, only to see cracks spiderweb across the fondant just before it reaches the table. It happens to beginners and experienced decorators alike, and it is almost always preventable. The good news is that fondant cracking comes down to a handful of well-understood causes, and once you know what to look for, you can stop it before it starts. This guide walks you through exactly why fondant cracks, which tools make the biggest difference, a step-by-step process for flawless application, and how to rescue any issues that do appear.
Table of Contents
- What causes fondant to crack?
- Essential tools and materials to avoid cracking
- Step-by-step: How to stop fondant from cracking
- Troubleshooting and rescuing cracked fondant
- Our take: The overlooked secrets to lifelong fondant success
- Find everything you need for flawless fondant
- Frequently asked questions
Key Takeaways
| Point | Details |
|---|---|
| Root causes matter | Understanding why fondant cracks lets you target your fix and avoid repeat problems. |
| Preparation prevents cracks | Using the right tools and prepping fondant properly stops dry edges and tears. |
| Expert techniques help | Rolling, applying, and sealing fondant with care keeps it smooth and flawless. |
| Quick fixes available | Minor cracks can often be patched with shortening, heat, or gentle smoothing. |
What causes fondant to crack?
Understanding why fondant cracks is the first step to stopping it. Most cracking comes down to three main culprits: temperature, humidity, and overworking the fondant itself. Each one affects the texture and elasticity of your fondant in different ways, and sometimes all three gang up on you at once.
Temperature is a big one. Fondant that is too cold becomes stiff and brittle, so it cracks when you try to stretch it over a cake. Fondant that is too warm gets sticky and tears easily. The sweet spot is a kitchen temperature around 18 to 21 degrees Celsius, which keeps the fondant pliable without making it unmanageable.
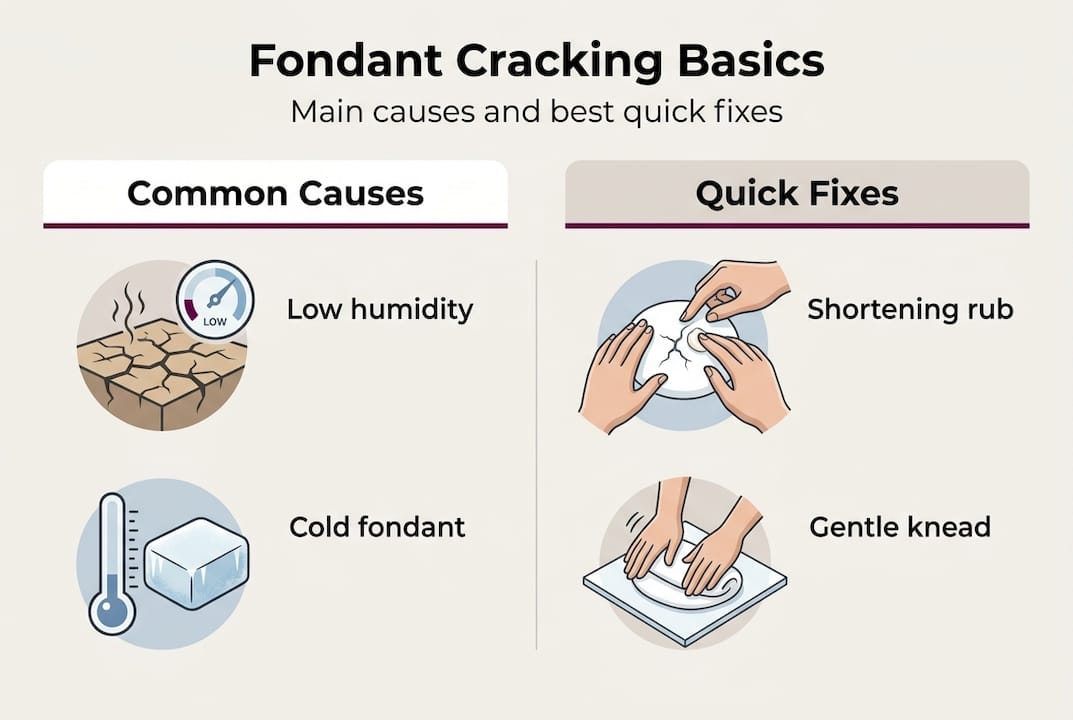
Humidity works against you in two directions. A very dry environment pulls moisture out of the fondant quickly, leaving the surface dry and prone to cracking. A very humid environment can make fondant sweaty and soft, which causes different problems. If you live somewhere with extreme humidity, a dehumidifier in your workspace can genuinely change your results.
Overworking is the sneaky one. The more you knead and handle fondant, the more it warms up and the more air gets worked in. Too much air creates tiny pockets that become cracks once the fondant dries. Knead just enough to make it smooth and pliable, then stop.
Here are the most common causes to watch out for:
- Fondant stored without proper wrapping, causing it to dry out
- Rolling fondant too thin, especially at the edges
- Applying fondant over a dry or crumbly crumb coat
- Lifting and repositioning fondant repeatedly during application
- Using fondant straight from the fridge without letting it come to room temperature
Storage and handling matter enormously, and you can read more about the fondant basics that affect texture and behaviour before you even open the packet.
Worth knowing: Marshmallow fondant needs extra attention. It is more prone to cracking when overworked or exposed to extreme temperatures. Adding a small amount of gelatin or vegetable shortening can significantly improve its elasticity and make it far more forgiving to work with.
Edge cases like very dry commercial mixes or fondant that has been frozen and thawed also need special handling. Always bring fondant to room temperature slowly and knead in a touch of shortening if it feels stiff.
Essential tools and materials to avoid cracking
Having the right kit ready before you start makes an enormous difference. You do not need a professional setup, but a few key items will protect your fondant from the most common cracking triggers.
| Tool | Purpose | Home baker substitute |
|---|---|---|
| Non-stick rolling pin | Even pressure, no sticking | Smooth glass bottle |
| Fondant smoother | Eliminates air bubbles and creases | Back of a spoon |
| Cornstarch or icing sugar | Prevents sticking to surface | Icing sugar only |
| Vegetable shortening | Adds elasticity, prevents drying | Coconut oil (refined) |
| Acetate sheet | Non-stick rolling surface | Silicone baking mat |
Each of these tools plays a specific role. A good rolling pin gives you consistent thickness across the whole sheet, which is critical because thin patches crack first. A fondant smoother lets you apply firm, even pressure without your fingerprints leaving marks or creating stress points in the fondant.
Cornstarch is your best friend for preventing sticking, but use it sparingly. Too much dries out the surface of the fondant and actually causes cracking rather than preventing it. A light dusting is all you need. Lightly dusting your surface and rolling pin with cornstarch or powdered sugar, and greasing your hands and tools with shortening, keeps the fondant workable without overdrying it.
Here are the essentials to have within arm’s reach:
- A smooth, clean work surface (acetate or silicone mat)
- A rolling pin with guide rings for consistent thickness
- A fondant smoother or paddle
- Cornstarch in a small shaker
- Vegetable shortening in a small bowl
- A sharp pizza wheel or craft knife for trimming
Pro Tip: Rub a tiny amount of shortening onto your hands before kneading. It conditions the fondant from the outside in and stops it drying on contact with your skin.
Knowing how to look after your fondant between sessions is just as important as the tools you use. Check out this guide on storing fondant correctly to make sure your supply stays fresh and crack-free between uses.
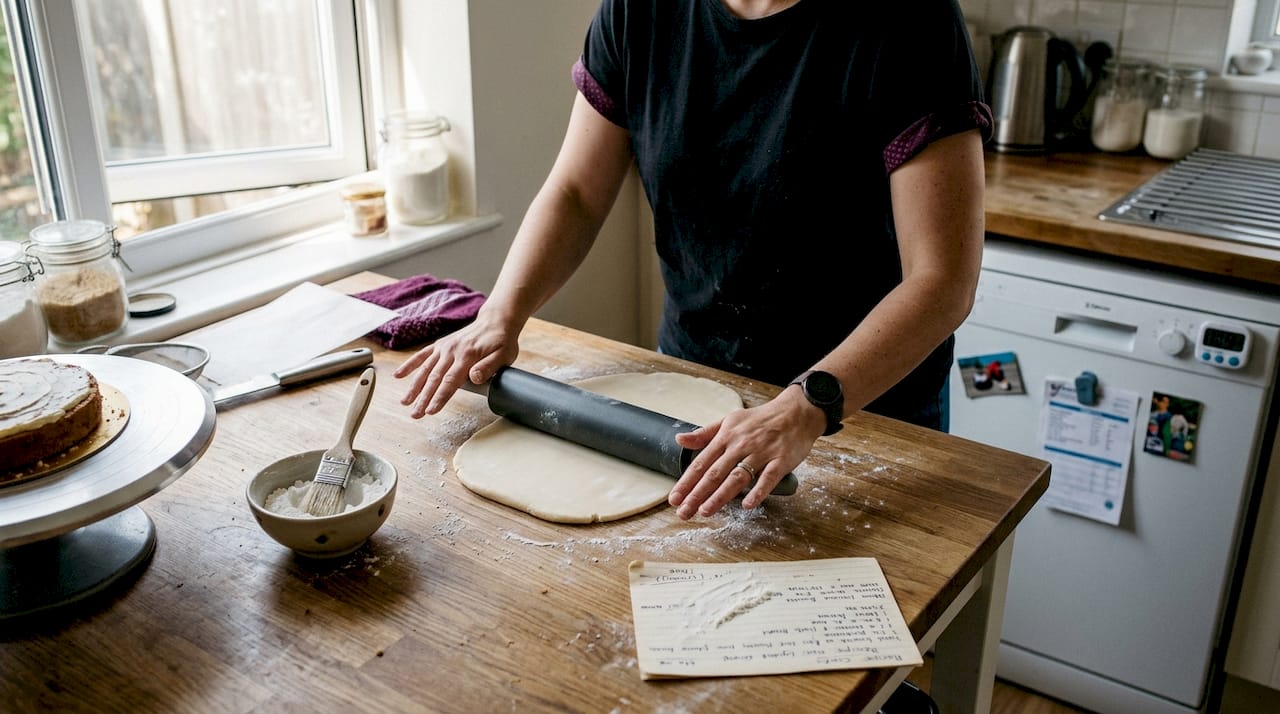
Step-by-step: How to stop fondant from cracking
Now that you have the right tools, here is the process that consistently produces smooth, crack-free results.
- Bring fondant to room temperature. Take it out of storage at least 30 minutes before you need it. Cold fondant is stiff and will crack immediately.
- Knead until smooth. Work the fondant gently until it is soft and pliable, like warm playdough. Stop as soon as it feels smooth. Overworking introduces air and heat.
- Grease your hands and surface. Apply a thin layer of shortening to your hands and lightly dust your mat or surface with cornstarch. Greasing tools with shortening alongside a light cornstarch dusting prevents sticking without drying.
- Roll to an even thickness. Aim for around 4 to 5mm. Use guide rings on your rolling pin if you have them. Thin edges are the first place cracks appear.
- Lift carefully. Use your rolling pin to lift the fondant sheet. Drape it over the cake from the centre outward, avoiding stretching.
- Smooth from the top down. Use your smoother to press out air bubbles, working from the top of the cake down the sides. Move in smooth, confident strokes.
- Trim the excess. Use a sharp knife or pizza wheel to cut cleanly at the base. Jagged cuts can cause the fondant to pull and crack near the edge.
- Seal and smooth. Go over the whole cake one final time with your smoother, paying attention to corners and the base edge.
Here is a quick comparison of two common approaches:
| Approach | Result |
|---|---|
| Rolling too thin, no dusting | Tearing, sticking, cracking at edges |
| Rolling to 4mm, light cornstarch dusting | Smooth drape, minimal stress on fondant |
Pro Tip: If you spot a small air bubble under the fondant, do not panic. Use a clean pin to pierce it at an angle, then smooth the fondant back down with your finger.
The type of undercoat you use also matters. A well-chilled ganache or buttercream layer gives the fondant something firm and slightly tacky to grip. Learn more about the best filling and undercoat choices to set yourself up for success before the fondant even goes on.
Troubleshooting and rescuing cracked fondant
Even with the best preparation, things can go wrong. Here is how to handle the most common issues without starting over.
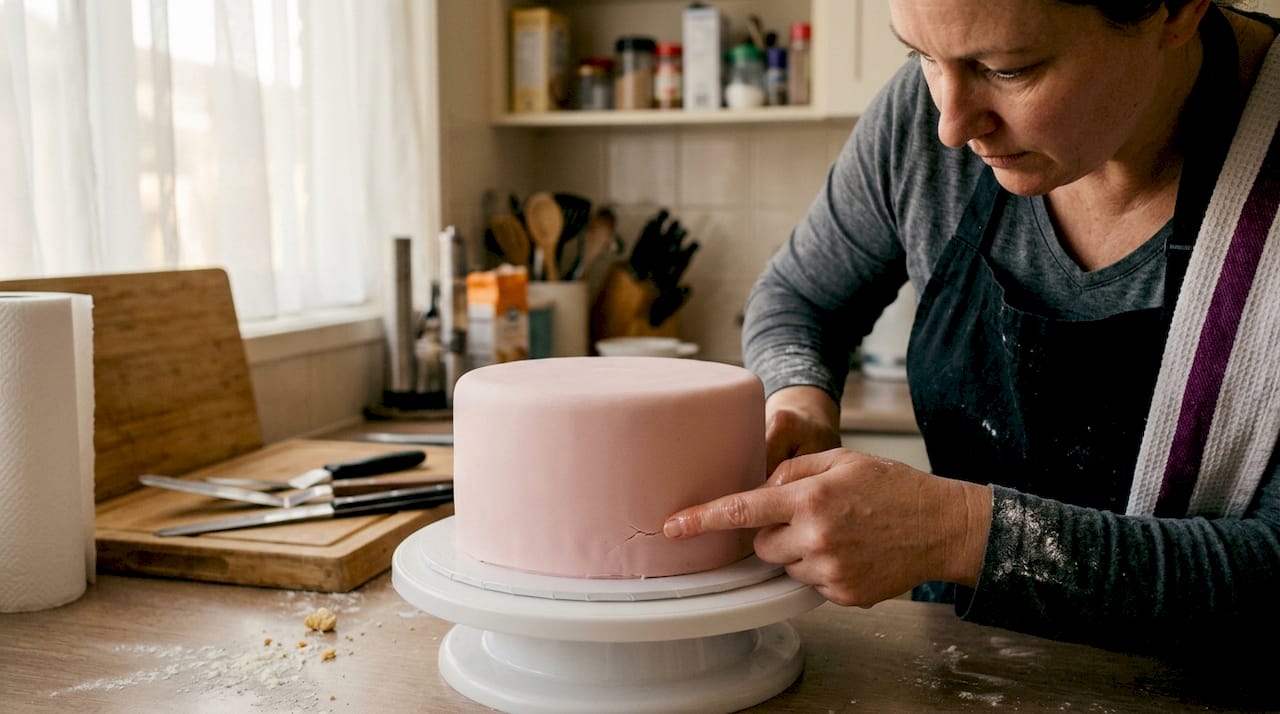
Small surface cracks are the easiest to fix. Dip your fingertip in a tiny amount of vegetable shortening and rub it gently over the crack in a circular motion. The warmth of your finger softens the fondant, and the shortening fills the gap. For slightly larger cracks, a small piece of fresh fondant smoothed over the top works well.
Dry edges often appear when the fondant has been exposed to air for too long. Rub a little shortening around the base edge and smooth with a fondant paddle. Act quickly, as dry fondant becomes harder to work with the longer it is left.
Elephant skin (a rough, wrinkled texture) usually means the fondant was overworked or too dry to begin with. Unfortunately, this is harder to rescue once it sets. The best fix is to cover it with decorations or textured elements.
Here are the most common mistakes and their quick fixes:
- Fondant cracking on the sides: too thin or too cold when applied
- Cracks at the base: fondant was not smoothed down firmly enough
- Cracks appearing hours later: environment is too dry, use a humidifier or cover the cake loosely
- Tearing during rolling: knead in more shortening and re-roll
Quick reminder: Marshmallow fondant is particularly sensitive to overworking and temperature swings. Keep a small amount of gelatin or shortening nearby when working with it, and handle it as little as possible once it is smooth.
For a finished cake, run your hand lightly over the surface to feel for any invisible imperfections. Look at the cake from eye level under good lighting to catch any fine lines before they become obvious. If you are considering skipping fondant altogether on certain projects, there are some creative fondant alternatives worth exploring. And if you are adding fondant decorations, check out tips on making fondant decorations last so all your hard work holds up beautifully. For a broader look at fondant troubleshooting tips, there are some excellent additional pointers available.
Our take: The overlooked secrets to lifelong fondant success
Here is something most guides skip over entirely: your kitchen environment matters more than your technique. You could follow every step perfectly and still end up with cracked fondant if your workspace is too dry or too cold. We have seen this happen time and again, and it is genuinely the number one thing that separates consistent results from frustrating ones.
Adapting to your specific kitchen, whether that means running a small humidifier in winter or working earlier in the day before the heating kicks in, is the kind of practical wisdom that no recipe can give you. It takes a bit of trial and error, but once you know your environment, you can work with it rather than against it.
We also strongly recommend keeping a small fondant rescue kit on your workbench: a pot of shortening, a dusting of cornstarch, a smoother, and a pin. Even experienced decorators reach for these regularly. And never underestimate the importance of storing fondant long-term properly between projects. Fondant that is well-stored is always easier to work with, and that alone prevents most cracking before it starts.
Find everything you need for flawless fondant
If you are ready to put all of this into practice, having quality supplies makes every step easier and more enjoyable.

At The Vanilla Valley, we stock everything from rolling pins and fondant smoothers to a fantastic range of ready-to-use fondant in a huge variety of colours. Whether you are just starting out or looking to upgrade your kit, our fondant essentials shop has you covered. We have been helping bakers across the UK since 2009, and we love seeing the amazing things our community creates. For a deeper look at working with fondant, our complete fondant guide is a brilliant next step. Pop in, browse, and let us help you get those perfect, crack-free results.
Frequently asked questions
How do I keep fondant from drying out before covering a cake?
Wrap fondant tightly in cling film and store in an airtight container to lock in moisture until use. For more detail, this guide on storing fondant freshness covers best practice for both homemade and shop-bought fondant.
Can I repair cracks after fondant is already on the cake?
Yes, smooth small cracks with a little vegetable shortening or rub gently with a warmed finger to blend the edges together. A light shortening application works well for surface-level cracks without disturbing the surrounding fondant.
Is marshmallow fondant more likely to crack than regular fondant?
Marshmallow fondant can be more prone to cracking, especially when overworked or exposed to extreme temperatures. Adding gelatin or shortening improves its elasticity considerably.
What should I do if fondant keeps tearing while rolling?
Knead in a small amount of shortening and ensure your work area is lightly dusted to improve elasticity and prevent sticking. A light cornstarch dusting on your mat and rolling pin also helps the fondant glide smoothly without gripping the surface.