
How to create a dessert table that looks Instagram-worthy
TL;DR:
- A stunning dessert table relies on smart planning, theme, and creative presentation rather than a big budget.
- Proper layout, visual flow, and minimalistic themes create memorable and photogenic displays.
- Incorporate layers, lighting, and simple decorations to elevate any dessert setup effectively.
You want your dessert table to stop the scroll, dazzle guests, and make everyone reach for their phones before they reach for a fork. The gap between Pinterest perfection and what actually ends up on your table can feel enormous, especially when you’re juggling baking, decorating, and entertaining all at once. But here’s the truth: a show-stopping dessert table isn’t about having a professional budget or a catering team. It’s about smart planning, a clear visual theme, and a few creative tricks. This guide breaks it all down, from your first planning notes right through to those final, camera-ready touches.
Table of Contents
- Planning your Instagram-worthy dessert table: Essentials for success
- Step-by-step: Designing and assembling your table layout
- Bringing the wow factor: Decoration, lighting, and the Instagram edge
- Troubleshooting and adaptation: Weather, crowd, and common pitfalls
- Why less really is more (and perfection is overrated)
- Bring your vision to life with the right tools
- Frequently asked questions
Key Takeaways
| Point | Details |
|---|---|
| Prioritise variety | Offer different flavours, textures, and dietary options to appeal to all guests. |
| Structure is key | An organised flow and varied heights make dessert tables visually striking for Instagram. |
| Style on a budget | Use household props, thrift finds, and simple decorations for a professional look without overspending. |
| Plan for freshness | Prepare and freeze ahead, then assemble with fresh items just before your event. |
| Simplicity wins | Homemade, imperfect desserts with thoughtfully planned presentation outshine overdone setups. |
Planning your Instagram-worthy dessert table: Essentials for success
Before a single cake board is placed or a cupcake is iced, the real work happens on paper. Good planning is what separates a gorgeous table from a stressful scramble.
Start with your numbers. For 50 guests, plan 4-6 dessert varieties totalling 150-300 bite-sized portions, prioritising variety in flavours, textures, and dietary options. Scale this down proportionally for smaller gatherings. For wedding dessert table ideas and larger events, always err on the side of slightly more rather than less.
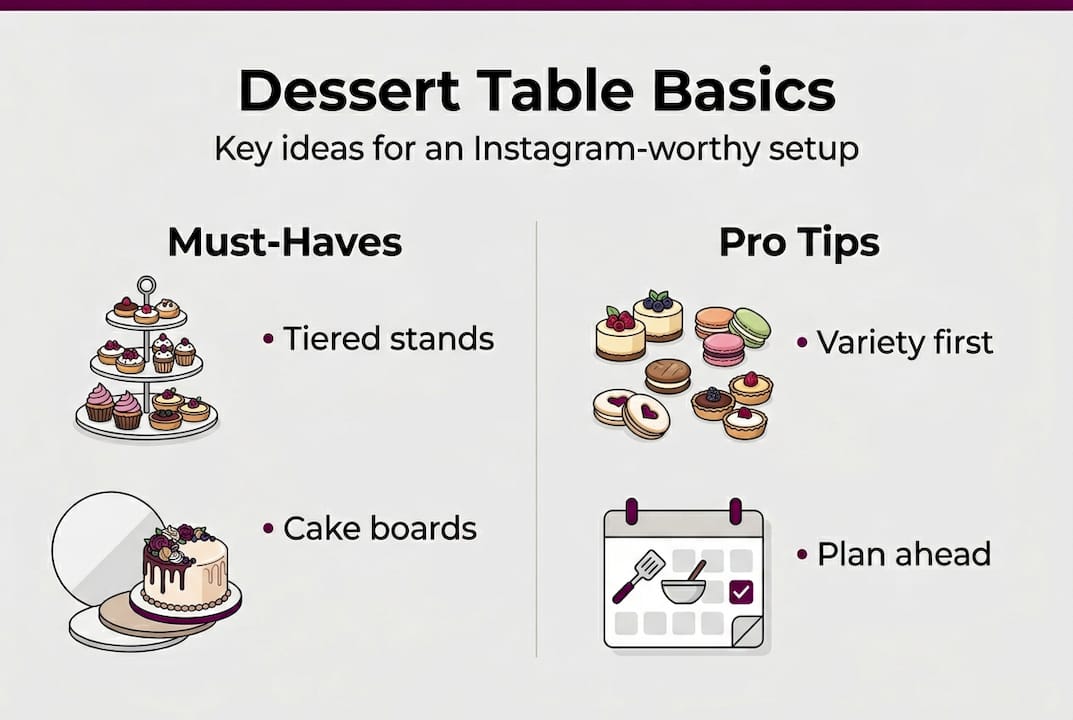
Diversity matters just as much as quantity. Mix textures (creamy, crunchy, soft), flavours (fruity, chocolatey, nutty), and formats (bite-sized, sliceable, scoopable). Always include at least one allergen-friendly option and label everything clearly. This isn’t just thoughtful hosting, it’s increasingly expected.
Gather your supplies early. Here’s a quick overview of what you’ll need:
| Category | Items to gather |
|---|---|
| Structure | Tiered stands, cake boards, risers, linen tablecloths |
| Servingware | Small plates, tongs, napkins, dessert forks |
| Styling props | Candles, florals, signage, themed figurines |
| Packaging | Boxes, bags, wrapping for take-home treats |
| Practical kit | Labels, allergen cards, serving spoons, cling film |
Don’t feel pressure to bake everything from scratch. Mixing semi-homemade items (think shop-bought meringues dressed up with fresh fruit and edible glitter) with your homemade centrepieces is a brilliant time-saver. Nobody needs to know.
For visual inspiration, look here:
- Instagram hashtags: #desserttable, #cakesofinstagram, #partyfood
- Pinterest boards for your theme or colour palette
- Baking and lifestyle magazines for seasonal layouts
- Local bakeries and event photographers for real-world scale
Pro Tip: Start planning at least four weeks before your event. This gives you time to source props, test recipes, and adjust your design without the last-minute panic that kills creativity.
Step-by-step: Designing and assembling your table layout
With your ingredients and vision in place, set up your space for maximum visual and guest impact.
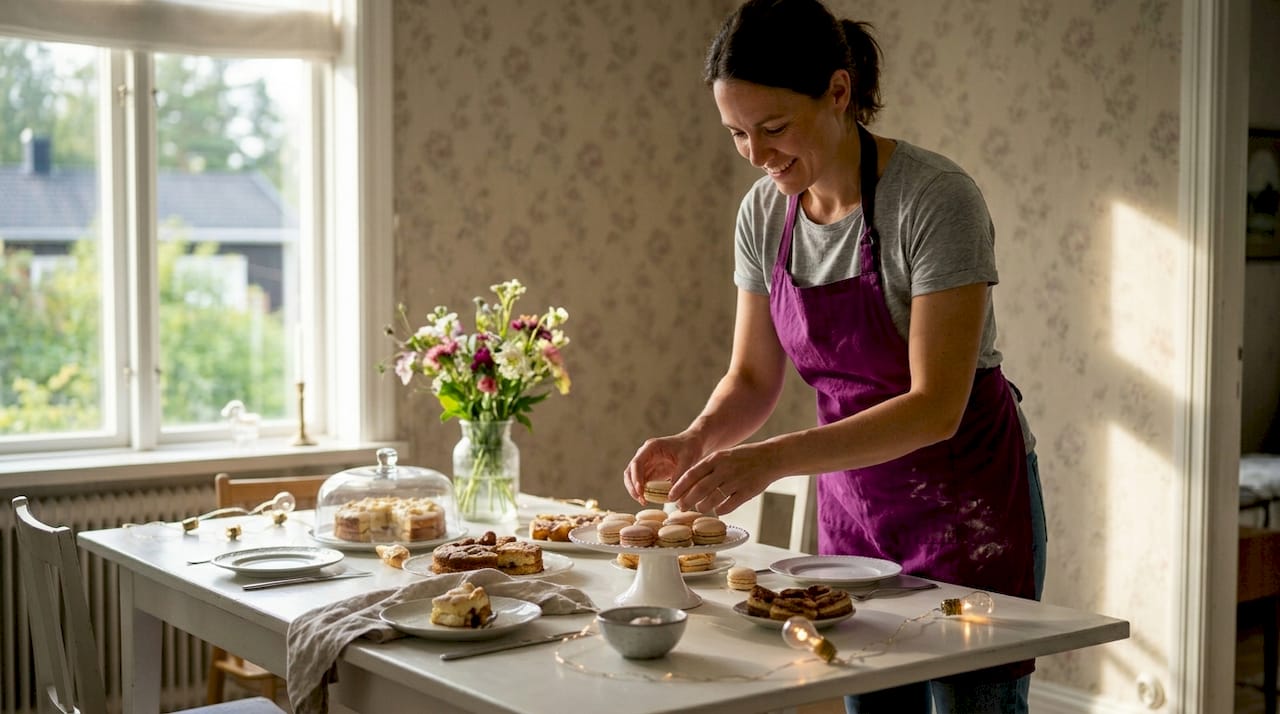
Assembly is where the magic happens, and where most people go wrong. A beautiful table needs flow, not just prettiness. Follow these steps:
- Set your backdrop first. A plain wall, a banner, or a draped fabric panel gives your table a visual anchor and makes every photo pop.
- Lay your tablecloth and risers. Establish the foundation before adding a single item. Height is everything on camera.
- Position your largest, tallest items first. Tiered cake stands and tall displays go at the back and centre.
- Fill in with medium-height items. Cupcake towers, domed stands, and small cake boards work brilliantly in the middle zones.
- Add flat or small items last. Macarons, truffles, and bite-sized sweets sit at the front, at eye level for grazing guests.
- Check from the camera angle. Crouch down and look through your phone before anyone arrives. This single step catches gaps and imbalances instantly.
One of the great debates in dessert table design: symmetry versus maximalism. Both work brilliantly, but they feel very different.
| Style | Look | Guest flow | Pros | Cons |
|---|---|---|---|---|
| Symmetrical | Polished, editorial | Easy, intuitive | Elegant on camera | Can feel stiff |
| Maximalist | Abundant, joyful | Exploratory | Wow factor | Easy to overcrowd |
For allergy and dietary items, making edible decorations last longer is easier when those items are stored separately anyway. Use this to your advantage: place allergen-friendly options at one end with clear signage, physically separated from items containing nuts or gluten.
Optimal flow means placing plates and napkins at the entry point, positioning non-perishables first, and placing moist or fragile items further along. Use small 5-7 inch plates at the end to encourage sampling and reduce crowding. It’s a small detail that makes a big difference.
For creating edible toppers that hold their shape through the event, keep them off the table until an hour before guests arrive.
Pro Tip: Stack wrapped books or small boxes under your tablecloth for instant, customisable height. Free, invisible, and incredibly effective.
Bringing the wow factor: Decoration, lighting, and the Instagram edge
Now the base is ready, it’s time to add the unforgettable visual punch.
A gorgeous dessert table isn’t accidental. Instagram-worthiness prioritises height variation, colour pops, lighting, and symmetry, but flavour always trumps perfection. Keep that in mind as you style: the goal is a table that looks incredible and tastes even better.
For your DIY decoration toolkit, think about:
- Edible flowers: Pansies, violets, and rose petals add instant elegance at minimal cost
- Fresh fruit: Sliced figs, berries, and citrus wheels bring bold natural colour
- Themed backdrops: A balloon garland, floral arch, or fabric drape frames your table beautifully
- Candles and fairy lights: Warm lighting transforms even a simple spread into something magical
- Personalised signage: Handwritten chalkboard labels or printed tags add charm and practicality
Lighting is genuinely underrated by most home bakers. Natural window light is your best friend for photography. If you’re shooting indoors in the evening, string lights or a warm-toned ring light will do the job. Avoid harsh overhead fluorescents, they flatten colours and make everything look clinical.
For those last-minute decoration ideas when time runs short, a scattering of edible glitter or a handful of sprinkles can elevate a simple display in seconds. And if you love a clean, unfussy aesthetic, minimalist cake looks are just as scroll-stopping as maximalist spreads.
Pro Tip: Mix one or two store-bought hero items with your homemade bakes. A beautiful artisan chocolate bar or a jar of luxury biscuits adds texture to your table without adding stress to your schedule.
Troubleshooting and adaptation: Weather, crowd, and common pitfalls
Even perfect plans need backup. Here’s how to handle what could go wrong with confidence.
Outdoor events bring their own challenges. For outdoor setups, weight your tablecloth to stop it lifting in the breeze, use shade structures or umbrellas to protect from sun and insects, and keep perishables out of direct heat. Avoid displaying items like buttercream-topped cupcakes outdoors in warm weather, they will melt faster than you expect.
Here are quick fixes for the most common pitfalls:
- Overcrowding: Remove items and use a secondary side table or staggered refill trays instead
- Flat, boring layout: Add a riser or tiered stand immediately, even mid-event
- Unlabelled items: Carry a small pack of pre-printed allergen cards as backup
- Temperature issues: Keep chilled items in a cool box until 30 minutes before serving
- Mismatched desserts: Group by colour or height to create visual cohesion even with eclectic items
For allergen safety, this is non-negotiable:
Always physically separate nut-containing, gluten-containing, and dairy items from free-from alternatives. Use different serving utensils for each section. Print ingredient lists for every item and display them clearly. When in doubt, make items nut-free across the board to avoid cross-contamination risks.
Budget worries? Don’t let them stop you. Using leftover cake supplies creatively, like repurposing ribbon, sprinkle mixes, or coloured boards from previous bakes, is one of the smartest moves you can make. Thrift shops and car boot sales are gold mines for cake stands, frames, and vintage props at a fraction of the cost.
For large crowds, consider running two identical stations on either side of the room rather than one long single table. It halves queue time and doubles the visual impact. Always plan for refills on your most popular items.
Why less really is more (and perfection is overrated)
Here’s something we’ve noticed over the years at The Vanilla Valley: the tables people talk about longest are rarely the most elaborate ones. They’re the ones with a clear theme, one or two showstopper elements, and a warmth that you can feel even in a photograph.
The pressure to fill every inch of your table, to match every trend, and to produce a spread that looks like it came from a professional stylist’s shoot is real. But it often leads to cluttered, confusing displays that tire the eye rather than delight it.
Structure and theme matter far more than sheer abundance. A cohesive colour palette with three or four beautiful bakes will always outshine a chaotic jumble of twenty different items. Visible homemade touches, a slightly imperfect buttercream swirl, a handwritten label, a single stem of dried flowers, these are the details that make a table feel human and memorable.
As we always say: a minimalist approach done with intention is always more powerful than maximalism done in a rush. Your guests and your followers will feel the difference, even if they can’t explain why. Celebrate what makes your table unique. That’s the real wow factor.
Bring your vision to life with the right tools
Ready to create your own show-stopping table? Get everything you need in one place.
At The Vanilla Valley, we’ve been helping bakers like you bring their creative visions to life since 2009. Whether you’re after cake boards, beautiful sprinkles, edible decorations, or themed finishing touches, our cake decorating supplies are chosen with home bakers in mind.

Need a little more inspiration to get started? Our treat box inspiration guide is packed with creative ideas for styling and presentation that translate brilliantly to dessert tables of every scale. From your very first party spread to a full wedding dessert display, we’ve got the tools, the ideas, and the community to cheer you on every step of the way.
Frequently asked questions
How many dessert options do I need for 20 guests?
Aim for at least 3 varieties and 40-60 total portions so each guest enjoys 2-3 pieces. As a general rule, plan 2-6 portions per guest and balance flavours and dietary options across your selection.
What’s the best way to label desserts for allergies?
Clearly print ingredients and allergy warnings for every item on the table, and physically separate dietary options like nut-free or gluten-free items using different serving utensils and dedicated zones.
How far in advance can I prepare the desserts?
Bake and freeze suitable items up to three days ahead and assemble with fresh elements a few hours before serving. Start planning four weeks out to finalise your menu and sourcing without stress.
How do I keep desserts from melting or drying out at an outdoor event?
Use shade, weighted tablecloths, and protective covers, and set out perishable items at the last minute. Outdoor dessert stations require extra attention to temperature and wind, so always have a backup plan for fragile items like buttercream.
What are easy ways to add wow factor on a budget?
Stack books or boxes under your tablecloth for height, source second-hand props from thrift shops, and add edible flowers or fresh fruit for colour. Budget hacks like stacked books are some of the most effective styling tricks, regardless of your overall spend.
Recommended
- How to photograph cakes for Instagram: a baker’s guide - The Vanilla Valley
- Creative wedding dessert table ideas for spring 2026 - The Vanilla Valley
- How to Create Edible Toppers for Stunning Cakes - The Vanilla Valley
- How to instantly make your cakes look more professional - The Vanilla Valley
- How to photograph streetwear for social media in 2026 – INCIDENT