
How to make sugar flowers for wedding cakes in 2026
Creating stunning sugar flowers for wedding cakes is a skill that transforms simple designs into breathtaking centrepieces, yet many bakers struggle to achieve the professional realism they envision. Without proper techniques and quality materials, petals can crack, colours fade, and flowers lack the delicate detail that makes them truly special. This comprehensive guide walks you through every stage of sugar flower making, from selecting the right tools and materials to mastering colouring techniques and avoiding common pitfalls. Whether you’re preparing for your first wedding commission or refining your craft, you’ll discover practical methods to create lifelike blooms that elevate any celebration cake.
Table of Contents
- Essential Materials And Tools For Sugar Flower Making
- Step-By-Step Process To Create Beautiful Sugar Flowers
- Colouring And Finishing Touches For Realistic Sugar Flowers
- Troubleshooting Common Mistakes And How To Avoid Them
- Explore Quality Cake Decorating Supplies At The Vanilla Valley
Key takeaways
| Point | Details |
|---|---|
| Quality materials matter | High-quality sugarpaste and specialised tools greatly improve sugar flower realism and durability |
| Follow systematic steps | Precise sequencing in petal shaping and drying ensures lifelike and durable sugar flowers |
| Layer colours gradually | Applying powdered colour dusts and edible paints elevates detail and natural appearance |
| Avoid rushing processes | Patience during drying and careful material handling prevents cracking, wilting, and unrealistic colouring |
Essential materials and tools for sugar flower making
Successful sugar flower creation begins long before you shape your first petal. The foundation lies in assembling quality materials and understanding how each tool contributes to the finished bloom. High-quality sugarpaste and specialised tools greatly improve sugar flower realism and durability, making the difference between amateur attempts and professional results.
Sugarpaste forms the core material, requiring a firm yet pliable consistency that holds intricate shapes without tearing. Floral wires in various gauges provide structural support, with finer wires for delicate petals and thicker ones for stems. Floral tape binds components together whilst creating a natural appearance. Petal cutters and veiners replicate authentic flower shapes and surface textures, whilst foam mats allow gentle thinning and shaping without damage.
Modelling tools complete your kit, each serving distinct purposes. Ball tools thin petal edges to translucent delicacy. Dresden tools create natural veining and texture. Scalpels enable precise cuts. Brushes apply colour dusts and edible paints with control. You’ll also need cornflour for dusting surfaces, edible glue for assembly, and polystyrene dummies or foam blocks for drying flowers in natural positions.
| Material/Tool | Purpose | Recommended Type |
|---|---|---|
| Sugarpaste | Base material for petals and leaves | Firm, flexible formulation for sugarcraft |
| Floral wires | Structural support | Gauge 24-30 for petals, 18-22 for stems |
| Petal cutters | Shape consistency | Metal cutters for precision |
| Veiners | Surface texture | Silicone double-sided moulds |
| Colour dusts | Realistic shading | Edible petal dusts in natural tones |
| Modelling tools | Shaping and detail | Ball, Dresden, and veining tools |
Essential tool categories include:
- Cutting tools: petal and leaf cutters in multiple sizes, scalpel or craft knife
- Shaping tools: ball tools, Dresden tools, veining tools, foam pads
- Support materials: floral wires, floral tape, polystyrene dummies
- Colouring supplies: petal dusts, edible paints, food-safe brushes
- Adhesives: edible glue, royal icing for secure bonds
Pro Tip: Choose flexible floral wires rather than rigid alternatives for flower stems to avoid breakage during assembly and transport. Flexible wires bend without snapping, allowing natural positioning and easier insertion into cakes.
Investing in proper edible toppers tools and understanding their functions sets you up for consistent success. Quality materials respond predictably, whilst inferior products frustrate even experienced decorators. Stock your workspace thoughtfully, and you’ll find each project becomes more enjoyable and produces superior results. The right baking tools for cake decorating transform challenging techniques into achievable skills.
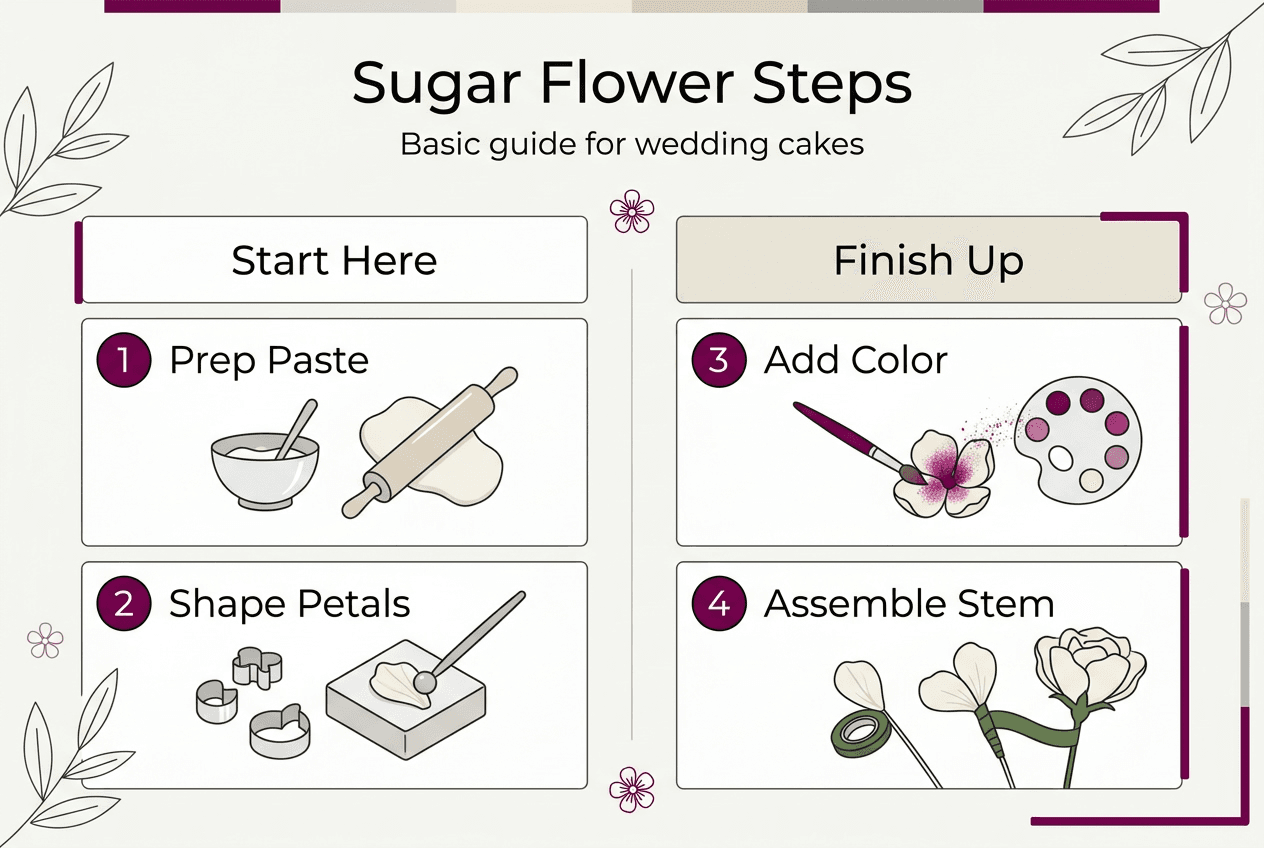
Step-by-step process to create beautiful sugar flowers
With your materials assembled, you’re ready to transform sugarpaste into delicate blooms through systematic execution. Following a precise sequence in petal shaping and drying ensures lifelike and durable sugar flowers that withstand handling and display.
-
Prepare your sugarpaste by kneading until smooth and pliable, adding tiny amounts of white vegetable fat if too dry or cornflour if sticky. The paste should stretch without tearing and hold shapes cleanly.
-
Roll the paste thinly on a non-stick surface lightly dusted with cornflour, aiming for approximately 1-2mm thickness depending on the flower type. Delicate flowers like sweet peas need thinner paste than robust roses.
-
Cut petal shapes using your chosen cutter, working quickly to prevent drying. Place cut petals immediately onto a foam mat, covering unused paste with cling film.
-
Thin petal edges using a ball tool, working in gentle circular motions on the foam pad until edges become translucent and slightly ruffled. This creates the delicate appearance of real petals.
-
Add texture by pressing petals into silicone veiners, applying firm even pressure to transfer realistic vein patterns. Remove carefully to avoid distortion.
-
Shape petals using your fingers and tools, cupping some inward and curling others outward to mimic natural variation. No two petals should look identical.
-
Insert floral wire through the base of each petal, securing with a tiny amount of edible glue. Support petals on foam or in formers to dry in natural curved positions.
-
Allow petals to dry completely before assembly, typically 24-48 hours depending on thickness and humidity. Rushing this stage causes collapse and distortion.
-
Assemble flowers by taping dried petals around a centre, building outward in natural layers. Start with the smallest inner petals, gradually adding larger outer ones.
-
Secure the base with floral tape, wrapping smoothly down the wire stem to create a neat finish ready for colouring.
Pro Tip: Exercise patience during drying stages for best results. Attempting to assemble or colour petals before they’re fully firm leads to fingerprints, distortion, and collapsed shapes that compromise the finished flower.
Precision in each step from cutting to assembly determines whether sugar flowers appear homemade or professionally crafted. Attention to detail separates adequate results from stunning centrepieces.
Mastering these fundamental techniques provides the foundation for any sugar flower variety. Once comfortable with basic construction, you can adapt the process for specific blooms by adjusting petal shapes, sizes, and assembly patterns. The colour sugarpaste techniques you apply next will bring your carefully constructed flowers to vibrant life.
Colouring and finishing touches for realistic sugar flowers
Shaping creates the structure, but colouring breathes life into sugar flowers. Applying powdered colour dusts and edible paints can significantly elevate the detail and natural look of sugar flowers, transforming white paste into botanically accurate blooms.
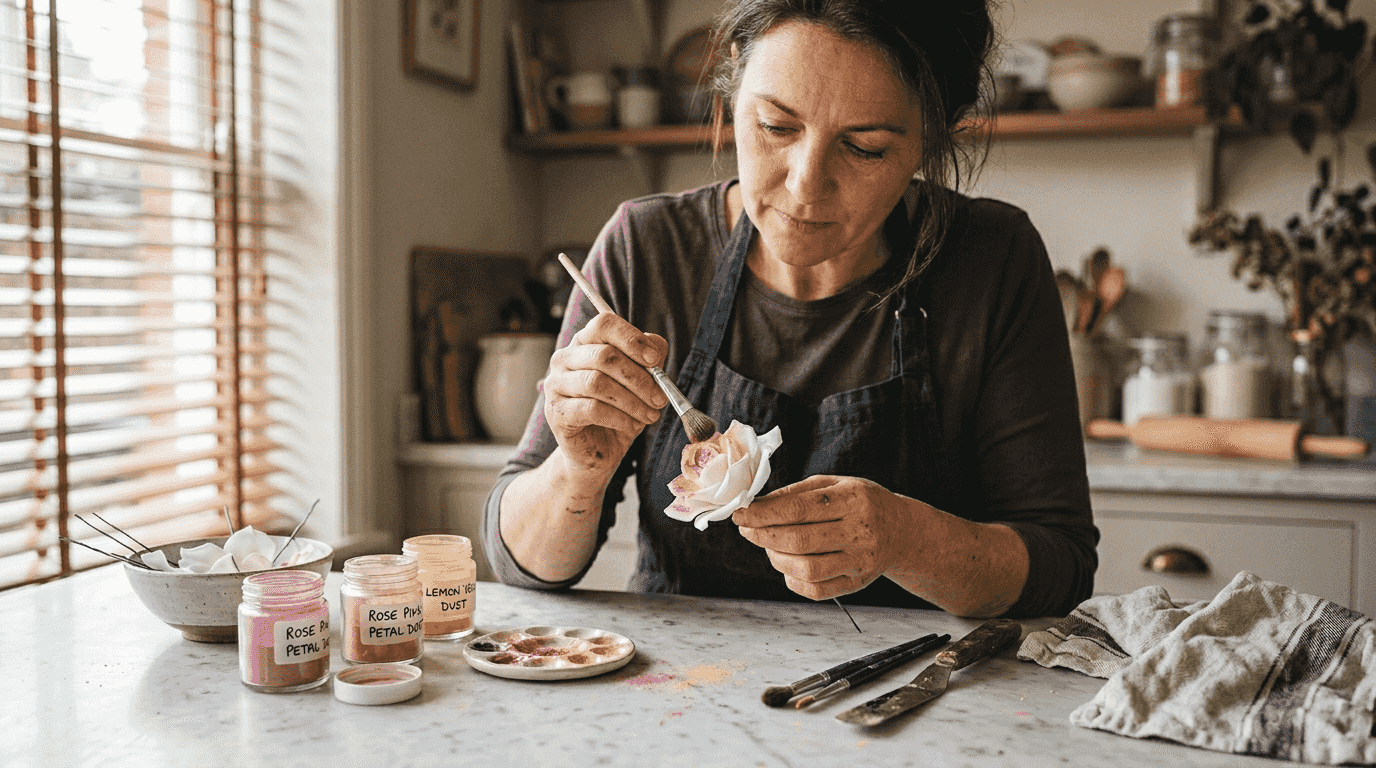
Three primary colouring methods offer distinct advantages. Dusting applies dry petal dust with soft brushes, building colour gradually in layers. This technique excels for subtle shading and natural depth. Painting uses edible paints or dusts mixed with clear alcohol for precise detail work and vibrant hues. Airbrushing delivers even coverage and smooth gradients, ideal for large projects or consistent base colours.
| Technique | Pros | Cons | Best For |
|---|---|---|---|
| Dusting | Natural gradients, easy blending, forgiving | Can appear powdery if over-applied | Subtle shading, petal edges |
| Painting | Precise details, vibrant colours, controlled application | Requires steady hand, longer drying | Fine veining, centres, accents |
| Airbrushing | Even coverage, professional finish, time-efficient | Equipment cost, practice needed | Large batches, base colours |
Choice between airbrushing and dusting each offers unique effects based on desired finish, with many decorators combining methods for optimal results.
Start colouring with the lightest shades, building darker tones gradually. Apply dust to petal edges and centres where natural flowers show colour concentration. Use darker shades sparingly in petal bases and along veins for depth. Highlight raised areas with lighter dust or edible lustre for dimension.
Finishing touches that enhance realism include:
- Veining: Paint fine lines with thinned edible colour following natural vein patterns
- Highlighting: Dust petal edges with white or pale shimmer for luminosity
- Edible glitter: Apply sparingly to centres or dew-effect areas
- Stamens: Add purchased or handmade stamens with royal icing or edible glue
- Leaves: Create coordinating foliage with darker greens and brown-dusted edges
- Calyxes: Add small green sepals at flower bases for botanical accuracy
Pro Tip: Build colours gradually to avoid over-saturation that appears artificial. Multiple light layers create depth and translucency impossible to achieve with heavy single applications.
Steaming finished flowers briefly over boiling water sets dust colours and adds a subtle sheen that mimics fresh petals. Hold flowers in the steam for just 2-3 seconds, rotating gently. This technique also removes excess loose dust and creates a polished appearance. Allow steamed flowers to dry completely before arranging on cakes.
Experiment with colour dusts techniques on practice petals before working on final pieces. Different flower varieties require distinct colour approaches. Roses benefit from deeper centres fading to pale edges, whilst daisies need vibrant uniform petals with contrasting centres. Study photographs of real flowers to guide your sugarpaste colouring methods and achieve convincing botanical accuracy.
Troubleshooting common mistakes and how to avoid them
Even experienced decorators encounter challenges in sugar flower making. Understanding frequent errors and their solutions prevents frustration and wasted materials. Errors like cracking, wilting, or unrealistic colouring often result from rushed processes or improper material handling.
Common mistakes include:
- Over-wetting: Excessive water or edible glue causes paste to become sticky, lose shape, and develop a shiny artificial appearance
- Incorrect drying: Insufficient drying time leads to collapse, whilst over-drying in direct heat causes brittleness and cracking
- Poor colour blending: Heavy-handed application creates unnatural blocks of colour rather than subtle gradients
- Thick petals: Inadequate thinning produces heavy, unrealistic flowers that lack delicacy
- Inconsistent sizing: Failing to scale petals appropriately results in disproportionate blooms
- Inadequate support: Petals dried flat rather than in formers lack natural curves and dimension
When problems arise, take corrective action promptly:
-
For sticky paste, knead in small amounts of cornflour or icing sugar until the proper consistency returns. Work on a surface dusted with cornflour.
-
If petals crack during shaping, the paste is too dry. Knead in tiny amounts of white vegetable fat and work quickly before it dries further.
-
When colours appear too intense, gently brush with cornflour to lighten, or layer complementary lighter shades over the top to soften.
-
For wilting flowers, ensure proper wire gauge for the petal size and allow complete drying before assembly. Store in low humidity.
-
If petals won’t release from cutters, dust cutters lightly with cornflour before each cut and work with slightly firmer paste.
-
When flowers lack dimension, reshape partially dried petals gently with steam to soften, then reposition in formers until firm.
Patience and the correct environment are fundamental to sugar flower success. Rushing any stage compromises the entire project, whilst controlled conditions ensure consistent results.
Environmental factors significantly impact outcomes. High humidity prevents proper drying and causes colours to bleed. Work in air-conditioned spaces when possible, using dehumidifiers if necessary. Excessive heat accelerates drying too quickly, causing cracks. Maintain room temperature between 18-21°C for optimal results. Direct sunlight fades colours and weakens paste structure, so store finished flowers in dark, dry containers.
Prevention proves easier than correction. Measure paste thickness with a small ruler initially until you develop an eye for appropriate thinness. Test new colours on spare petals before applying to finished work. Maintain detailed notes on successful techniques, including paste consistency, drying times, and colour combinations for future reference.
For longest-lasting decorations that maintain their beauty through storage and display, follow extending decoration durability guidelines. Proper storage in airtight containers with silica gel packets protects against humidity. Layer flowers carefully between tissue paper to prevent damage. With attention to detail and systematic problem-solving, you’ll consistently create sugar flowers worthy of the most elegant wedding cakes.
Explore quality cake decorating supplies at The Vanilla Valley
Mastering sugar flower techniques requires not just skill but access to professional-grade materials that respond predictably and deliver consistent results. The Vanilla Valley specialises in cake decorating supplies carefully selected for both amateur enthusiasts and professional decorators, ensuring you have everything needed to create stunning wedding cake flowers.

From premium sugarpaste formulations that hold intricate shapes to comprehensive ranges of petal cutters, veiners, and modelling tools, you’ll find the specialised equipment discussed throughout this guide. The extensive selection of colour dusts techniques supplies includes natural petal shades and lustres that bring your flowers to life with botanical accuracy. Whether you’re building your first sugar flower kit or replacing worn tools, The Vanilla Valley’s commitment to quality ensures every purchase supports your creative vision. Explore their range of edible toppers tools and discover how the right supplies transform challenging techniques into achievable artistry.
FAQ
Can sugar flowers be made in advance for wedding cakes?
Yes, sugar flowers can be made weeks or even months ahead when stored properly in dry, airtight containers away from direct sunlight and humidity. This advance preparation allows ample time for detailed finishing work and ensures flowers are completely firm before cake assembly. Store in a cool, dark location with silica gel packets to maintain crispness.
What is the best sugarpaste for durable wedding cake flowers?
Use a firm, high-flexibility sugarpaste specifically formulated for sugarcraft and modelling rather than general cake covering paste. These specialised formulations contain additional strengthening agents that prevent wilting and cracking. Avoid overly soft pastes that cannot hold delicate shapes or withstand the weight of assembled blooms.
How can I add realistic colour details to sugar flowers?
Use layered powder dusting with soft brushes, building from light to dark shades as described in the colour dusts techniques section. Combine with edible paints for fine veining and accent details. Build up shades gradually in multiple thin layers rather than single heavy applications for depth and translucency that mimics natural petals.
What are common mistakes to avoid when making sugar flowers?
Avoid wetting petals excessively with water or edible glue, which causes stickiness and loss of shape. Never rush drying times, as this leads to collapse and distortion. Prevent uneven colouring by building colours gradually in light layers. Patience throughout each stage and correct tool use are essential for professional results that withstand handling and display.