
Make your cakes look more professional: step-by-step guide
You spend hours baking a cake that tastes absolutely incredible, then step back and feel that familiar pang of disappointment. It looks homemade in all the wrong ways. Wonky layers, crumbs trapped in the frosting, sides that just won’t sit straight. Sound familiar? The good news is that professional-looking cakes aren’t reserved for trained pastry chefs. With the right tools, a clear process, and a few insider tricks, you can close that gap between how your cakes taste and how they look. This guide walks you through every stage, from building your toolkit to nailing that glass-smooth finish.
Table of Contents
- Gather your essential cake decorating tools
- Level your layers for a flawless foundation
- Master crumb coating for a clean finish
- Frost and smooth like a professional
- Control your frosting and piping for decorative flair
- Fix common cake decorating mistakes
- Practise and present your cakes like a pro
- Find all your professional cake decorating supplies in one place
- Frequently asked questions
Key Takeaways
| Point | Details |
|---|---|
| Level and chill layers | Always cool and level your cake layers before stacking for a smooth start. |
| Use a crumb coat | Seal in crumbs with a thin frosting layer before the final coat for a neater finish. |
| Invest in essential tools | A turntable, offset spatula, and bench scraper create professional-looking results with less effort. |
| Practice makes perfect | Skill builds with every cake—try cake dummies to refine your techniques without waste. |
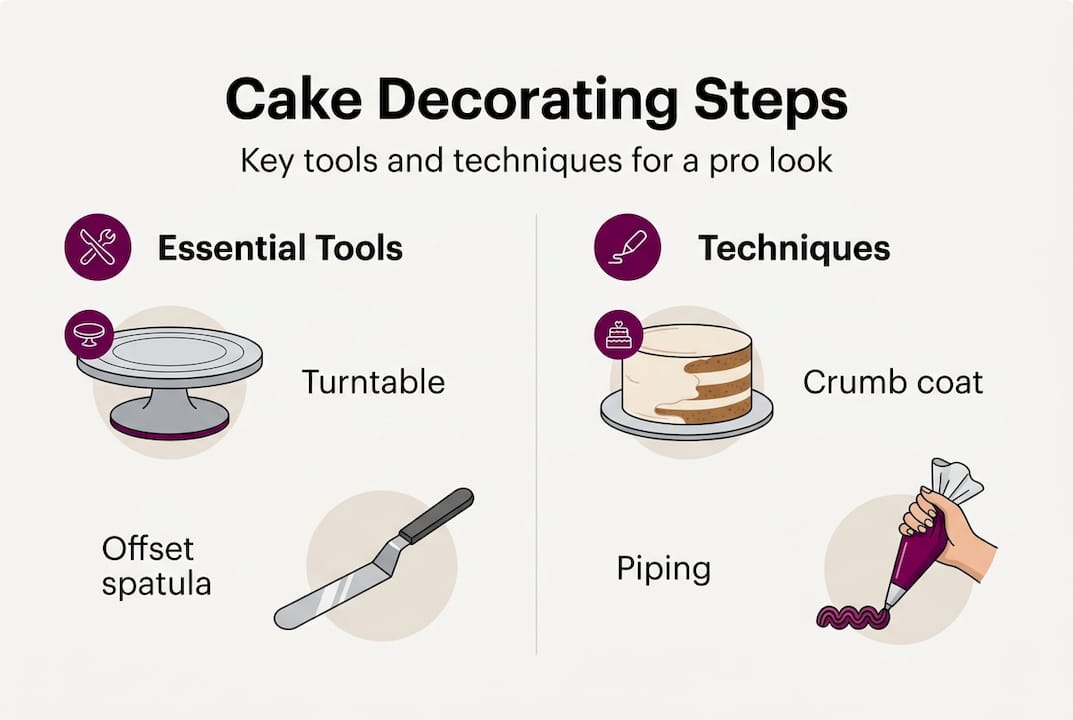
Gather your essential cake decorating tools
Every great-looking cake starts before you even open a bag of flour. Your toolkit matters enormously. According to best cake decorating tools reviews, the essentials include a turntable, bench scraper, offset spatulas in 6 to 10 inch sizes, and a cake leveller, with brands like Wilton and Ateco consistently recommended for quality and reliability.
Here’s a quick breakdown of what each tool does for you:
- Turntable: Lets you spin the cake smoothly while you frost, giving you consistent pressure and even coverage all the way around
- Offset spatula: The angled blade keeps your hand away from the surface, so you get cleaner, more controlled strokes
- Bench scraper: Held at a right angle against the side of the cake while you spin the turntable, this is what creates those sharp, straight edges
- Cake leveller: Removes the domed top of each sponge so your layers stack perfectly flat
If you’re just starting out, our guide to best baking tools for home bakers is a brilliant place to see what’s worth investing in first. You can also check out icing spatula reviews to compare options before you buy.
| Tool | Why it matters | Recommended brands |
|---|---|---|
| Turntable | Smooth, even frosting application | Wilton, Ateco |
| Offset spatula | Precision spreading without drag | Wilton, Ateco |
| Bench scraper | Sharp, straight sides | PME, Wilton |
| Cake leveller | Flat, even layers | Wilton |
Pro Tip: If you want to practise without wasting a baked cake, pick up a foam cake dummy. You can smooth buttercream on it repeatedly, scrape it off, and start again. It’s a game-changer for building muscle memory.
Level your layers for a flawless foundation
With the right tools at hand, it’s time to set your cake up for stability and symmetry from the ground up. Levelling your layers is one of those steps that home bakers often skip, and it’s almost always the reason a finished cake looks lopsided.
As layer cake guides from professional decorators confirm, using a serrated knife or cake leveller to create even layers prevents bulging and keeps your stack perfectly upright. Here’s how to do it properly:
- Allow your sponges to cool completely at room temperature before you touch them
- Wrap them in cling film and chill in the fridge for at least an hour, ideally overnight
- Place each layer on a flat surface and use your leveller or a long serrated knife to slice off the dome
- Check each layer is the same height before you begin stacking
- Stack on a cake board, not directly on your turntable, so you can move the cake easily
“Level cake layers using a serrated knife or cake leveller to ensure even stacking and prevent bulging.” Chilling first makes the sponge firmer and far easier to cut cleanly.
Our beginner cake decorating tips article covers this stage in more detail if you’d like a deeper look.
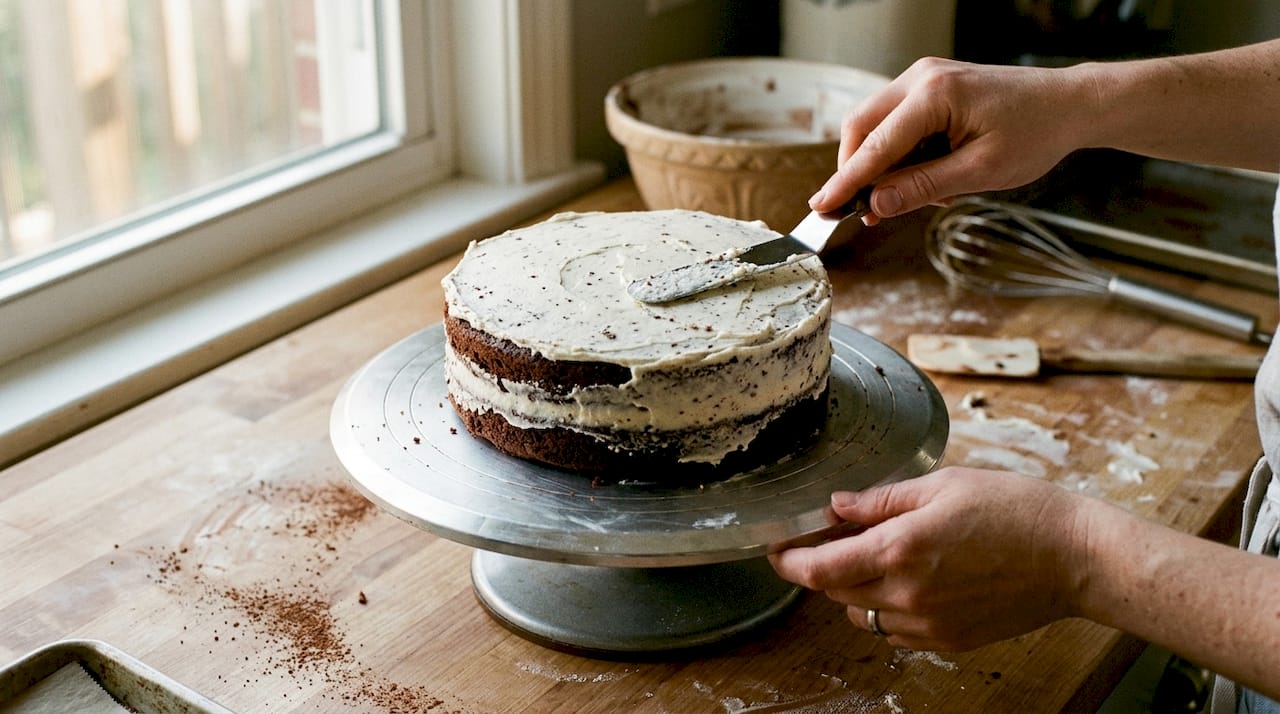
Master crumb coating for a clean finish
Once your layers are flat and ready, it’s crucial to trap crumbs before moving to the main frosting. A crumb coat is a thin, almost see-through layer of frosting applied all over the cake. Its only job is to seal in any loose crumbs so they don’t appear in your final coat.
Following the approach outlined in pro decorating guides, apply a thin crumb coat and chill the cake for 15 to 30 minutes before adding your final layer of frosting. Here’s the process step by step:
- Apply a small amount of buttercream to the top and sides using your offset spatula
- Spread it thinly, covering every surface. Don’t worry if you can see the sponge through it
- Use your bench scraper to smooth it roughly. Perfection isn’t the goal here
- Place the cake in the fridge for 15 to 30 minutes until the coat is firm to the touch
- Once set, you’re ready for the final coat
If your buttercream is giving you grief at this stage, our buttercream troubleshooting guide has fixes for the most common issues. You can also explore frosting techniques for more inspiration.
Pro Tip: Use noticeably less frosting for your crumb coat than you plan to use for the final layer. A thick crumb coat defeats the purpose and makes the next stage harder.
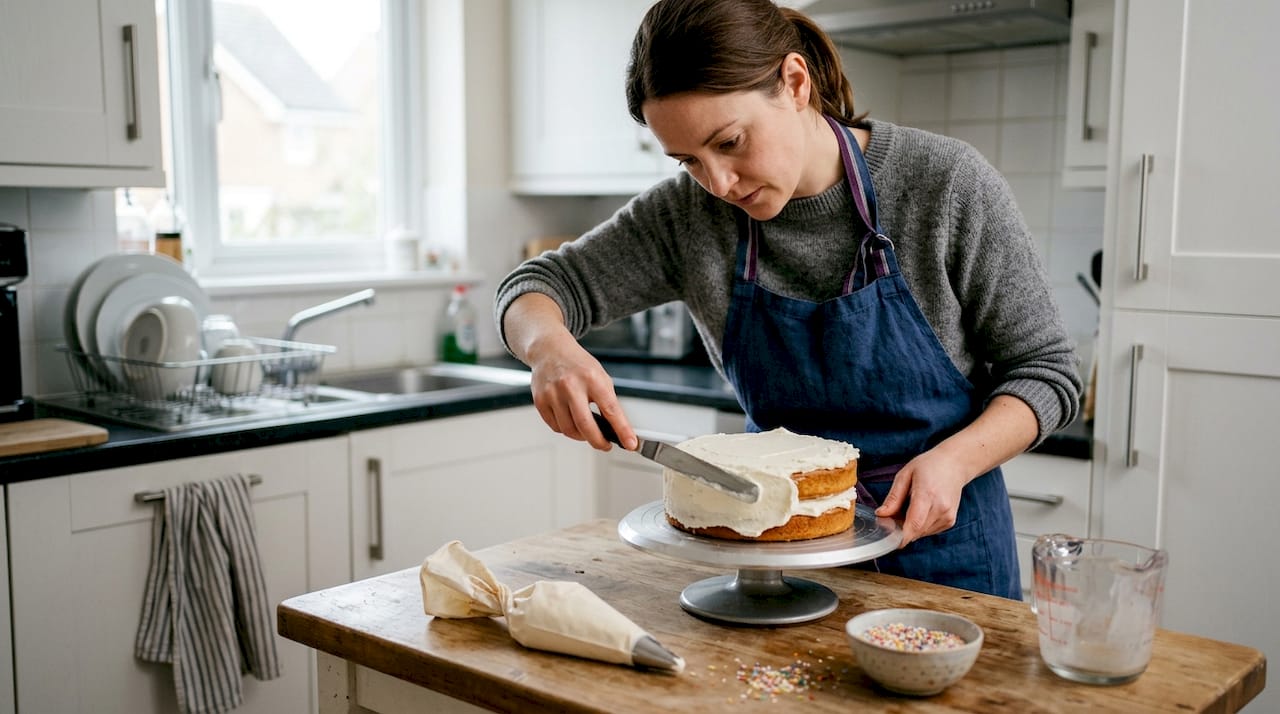
Frost and smooth like a professional
With your crumb coat set, the next step is what makes your cake truly look shop-bought: flawless frosting. This is where patience pays off.
The Chelsweets smoothing guide recommends using an offset spatula for the top and a bench scraper for the sides while spinning the cake on a turntable. Apply generous frosting, then spin while holding the scraper at 90 degrees for sharp, clean edges.
- Pile a generous amount of frosting on top and spread it outward with your offset spatula
- Apply frosting to the sides and use your bench scraper, held perfectly upright, to smooth as you spin
- For extra shine, dip your bench scraper briefly in hot water, dry it, and do a final pass
- Use a small offset spatula to pull any overhanging frosting inward across the top edge for sharp corners
Choosing the right frosting also shapes your result. Here’s a quick comparison:
| Frosting type | Finish | Best for |
|---|---|---|
| Buttercream | Soft, pipeable, textured | Rosettes, ruffles, colour work |
| Ganache | Mirror-smooth, firm | Sharp edges, drip cakes |
For a deeper look at which works best for your style, our frosting types comparison breaks it all down. You can also read more about buttercream vs ganache finishes to help you decide. If you fancy adding texture instead of a smooth finish, our textured cake techniques article is full of creative ideas.
Control your frosting and piping for decorative flair
A stunning finish also depends on decorative features, so mastering piping is the next skill to develop. Getting your frosting to the right consistency before you pipe is everything.
As piping technique guides confirm, a medium consistency works best for rosettes and patterns, American buttercream is particularly stable for detailed work, and chilling your filled piping bag briefly before use gives you firmer, cleaner results.
Here are some practical tips to keep your piping tidy:
- Twist the top of your piping bag tightly and hold it in your dominant hand, using your other hand only to guide the tip
- Test your consistency on a piece of baking paper before touching the cake
- If your buttercream is too soft, add a little more icing sugar and mix briefly
- If it’s too stiff, add a teaspoon of milk or cream and stir gently
- Keep a damp cloth nearby to wipe the nozzle between passes
For adding colour and shimmer to your piped details, our guide on using colour dusts is well worth a read. If you’re curious about cream cheese alternatives, cream cheese buttercream is a lovely option for certain styles.
Pro Tip: Pop your filled piping bag in the fridge for 10 minutes before you start detailed work. Slightly chilled buttercream holds its shape far better and gives you crisper definition.
Fix common cake decorating mistakes
Even with care, challenges crop up, and knowing how to fix them is what sets pros apart. The most common issues home bakers face are bulging sides, air bubbles in the frosting, and an uneven final coat.
According to buttercream smoothing guides, bulging sides usually come from uneven layers or fillings that are too soft. The fix is to chill the cake, ensure your layers are level, and pipe a firm buttercream dam around the edge of each layer before adding your filling. Air bubbles come from poorly whipped or inconsistent frosting. Re-whip and adjust the texture before applying.
Here’s a quick troubleshooting list:
- Bulging sides: Chill the cake, check your layers are level, and use a buttercream dam for soft fillings
- Air bubbles: Re-whip your frosting and ensure it’s smooth before spreading
- Uneven coat: Apply more frosting and do another pass with the bench scraper once chilled
- Crumbs in the final coat: Your crumb coat wasn’t thick enough or wasn’t fully chilled before the final layer
“Mistakes are part of the process. Every cake you make teaches you something new, and that’s genuinely exciting.”
Our fixing buttercream problems guide has even more solutions if you’re stuck.
Practise and present your cakes like a pro
With common errors addressed, you can focus on the ongoing journey toward professional style. The honest truth is that the decorators whose cakes look effortlessly polished have simply done it many, many times.
Cake decorating experts suggest spending 10 to 20 minutes smoothing per cake to build real muscle memory, noting that taller cakes naturally look more professional and that using the freezer for a quick set between stages speeds up the whole process.
Here are some ways to keep improving and make your cakes shine:
- Use a cake dummy to practise smoothing without the pressure of a real bake. Our guide on using cake dummies explains exactly how
- Display your finished cakes on a simple stand to elevate the presentation instantly
- Natural light is your best friend for photos. A window behind you and the cake in front works beautifully
- Taller cakes with three or four layers always photograph more impressively than shorter ones
- Treat every cake as a learning opportunity, not a performance
The more you bake and decorate, the more natural it all feels. That’s the real secret.
Find all your professional cake decorating supplies in one place
Ready to put all of this into practice? Having the right supplies close to hand makes every stage so much easier and more enjoyable.

At The Vanilla Valley, we’ve been helping home bakers and decorators find exactly what they need since 2009. From turntables and bench scrapers to food colours, sprinkles, and fondant, our cake decorating supplies shop brings everything together in one place. We stock trusted brands and offer free delivery options, so you can focus on the fun part. If you’re building your kit from scratch, our guide to must-have baking tools is a brilliant starting point. We’re always here to support your next bake.
Frequently asked questions
How do I get smooth, sharp edges on my cake’s frosting?
Use an offset spatula for the top and a bench scraper for the sides while spinning the cake on a turntable. Apply plenty of frosting and hold the scraper at a right angle for sharp edges.
What’s the best way to fix bulges in my cake layers?
Chill the cake, make sure your layers are level, and pipe a ring of firm buttercream to contain soft fillings. This dam prevents bulging before you apply the outer frosting.
Can I achieve a professional look without specialised tools?
Improvised tools can help in a pinch, but turntables and scrapers make a genuinely significant difference to the quality of your finish and are worth the investment.
How can I keep my frosting from melting in a warm kitchen?
Chill your cake and filling between every stage and work in shorter sessions. Prioritising chilling throughout is the most effective way to handle a warm kitchen environment.
Recommended
- How to photograph cakes for Instagram: a baker’s guide - The Vanilla Valley
- How to Use Colour Dusts for Professional Cake Details - The Vanilla Valley
- Beginner Cake Decorating Tips for Stunning Results - The Vanilla Valley
- Use Cake Dummies for Practice and Display: Step-by-Step Guide - The Vanilla Valley