
Airbrushing cakes: A beginner’s guide to stunning designs
TL;DR:
- More home bakers are successfully using airbrushing to decorate cakes with vibrant, professional-looking effects.
- Beginners should choose simple, reliable kits with variable pressure controls and practice on fondant or chilled buttercream surfaces.
- Consistent cleaning and patient practice are key to mastering airbrushing techniques and achieving stunning cake designs.
Airbrushing might sound like something reserved for professional cake artists with years of experience and a studio full of fancy equipment. But that idea is fading fast. More and more home bakers are picking up an airbrush for the first time and producing genuinely beautiful results, often within their very first session. This guide is here to walk you through everything, from understanding what airbrushing actually involves, to choosing your kit, preparing your cake surface, and practising the techniques that will take your decorating to a whole new level. Let’s get into it.
Table of Contents
- What is airbrushing in cake decorating?
- Choosing your airbrushing kit: What beginners need to know
- Fondant vs buttercream: Best surfaces for airbrushing
- Beginner airbrushing techniques: Getting started step by step
- Looking after your airbrush: Cleaning and maintenance essentials
- The truth about airbrushing cakes: What most guides don’t tell you
- Ready to airbrush? Next steps for your cake decorating journey
- Frequently asked questions
Key Takeaways
| Point | Details |
|---|---|
| Start simple | Airbrushing is accessible for beginners—focus on learning basics before attempting complex designs. |
| Surface matters | Fondant gives the best results for airbrushing, but careful technique makes buttercream possible. |
| Clean after every use | Regular cleaning prevents clogs and keeps your airbrush performing at its best. |
| Practise makes perfect | Expect to improve through short, regular practice sessions and don’t worry about early mistakes. |
What is airbrushing in cake decorating?
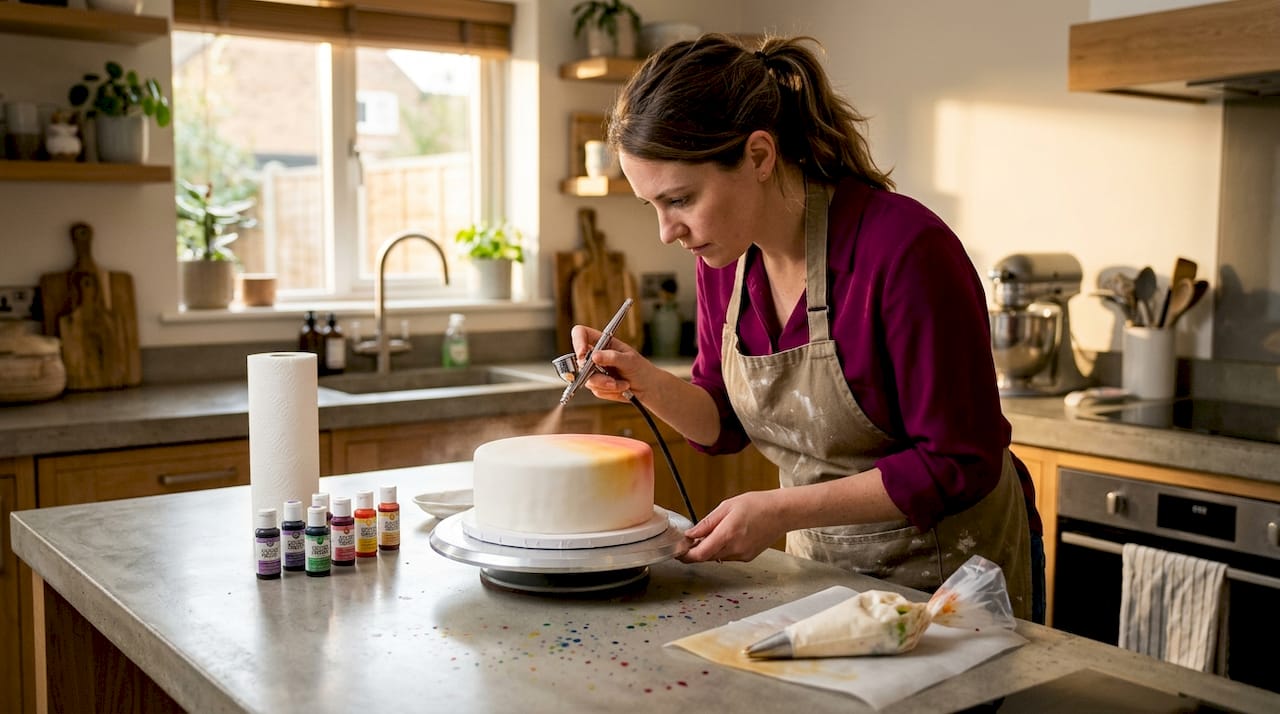
Airbrushing in cake decorating is the process of using a small, pen-like tool connected to a compressor to spray fine mists of edible colour onto a cake surface. The result is smooth, even colour application that is almost impossible to achieve with a brush or spatula alone. It opens up a world of creative possibilities, from soft ombre gradients to bold stencilled patterns and dramatic galaxy effects.
What makes airbrushing so exciting for beginners is the speed. You can cover a whole cake tier in minutes. You can blend colours seamlessly without muddying them. And you can layer effects in a way that looks genuinely impressive, even when you are still learning. It is no surprise that over 60% of UK decorators now use airbrushes as part of their decorating toolkit.
Here are some of the effects you can achieve as a beginner using basic airbrush techniques:
- Soft colour washes and ombre fades
- Stencilled patterns with clean, crisp edges
- Metallic and shimmer finishes using specialist colours
- Realistic shadow and depth effects on fondant figures
- Tie-dye and watercolour style backgrounds
“Airbrushing transformed the way I decorate. I was nervous at first, but after one practice session on a dummy cake, I was completely hooked.” This is the kind of feedback we hear again and again from bakers who take the plunge.
If you are just starting out, pairing airbrushing with a few solid beginner cake decorating tips will help you build confidence quickly and avoid the most common early mistakes.
Choosing your airbrushing kit: What beginners need to know
Now that you know what airbrushing brings to cake artistry, let’s demystify the equipment you will need to get started. The good news is that you do not need to spend a fortune. There are brilliant entry-level kits available that give you everything you need to begin practising right away.
Recommended beginner kits include Watson & Webb (widely regarded as the best overall option, with three speed settings), Master Airbrush (excellent value for money), and U.S. Cake Supply (great for beginners who want easy colour compatibility). Each of these offers reliable performance without an overwhelming learning curve.
When choosing your kit, look for these key features:
- Pressure control: Variable pressure settings allow you to start low and build up gradually, which is essential for beginners.
- Ease of cleaning: A kit with a simple nozzle design will save you a lot of frustration. Look for models with removable, dishwasher-safe parts.
- Kit inclusions: Some kits come with colour sets, cleaning brushes, and practice stencils. These are genuinely useful when you are starting out.
- Compressor quality: A quiet, consistent compressor makes a big difference to your experience, especially if you are decorating in a home kitchen.
- Gravity feed vs siphon feed: Gravity feed airbrushes (where the colour cup sits on top) are generally easier to control for cake work and are the most popular choice among decorators.
| Kit | Best for | Speed settings | Price range |
|---|---|---|---|
| Watson & Webb | Overall beginners | 3 | Mid-range |
| Master Airbrush | Budget-conscious bakers | 1-2 | Budget |
| U.S. Cake Supply | Easy colour use | 2 | Mid-range |
Pro Tip: Do not be tempted to buy the kit with the most accessories. A reliable compressor and a straightforward airbrush pen will serve you far better than a cheaper set packed with extras you will never use. Reliability is everything when you are learning.
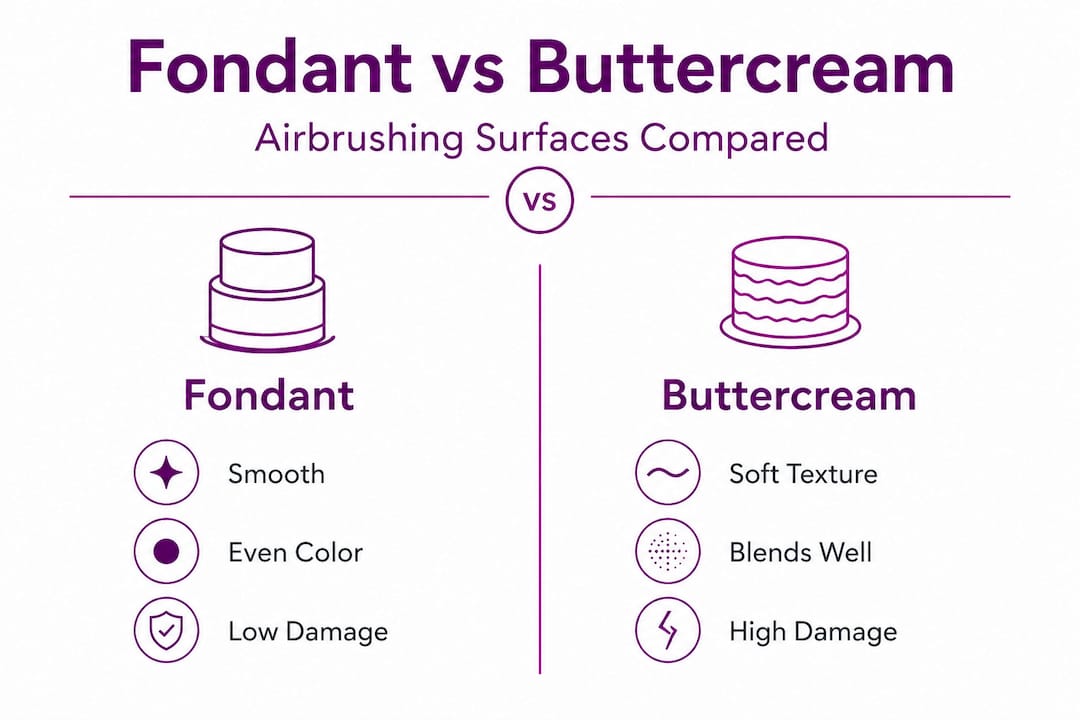
Fondant vs buttercream: Best surfaces for airbrushing
Of course, every decoration’s outcome is influenced by the surface. Let’s compare the top options and see what works best for beginners.
Fondant is widely considered the ideal surface for airbrushing. It is smooth, firm, and absorbs colour evenly. The texture does not shift under pressure, which means you have far more control over your results. Fondant also dries quickly after airbrushing, so you can layer colours without long waits between sessions. For a deeper look at how fondant compares to other finishes, our buttercream vs fondant comparison is a great place to start.
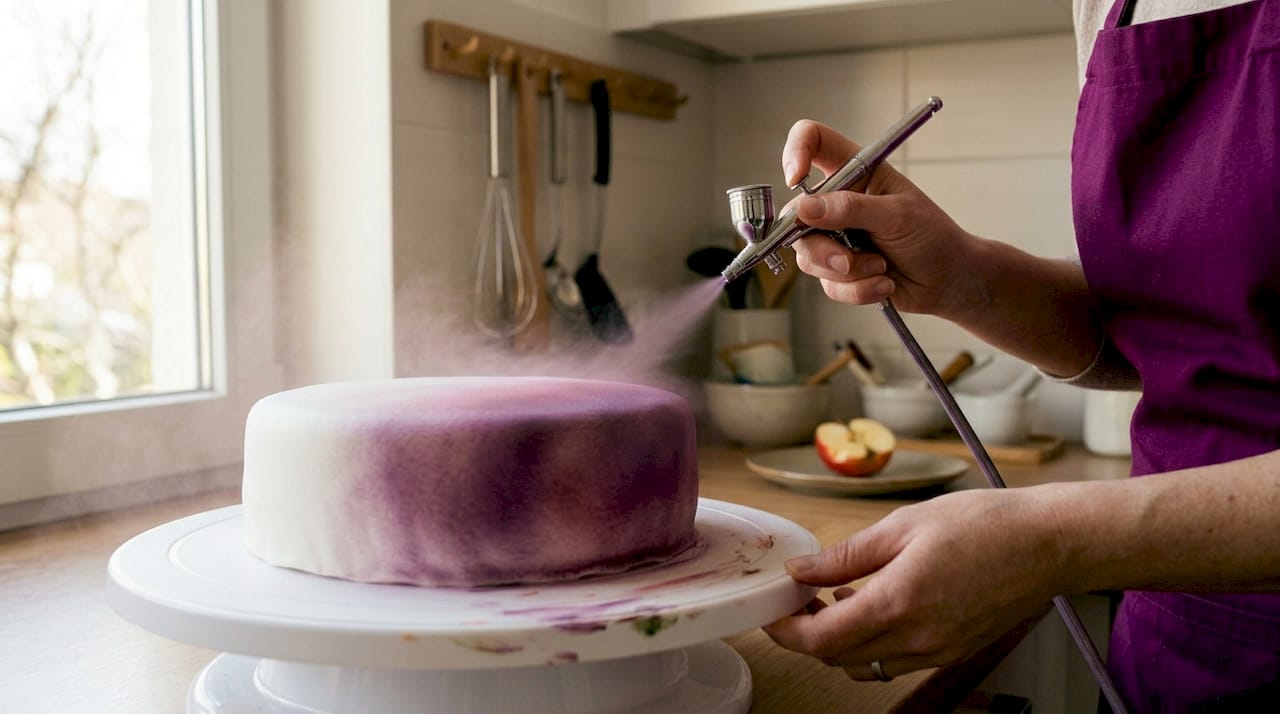
Buttercream is trickier, but absolutely possible. The key is understanding its limitations. Buttercream requires caution: you need low pressure and a distance of 6 to 8 inches to avoid blowing holes in the surface. Too much pressure and you will end up with craters and uneven patches that are very difficult to fix. Chilling your buttercream cake thoroughly before airbrushing helps firm up the surface and makes it much more receptive to colour.
Here is a step-by-step approach to airbrushing buttercream successfully:
- Chill the finished buttercream cake for at least 30 minutes before you begin.
- Set your compressor to the lowest pressure setting.
- Hold the airbrush 6 to 8 inches from the surface.
- Apply colour in light, sweeping passes rather than holding the nozzle in one spot.
- Allow each layer to dry before adding the next.
- Work from light colours to dark to avoid muddying your palette.
| Surface | Ease for beginners | Colour absorption | Risk of damage |
|---|---|---|---|
| Fondant | High | Excellent | Low |
| Buttercream | Moderate | Good (when chilled) | Medium |
| Ganache | Moderate | Good | Low |
| Royal icing | High | Excellent | Very low |
For those interested in how different finishes interact with decoration, our ganache vs fondant insights article covers this really well. And if buttercream is your go-to, do not miss our creative buttercream tips for getting the most out of this versatile finish.
Pro Tip: If you are airbrushing onto buttercream for the first time, practise on a chilled dummy cake or a spare batch of buttercream spread onto a flat board. This gives you the feel of the surface without the pressure of working on a finished cake.
Beginner airbrushing techniques: Getting started step by step
With the right surface and kit, you are ready to airbrush. Let’s break down the process for real-life, beginner-friendly results.
The consensus among decorators is clear: start with low pressure, use proper edible colours, keep your equipment clean, and practise on fondant before moving to more challenging surfaces. These simple habits make an enormous difference to your early results.
Step-by-step airbrushing process:
- Prepare your workspace. Cover surrounding surfaces with paper or cling film. Overspray is real, and it travels further than you expect.
- Fill your colour cup. Use edible airbrush colours specifically designed for cake decorating. Add only a small amount at a time to maintain control.
- Test on paper first. Before touching your cake, spray a few passes on baking paper to check pressure, flow, and colour intensity.
- Start with light pressure. Begin at the lowest setting and increase gradually. You can always add more colour but you cannot take it away.
- Keep moving. Use smooth, even strokes across the surface. Never hold the airbrush still while spraying, as this causes blotches.
- Build colour in layers. Apply two or three light coats rather than one heavy one. This gives you much more control over depth and vibrancy.
- Clean between colours. Flush the airbrush with water until it runs clear before switching to a new shade.
For gradient and blending effects, try these approaches:
- Hold the airbrush further away for a softer, more diffused colour.
- Move closer (but not too close) for more intense, concentrated coverage.
- Overlap two colours slightly in the middle of the cake for a seamless blend.
- Use textured buttercream techniques as a base layer before airbrushing for added dimension.
- Stencils are brilliant for adding pattern work. Hold them firmly against the surface and spray in short, light bursts. Our guide to embossed cake techniques has some brilliant inspiration for this.
Pro Tip: Start your first few sessions using neutral tones like ivory, soft grey, or pale gold. These colours are forgiving and help you master control before you move on to bold, saturated shades that show every wobble and inconsistency.
Looking after your airbrush: Cleaning and maintenance essentials
Mastering airbrushing means caring for your tools. Here is how to keep your kit running smoothly between creative sessions.
The most common reason airbrushes stop working properly is not equipment failure. It is missed cleaning sessions. Colour residue builds up inside the nozzle and needle, causing clogs that affect spray quality and pressure. The good news is that a proper cleaning routine takes only a few minutes and makes a huge difference to the longevity of your kit.
Cleaning routine after every session:
- Empty any remaining colour from the cup.
- Fill the cup with clean water and spray until the water runs completely clear.
- Repeat with fresh water two or three times.
- For a deeper clean, disassemble the nozzle and needle and rinse each part individually under warm running water.
- Use a small cleaning brush (often included with your kit) to clear any residue from inside the nozzle.
- Allow all parts to dry fully before reassembling and storing.
When switching between colours mid-session, clean immediately by flushing with water until the spray runs clear. This prevents colours from mixing and muddying your next shade. It also stops pigment from drying inside the nozzle, which is the number one cause of clogs.
Essential cleaning tools to keep on hand:
- Small nozzle cleaning brushes
- Lint-free cloths or kitchen roll
- A small pot of clean water
- Food-safe cleaning solution for stubborn residue
For inspiration on the kinds of effects that make all this care worthwhile, our article on edible paints shows just how stunning the results can be when your equipment is in great shape.
The truth about airbrushing cakes: What most guides don’t tell you
Before you start on your own cake, we want to share some honest truths and encouraging words for anyone new to airbrushing.
Most guides focus on the technique and the tools. What they often skip is the emotional side of learning something new. Airbrushing is a skill, and like any skill, it comes with a learning curve. Your first attempt will probably not look like the photos you have seen online. There might be streaks. There might be overspray in places you did not intend. You might end up with a slightly patchy finish on your first fondant cake. That is completely normal, and it is not a sign that you are doing it wrong.
The decorators we admire most at The Vanilla Valley are not the ones who got it perfect first time. They are the ones who kept practising, even when things did not go to plan. Proficiency with an airbrush comes from short, regular sessions rather than one long, frustrated afternoon. Even fifteen minutes of practice on a spare piece of fondant or a dummy cake will build your muscle memory and your confidence faster than you might expect.
One thing we genuinely believe is that creativity matters more than flawlessness. A slightly imperfect ombre that you achieved yourself has so much more value than a technically perfect finish you are not sure how you created. Airbrushing is expressive. It is playful. It rewards experimentation.
If you want to add extra dimension and detail alongside your airbrushing, learning how to use colour dusts is a brilliant next step. The two techniques complement each other beautifully and open up a whole new level of creative possibility.
Do not let perfectionism hold you back. The buzz of seeing your first successful gradient on a real cake is genuinely exciting, and we want you to experience that.
Ready to airbrush? Next steps for your cake decorating journey
Equipped with new skills and confidence, you are ready for hands-on practice. Here is how to keep progressing.
At The Vanilla Valley, we have been supporting bakers just like you since 2009. We know how exciting it feels to discover a new technique, and we want to make sure you have everything you need to keep that momentum going. Whether you are after edible airbrush colours, fondant for practising on, stencils, or inspiration for your next design, we have got you covered.

Our cake decorating supplies shop is packed with everything a beginner airbrush artist needs, from starter kits and edible colour sets to cake boards, dummy cakes for practice, and all the finishing touches that make your creations truly special. We offer free delivery options and next day delivery for when inspiration strikes and you need supplies fast. Pop in to see us in North Cardiff, or browse online any time. We love seeing what our community creates, and we are always here to help you take the next step.
Frequently asked questions
Can you airbrush buttercream cakes, or is it just for fondant?
You can airbrush buttercream, but it requires low pressure and a distance of 6 to 8 inches to prevent blowing holes in the surface, while fondant is more forgiving and easier for beginners.
How often should I clean my airbrush when decorating a cake?
Clean immediately after each session and always flush with water when switching colours to avoid clogs and colour contamination.
What are the best entry-level airbrush kits for beginners?
Popular starter kits include Watson & Webb, Master Airbrush, and U.S. Cake Supply, as they offer ease of use, reliable performance, and good value for beginners.
Which types of food colouring can I use in my cake airbrush?
You should use edible airbrush colours specifically formulated for cake decorating, as these are food-safe, the right consistency for spraying, and produce vibrant, even results.
How do I avoid streaks and spots when airbrushing cakes?
Practise smooth, even movement and maintain the correct distance, usually 6 to 8 inches from the surface, and always build colour gradually with light layers rather than one heavy pass.
Recommended
- How to Use Colour Dusts for Professional Cake Details - The Vanilla Valley
- Make your cakes look professional instantly: simple tips - The Vanilla Valley
- Master Textured and Embossed Cake Decorating Techniques - The Vanilla Valley
- 7 Essential Cake Airbrush Techniques for Beginners - The Vanilla Valley
- Taarttafel decoreren: stap-voor-stap feestelijke uitstraling – PartyPro.nl
- Születésnapi Tortaasztal Dekorálás Lépésről Lépésre