
Transform your cakes with expert gold leaf techniques
TL;DR:
- Edible gold leaf is a post-baking decoration made from pure gold, safe to eat, and adds a luxurious shine. Preparation involves applying it to cooled, slightly tacky surfaces like buttercream or fondant, never during baking. Using restraint and proper tools enhances the artistry, with imperfections adding organic texture, and the right supplies improve results.
Gold leaf on a cake is one of those finishes that stops people in their tracks. It catches the light, it looks impossibly glamorous, and yet so many bakers assume it must involve some complicated baking magic. Here is the truth: gold leaf has absolutely nothing to do with the oven. It is a post-baking decoration, applied with patience and a steady hand onto a perfectly cooled surface. Once you understand that simple fact, everything else falls into place. This guide walks you through the science, the preparation, the application, and the artistry of working with edible gold leaf, whether you are decorating your first celebration cake or your fiftieth wedding tier.
Table of Contents
- The science and artistry behind edible gold leaf
- Preparing your cake for gold leaf application
- Step-by-step gold leaf application techniques
- Troubleshooting and advanced design with gold leaf
- What most bakers miss: Practical wisdom for mastering gold leaf
- Elevate your cake designs with premium supplies
- Frequently asked questions
Key Takeaways
| Point | Details |
|---|---|
| Gold leaf is post-bake only | Apply edible gold leaf after baking on cooled surfaces to prevent heat damage. |
| Transfer and loose leaf differences | Transfer leaf offers easy full coverage, loose leaf is best for accent touches. |
| Chilling improves application | A chilled, slightly tacky cake surface ensures optimal gold leaf adhesion and finish. |
| Wrinkles add texture | Imperfections like wrinkles and tears create organic, stunning visual impact. |
| Less is more for effect | Use gold leaf sparingly for dramatic, elegant cake decoration without waste. |
The science and artistry behind edible gold leaf
Edible gold leaf is exactly what it sounds like. Real gold, beaten into incredibly thin sheets, safe to eat, and utterly beautiful. It is measured in karats, with most edible versions sitting between 22 and 24 karats. The higher the karat, the purer the gold and the more vivid the shine.
Gold at this purity is completely inert. It has no flavour, no nutritional value, and passes through the body without being absorbed. That is precisely what makes it safe to use on food. You are not adding anything chemical or artificial. You are adding a tiny amount of a naturally occurring metal that has been used decoratively in food for centuries.
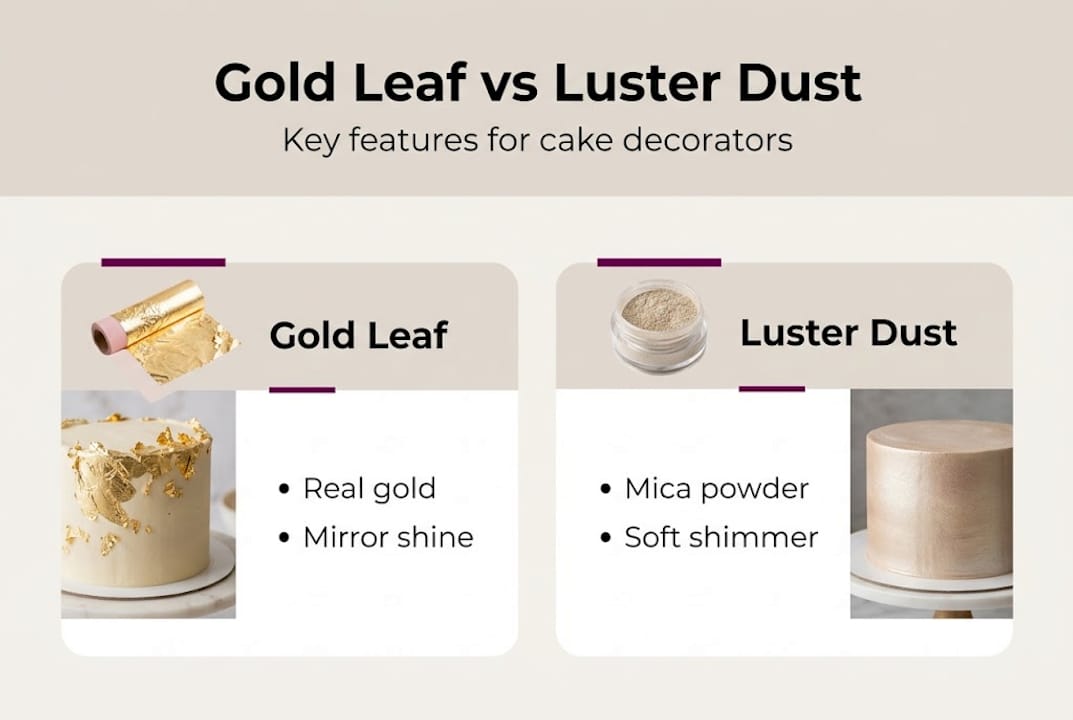
Now, a lot of bakers wonder whether luster dust is a reasonable swap. It can be, but they are genuinely different products. As this gold leaf expert guide explains, gold leaf is real gold, inert and flavourless, while luster dust is a cheaper, paintable alternative that can carry non-edible risks if mislabelled. Always check that any luster dust you buy is specifically labelled as food-safe or edible.
Here is a quick comparison to help you decide which suits your project:
| Feature | Edible gold leaf | Luster dust |
|—|—|—|
| Material | Real gold (22-24 karat) | Mica or metallic powder |
| Application method | Pressed or transferred onto surface | Painted or dusted onto surface |
| Finish | Mirror-like, dimensional shine | Soft metallic sheen |
| Safety | Always food-safe at correct karat | Check labelling carefully |
| Cost | Higher | Lower |
| Best for | Statement coverage, luxury finishes | Fine details, painted effects |
For decorators who enjoy using colour dusts alongside metallic finishes, luster dust can complement gold leaf beautifully. But for that unmistakable, high-impact luxury shine, nothing replaces the real thing.
A few things to keep in mind when buying edible gold leaf:
- Always buy from reputable suppliers who clearly state the karat and food-safe certification
- Transfer leaf comes sandwiched between tissue sheets and is easier to handle
- Loose leaf is more delicate but gives a more organic, textured result
- Store in a cool, dry place away from humidity and direct light
“Gold leaf brings a level of elegance to cake decorating that is genuinely hard to replicate with any other material. When it catches the light, it transforms a beautiful cake into something truly extraordinary.”
Preparing your cake for gold leaf application
Getting the surface right is everything. Gold leaf is unforgiving of a poorly prepared cake, and the good news is that preparation is straightforward once you know what you are aiming for.
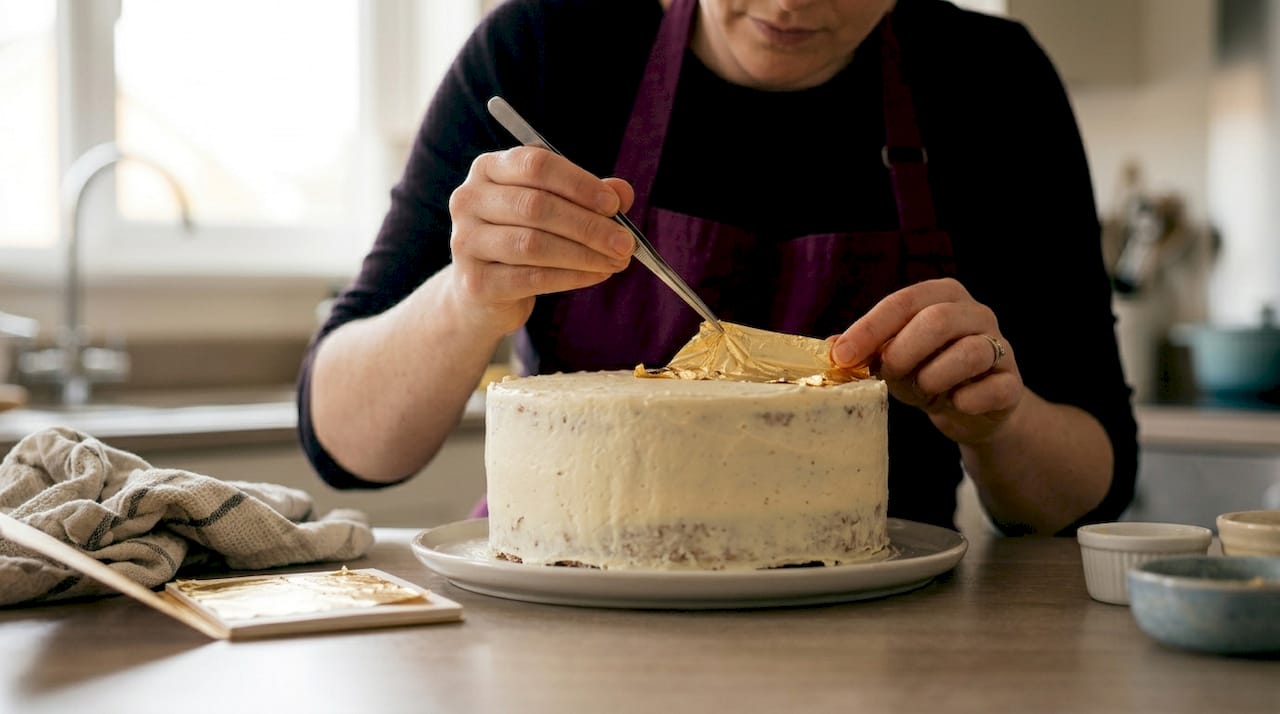
The single most important rule is this: gold leaf is applied post-baking as a decorative finish only on cooled cakes, never during baking. Heat destroys the leaf completely. It will disintegrate, discolour, and lose all its shine. Always wait until your cake is fully baked, cooled, and decorated with its base coating before you even think about reaching for the gold.
The ideal surface for gold leaf is one that is slightly tacky. Buttercream, fondant, and royal icing all work well. The slight stickiness acts as a natural adhesive, holding the leaf in place without any additional glue or medium needed.
Here is how to prepare your cake step by step:
- Bake and cool completely. Never rush this stage. A warm cake will cause condensation, which makes the surface too wet for clean gold leaf adhesion.
- Apply your base coating. Whether that is textured buttercream or smooth fondant, get your finish looking exactly as you want it before adding gold.
- Chill the cake. Pop it in the fridge for 20 to 30 minutes. This firms up the surface and makes it easier to handle without denting.
- Allow to come to room temperature briefly. Remove the cake from the fridge and let it sit for five minutes. This creates that ideal slightly tacky texture without being wet or soft.
- Work in a cool, dry environment. Humidity is the enemy of gold leaf. If your kitchen is warm and steamy, wait for a better moment.
Pro Tip: If you are working with fondant, lightly breathe onto the area you are about to cover just before applying the gold leaf. The tiny amount of moisture from your breath creates just enough tackiness without wetting the surface.
For longer projects or tiered cakes, good cake storage tips will help you manage timing between stages without compromising your base coating. A well-stored, well-chilled cake is genuinely your best starting point for flawless gold leaf work.
Step-by-step gold leaf application techniques
With your cake prepped, it is time to master the actual application techniques step by step. The method you choose depends on the type of gold leaf you are using and the effect you want to achieve.
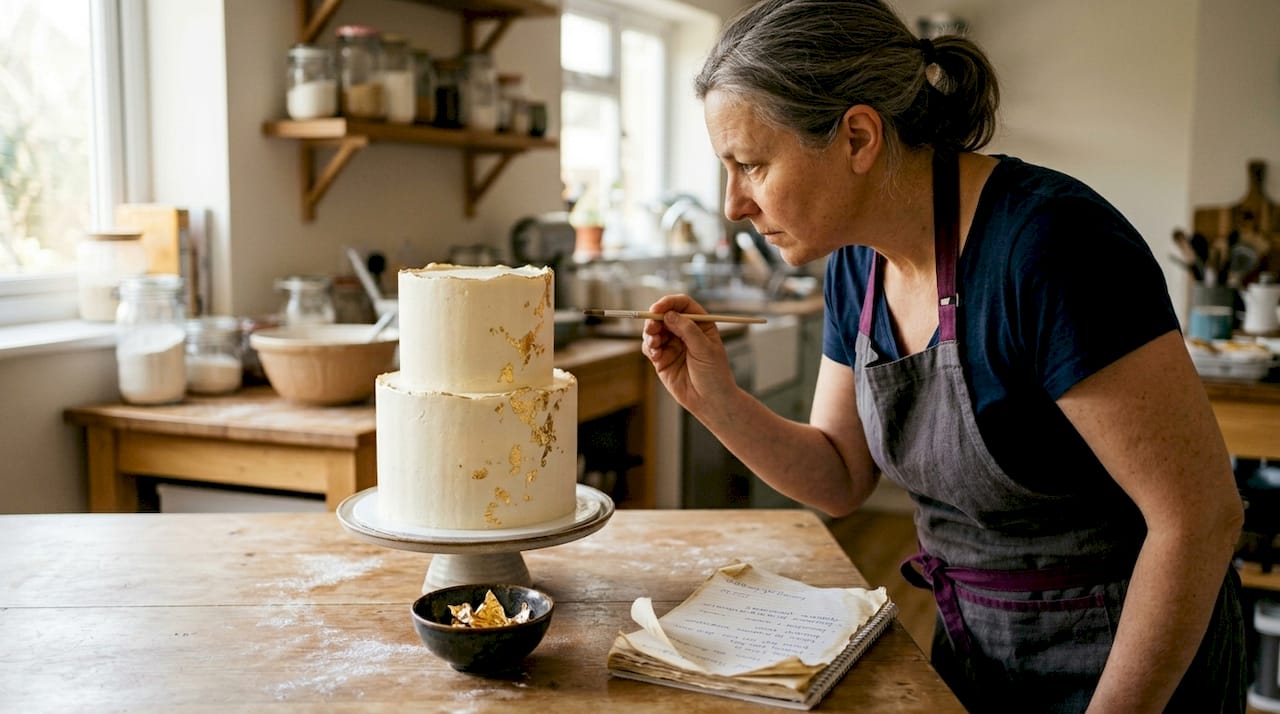
Transfer leaf is the best starting point for beginners. The gold is attached to a backing sheet, which makes it far easier to position and press into place. Loose leaf is more delicate and unpredictable, but that unpredictability is actually what gives it such a beautiful, organic quality.
For transfer leaf, follow these steps:
- Chill your cake until the surface is firm but slightly tacky.
- Cut the transfer sheet to the size and shape you need using scissors. Do this before opening the packet.
- Place the sheet gold-side down onto the cake surface, pressing gently with clean, dry fingers on the backing paper.
- Rub gently over the backing paper to transfer the gold to the surface.
- Peel away the backing paper slowly and carefully.
- Use a soft, dry brush to smooth any lifted edges and remove any loose flakes.
As this gold leaf transfer tutorial confirms, chilling before application and using a dry brush to finish are the two steps that make the biggest difference to your results.
For buttercream cakes specifically, the process is even simpler. According to this buttercream gold leaf guide, frost, chill, apply with a dry brush and no added adhesive is needed at all. The buttercream does all the work.
| Leaf type | Best for | Tools needed | Difficulty |
|---|---|---|---|
| Transfer leaf | Full coverage, beginners | Scissors, dry brush | Easy |
| Loose leaf | Accent touches, organic texture | Dry brush, tweezers | Intermediate |
Pro Tip: Never touch gold leaf with bare fingers. The natural oils from your skin will cause it to stick, tear, and lose its shine instantly. Always use a dry brush or the backing paper to guide and position the leaf.
If you are new to this, our beginner decorating tips are a great companion read. And for a deeper look at all things gold leaf, our gold leaf cake guide covers even more creative approaches.
Troubleshooting and advanced design with gold leaf
Now you know the methods, let us tackle common challenges and experiment with advanced artistry. Because here is something experienced decorators know that beginners often do not: imperfection is part of the beauty.
Gold leaf wrinkles. It tears. It folds in unexpected ways. And every single one of those things can look absolutely stunning if you lean into it rather than fight it. As this gold leaf expert guide puts it, wrinkles and tears add organic texture and less is genuinely more for a stunning effect.
The problems worth actually avoiding are these:
- Fingerprints and oil marks. Always use a brush or backing paper. Never your bare hands.
- Drafts and static. Gold leaf is so light that a draught from an open window or an air conditioning unit will send it flying. Work in a still, calm environment.
- Wet surfaces. If your cake surface is too wet, the gold leaf will dissolve into it rather than sitting on top. Chill the cake properly first.
- High humidity. Working above 55% relative humidity causes real problems. The leaf becomes unmanageable and the surface stays too damp.
According to this chef’s guide to gold leaf, avoiding fingers, drafts, and wet surfaces is the foundation of consistent results, and refrigerating post-application is fine but expect brief condensation.
“The most breathtaking gold leaf cakes are rarely the ones covered entirely in gold. A few well-placed sheets, a torn edge here, a crinkle there, that is where the real artistry lives.”
For more advanced effects, try these approaches:
- Intentional tearing. Tear loose leaf into irregular pieces and apply them scattered across the surface for a modern, editorial look.
- Partial coverage. Apply gold to just one tier or one side of a cake for dramatic contrast.
- Layering with colour. Pair gold leaf with deep jewel-toned fondant or creative buttercream ideas for maximum impact.
For cakes that need to be refrigerated after decoration, the gold leaf will be absolutely fine. Just allow the condensation to evaporate naturally at room temperature before serving. Do not try to dab or wipe it away. These professional cake tips cover post-decoration handling in more detail.
What most bakers miss: Practical wisdom for mastering gold leaf
Here is something we have noticed over years of helping bakers at The Vanilla Valley: the bakers who struggle most with gold leaf are the ones trying hardest to make it perfect. They press too firmly, they over-handle it, they cover every inch of the cake hoping more gold means more impact.
The reality is the opposite. Restraint is the secret. A single torn sheet placed at the base of a tier, or a few loose flakes scattered across a ganache drip, will always outshine a cake that looks like it has been wrapped in foil.
True mastery of gold leaf comes from understanding texture and embracing imperfection. Practice on a spare piece of chilled fondant or a cooled dummy cake before working on your final piece. You will learn more in ten minutes of hands-on practice than in hours of reading.
We also love pairing gold leaf with edible toppers for a layered, luxurious finish that feels genuinely considered and creative. Less gold, more intention, always wins.
Elevate your cake designs with premium supplies
Ready to bring your gold leaf ideas to life? Having the right supplies makes all the difference between a frustrating experience and one that feels genuinely exciting.

At The Vanilla Valley, we have been helping bakers find exactly what they need since 2009. From edible gold leaf and specialist brushes to fondant, food colours, and everything in between, our cake decorating supplies are chosen with both amateurs and professionals in mind. We offer free delivery options and next day delivery for those last-minute projects, and our team genuinely loves helping you get the best possible results. Pop over to the shop and see what inspires you next.
Frequently asked questions
Can you bake gold leaf directly into cakes?
No. Gold leaf is applied post-baking as a decorative finish only on fully cooled cakes, as heat destroys its shine and delicate structure entirely.
How do you prepare buttercream for gold leaf application?
Frost your cake as usual, chill until the surface is firm and crusted, then allow it to soften slightly at room temperature. As this buttercream gold leaf guide confirms, apply leaf with a dry brush and no additional adhesive is needed.
What are the main differences between gold leaf and luster dust?
Gold leaf is made from real gold, is inert, and delivers an authentic mirror shine. According to this gold leaf expert guide, luster dust is a cheaper alternative that can carry non-edible risks if mislabelled, so always check the packaging carefully.
Can you refrigerate cakes after gold leaf application?
Yes, refrigeration after application is perfectly fine. Expect a little surface condensation when the cake comes back to room temperature, but allow it to evaporate naturally rather than wiping it, as this chef’s guide to gold leaf confirms refrigeration post-application is safe.